Monday, February 28, 2011

Mojo Monday ~ Bright Birthday


Good Morning Friends!

It was an ice skating rink out in front of my house this morning... looks like I'll be sticking close to home.. (my hubby still isnt at work and it's 10:15 am here).. I hope he get's there safely. Its a cold and dreary day here, so I really wanted to go with something bright.

I have to tell you, I felt totally challenged by the sketch over on mojo Monday this morning... but once I got going, this went together with not too much trouble at all!

This is a square card measuring 5 1/4" square.
Layer 2: 4 7/8" square real red
Layer 4: 4 3/4" Designer paper.

the other layers of designer paper on top are the flip side of the numbers...

I used paper piecing to color my cupcake base and incorporated the pattern from above into the focal point further down my card.

The sentiment stamp is another from the same one I keep using this week, Curly cute. I used beads for the sprinkles, and large funky red glitter for the candle and flame. I attached both with tombo multipurpose adhesive by SU.

The paper banner was made from scraps leftover.. :D (love that).

I hope you have a wonderful week!
Rubbah hugs,
Selene Kempton
Sunday, February 27, 2011

Sweet Sunday Sketch Challenge ~ quick inspiration

Good Evening Friends!

I had some girlfriends over today, to help with a wedding album and we did a little stamping and used a LOT of glitter. At the end, it was down to me and my good friend Jo. (hi Jo). Anyway, Jo was telling me how difficult it is sometimes to create from scratch.. When I have days like that I just LOVE a good sketch challenge to get my creative juices flowing..

It takes one of the decisions out of the card making process. Making it easy to just follow a sketch and put elements where they "go" as opposed to trying to reinvent the wheel. :D I recently came across the sweetest thing blog, and just love the sketches that artist Karen Giron is coming up with!

So Joanne and I sat down and created TWO of these beauties in under a half hour!

Measurements:
Base: Crumb cake 8 1/2" x 5 1/2", scored and folded in half at 4 1/4"
Layer 2: Springtime vintage paper floral pattern 5 1/4" x 2"
Layer 3: Springtime vintage paper floral pattern (on the reverse side) 2 x 3 3/4"
Layer 4: artichoke circle 3" (cut with the big shot)
Layer 5: vanilla circle 2 1/2" punch

Stamps: Sweet Summer stamp set is available with any $50 stampin up purchase! (so cool)
Sentiment is from the Curly Cute stamp set.
Ink: Artichoke and baja ink, with blender pens.. Soft suede ink pad (for the stamping)

Additional accessories: glue dots, dimensionals (on layer 4 and the butterfly), JEWELS (self adhesive pearls), ribbon roses from the occasions mini catalog. My paper banner was also cut from the big shot petal cone die. We had some extra banners just sitting on the table after we made some cute baskets with the petal cone die. At the end, we used a 2 way glue pen, to add some dazzling diamonds glitter.

Finally, when the card was done, I stamped on our crumb cake colored medium envelope. I colored it also with blender pens and artichoke/baja ink. Then added glitter to the envelope.. Do you remember to stamp your envelopes? ahhhh Wouldn't you just love to get this one in the mail?

What a great way to start the week off!

Rubbah hugs to you,
Selene Kempton
Friday, February 25, 2011

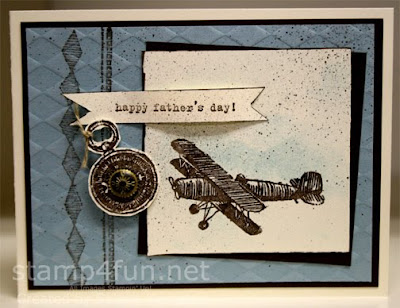
Saturday Sketch Challenge 192 ~ Masculine Plane and Simple

Good Evening Friends!

What a wonderful week it's been! It was club week here at the studio and I got to see all my stamp club members over the course of the week!
We meet in the AM and at night for 1 hour sessions that last all week long.. it's really a blast! If you're local and want to come try out club, just let me know! With 27 members currently, I have 3 available slots open!

It's that time! Time to be inspired by another sketch from stamping 411 and some Gorgeous samples from our design team! All the design team samples are so different from one another, yet all so gorgeous.. If you have time you should really check out what they are up to.. So ~ every week we have a "sketch" which is just a place setting of sorts for you to take what YOU have, and USE it! try a sketch challenge on for size and see what you come up with, then link back to the site. You'll be sure to hear from a few of the operators who cant wait to see your work!

I double dipped this week and used my card for one of the projects for club (love that). Here are my measurements and more details!

Base : vanilla 11 x 4 1/4" scored and folded in half at 5 1/2"
Layer 2: espresso 5 1/8 x 3 7/8"
Layer 3: Baja 5 x 3 3/4"
Layer 4: Espresso 3 1/8" square
Layer 5: Vanilla 3" square
Layers 6 and 7 were cut from scratch.. the paper banner is 1/2" thick..

Directions:

Step 1: On Layer 3 (baja layer) stamp the background stamp on your paper.

Step 2: Lay the design side down on your texture plate platform facing the texture plate and run through the big shot on tab one with the silicone rubber and impressions pad.. (see tab 1 for directions

Step 3: take a sanding block and sand the now textured layer, to make the design show up a little more (the sanding will make the raised layer look a little lighter.

Step 4: Using your punches, punch some random scallops into a scrap paper to make a mask, then sponge baja ink onto your top layer (with the plane) to make clouds.

Step 5: ink up and stamp the airplane towards the bottom of your 3" square layer.

Step 6: stamp your desired sentiment (there are 3 in the plane and simple set) on your 1/2" scrap layer. Cut a V in each end to make a paper banner.. You also can manipulate this layer with your fingers to make the cardstock bow like a banner.
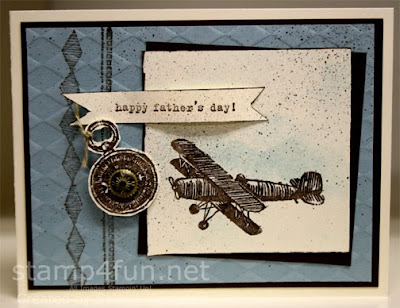
Step 7: Stamp your compass on scrap vanilla paper and cut it out (leaving a small white border all the way around). I used a mat pack to poke a hole in the center of my compass, and put a vintage brad through.. Doesnt that brad look like a compass? I also used the cropadile to punch holes out of the top of the compass, rather than trying to cut them with scissors.

Step 8: attach all your layers with tombo multipurpose adhesive (in the green tube) and use a dimensional for your compass.

Step 9: Using a marker and spritzer tool.. Spritz your card so that the ink splatters across the card for the aged appearance.

Step 10: address and send to your favorite guy! :D

A really simple card together, but the final card is just so beautiful. So ~ what do you think? Would you like to make one?

I hope you have time to play along with the operators this week. TGIF!
Rubbah hugs,

Selene Kempton
Thursday, February 24, 2011

Clean and Simple Tiny Teacup

I received a box of goodies for my club stampers on Monday.. I had put a small order in for ribbon and papers and earned this gorgeous tiny teacup set for free with my $50 order from Stampin' Up!

It uses the tiny teacup stamp and I stamped the sentiment separate and punched it out using the cute oval punch from the holiday mini.

I just love marina mist... paired with craft, espresso and white, it's so delicate!

so ~ how about some measurements
Base: Whisper White 11 x 4 1/4" scored and folded in half at 5 1/2"
Layer 2: espresso 5 1/8" x 3 7/8"
Layer 3: Marina mist dsp (from the big stack of soft subtles) in polka dots of course!
Layer 4: Espresso ~ scalloped circle punch
layer 5: Crumb cake 1 3/8" circle punch
Layer 5: 1 1/4" whisper white circle stamped with a marina mist tea cup.

I added the dots with a white gel pen and then added some dazzling diamonds glitter to the tea cup with a glue pen.. Oh and that ribbon is marina mist taffeta... isn't it pretty? Super easy, clean and simple. Hope you're having a great week. It's almost Friday! :D

Rubbah hugs,
Selene Kempton
Tuesday, February 22, 2011

Sweet Sunday Sketch challenge

Good afternoon friends!

I have to say, the picture does not do this card justice, and I'm having trouble with my photoshop... I hope I can get it fixed this week.. I edited this in a backup program so I could get it posted... Total bummer!

Written earlier:
Finally Tuesday and I have a few minutes to breath here before my crew comes in for stamp club tonight.. This card was **almost**one of my club projects, but I didnt have enough SALE A BRATION designer paper left to use all one color for the 6 panels in the background.. Out of my comfort zone a little, this is very bright using the multiple patterns. I really {heart} this sketch from Karen Giron over on her blog Sweet Sunday!

It IS bright, cheery and summery... This card actually uses two different SAB sets. The flowers are from Sweet Summer, and the whimsical sentiment from the "So Happy For You" set. Both sets, and the designer paper, {oh and the buttons} shown are available for FREE with every $50 in purchases you make (merchandise total) with Stampin' Up! Such a cool time of year!

Anyway, I stamped the image in stoft suede, and used blender pens and ink pads to color the sweet, whimsical image. On the blue strip across, I stamped the floral pattern in versamark. The very vanilla circle was punched from the 2 1/2" circle by Stampin' Up! and I used the 3" circle die from the mini catalog for the pacific point base.

The tricky part was cutting the 6 rectangles, they measure, 1 5/8" x 1 7/8" tall...

So my measurements are:
Base: Crumb cake card stock 5 1/2" x 8 1/2", scored and folded in half at 4 1/4"
Layer 2: 6 pieces of dsp measuring 1 5/8" wide x 1 7/8" tall
Layer 3: 1 x 5 1/2" strip of pacific point card stock
Layer 4: 3" pacific point die cut ~ sizzix machine
Layer 5: 2 1/2" circle vanilla ~ from a punch

I used linen thread to dress up the button with the delicate bow. I have another hour or two before my next club crew come to visit! I'm always in a good mood on club weeks! I just miss everyone!

I also want to tell you that I have some surprises coming for you in the next few weeks! I hope you'll be as excited as I am with the developments. I hope you have time to stamp4fun this week!

Rubbah hugs,
Selene
Monday, February 21, 2011

Mojo Monday ~ Vintage Newsprint Beautiful Friend

Good Morning Friends!

Well it's club week here at my stampin' pad, so I need to come up with a second project.. I love checking out the challenge sites to see what inspiration I can pull.

What a fun sketch!

This morning's mojo monday sketch has a whole lot of layers, but when using the newsprint DSP from Stampin' Up! it doesn't seem to matter! You get a WHOLE LOT of newsprint in one package and I'm totally lovin it! It's so quick to make an easy card.. I literally crumple it up in a ball multiple times before laying down my layers... So Fun!

This week I used the fun flowers die and the pretty rosettes from the mini catalog for my focal point. The little pearls get lost in the photo.. there are three in the upper right corner, and one tiny one on the "I" in friend.

That would be a funny sentiment.. "There most is an "I" in friend" ~ I stamped the sentiment from the fabulous phrases stamp set, and just loaded the two words side by side on a clear block..

I {heart} the clear mount stamps! looking for the low down on how to help your clear blocks stick better? It's all in how you put them together.. You can check out my tutorial here.. I did it about a year ago.. :D
Here's a close up of my focal point! I'm loving the distressed layers! I stuck the whole piece together with glue dots.. Easy peasy! :D

I hope you have a wonderful week and you have time to stamp4fun!

Rubbah hugs,
Selene Kempton
Friday, February 18, 2011

Saturday Sketch Challenge 191

Good Evening Friends!

Just a quick personal note to my stamping buddy Robin, who for personal reasons is stepping back from stamping 411. I sure will miss you and know that our readers will too!

Boy did I let loose with this week's sketch from stamping 411! Last week I started following a blog of a fellow demonstrator Linda Keal, and when I saw what she made this week in my inbox, I felt so inspired.

Then, I began to play and just couldn't stop! First I opened a brand{ie} new package of the newsprint DSP from the mini catalog. Boy, you sure do get a lot of product in one package. I was surprised how much was in there. I started cutting and cut my 3rd layer to 3 5/8" x 4 7/8".. Then, I crumpled it up in a ball.. uncrumpled it, and did that a few times. I rolled the ends and ripped it a bit. Oh it was fun! Then I cut a purple layer to 5 x 3 3/4" and crumpled that up a few times for good measure. When you crumple really good card stock, it will start to come apart, so I tore some of the layers off the top, exposing this soft and fluffy looking layer to lay my newsprint. At this point I pulled out the BLISS stamp set (a sale a bration freebee) and stamped the flourish in the top right corner.

Next.. I searched through my sizzix dies, looking for something to play with and saw the swirl pattern shown across and cut a layer of that (and crumpled it up).. {eyebrows raising up and down} uncrumpled it and laid it on top.. it sort of just curled around the right hand side, so rather than cut it off, i let it go and stuck it to the back.

Then I started thinking about the element on the right... I didn't want it to be a rectangle or square.. i wanted something different and played with the top note.. not loving any of those ideas... then I thought with that cool swirl, a butterfly would be kind of cool! So I cut some newsprint, and I stamped the flower image from the same stamp set and cut them out randomly.. It seemed to go together in seconds from there. A little sponging, that GORGEOUS vintage brad and I stuck it all together..

Next I spritzed the whole thing with the marker spritzer (to match that pretty in color purple) then added some Vanilla Shimmer mist. I'm not sure if you can get the shimmer mist in this close up below, but it's so soft and sparkly at the same time. Oh this just makes my heart beat a little faster.. I love when a project does that for me! :D
I think I went a little crazy with the distressing, because I cut a base 11 x 4 1/4" crumpled that up.. and it didn't work.. so i went with a regular base and just played with one corner...

I'd like it if the sentiment popped a bit more Imagine the possibilities... but I also didn't want to have another layer there.. I think I like it there...

So ~ that's how my card went together. Won't cha' play along this week? If you're so inclined to leave me a little note so I know you've been here, I'd love that! Your comments really keep me creating and sharing here!

I cant wait to see what you create this week! I hope you have time to stamp4fun!

Rubbah hugs,
Selene Kempton