Friday, June 29, 2012

Stampin' Up! Word Play and Floral District

Good Evening Friends! 

By the time you're reading this I'll hopefully be camping! We're heading away for a few days to celebrate Independence Day (and my birthday). 

I was crafting in the wee hours with no one awake in the house when I made this card.  This week's stamping 411 came out of my head, and I honestly didn't have a card in mind, but I LOVE whisper white and lots of layers.  :) 

This weeks' sketch can be simple or more complicated.  I went with simple. :)  Did I mention that I'm diggin all the white?  So first, some measurements.

Base layer 11 x 4 1/4", scored and folded in half at 5 1/2"
Layer 2: 4 x 5 1/4"
Layer 3: 4 x 2 3/8", then scallop edge punched
Layer 4: 4 x 2, embossed
Layer 5: 5" ribbon
Layer 6: 3 strips of Floral District designer paper cut 4" x 3/8 of an inch and punched with a square punch. 
Layer 7: a butterfly, punched with the new butterfly punch out of floral district DSP. 

Dazzling diamonds and a two way glue pen to make it all sparkly and the ultra sparkly new button, with a strip of paper to make a stitch.

Have a great weekend, and an awesome holiday!  :)

rubbah hugs,
Selene Kempton

Friday, June 22, 2012

Stampin' Up, Fabulous Florets meet Floral District DSP ~ Saturday Sketch challenge 261

Good Evening Friends!

It was nice to take a break to make this card earlier this week.  I have been doing a workshop marathon of sorts to help with some year end goals and I feel like I'm stamping 24/7.  :)

My little one hasn't been feeling good.  Between that, and me working like a crazy person life has been a challenge this week.  The good news is, it's almost time for my family vacation, which starts next Friday!  Yea, baby!  To the mountains we go!

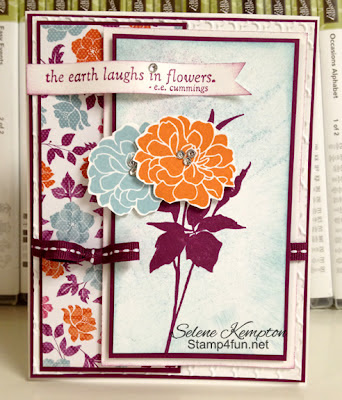
Tonight's sketch is so pretty, and I knew I wanted to make something floral.  Although the sketch doesn't call for it, I went a little crazy with the layers.  Okay.. I had a LOT of fun with the layers.  :)  Simon Cowell would be telling me that this is one self indulgent card, and yea I'd agree!  However, I had fun, isn't that why we make cards? 

"dim the lights and away we go"!   
Measurements:
Base: 5 1/2" x 8 1/2",scored and folded in half at 4 1/4"
Layer 2: 4 1/8" x 5 3/8", razzleberry
Layer 3: 4 x 5 1/4", whisper white, embossed with the new and oh so pretty fancy fan embossing folder
Layer 4: 2 1/8 x 5 1/8" razzleberry
Layer 5: 2 x 5" floral district designer series paper
Layer 6: Razzleberry 1/4" stitched grosgrain ribbon
Layer 7: 4 1/2" x 3" whisper white, sponged with razzleberry ink on the edges
Layer 8: Razzleberry paper 4 1/4" x 2 3/4"
Layer 9: Whisper white 4 1/8" x 2 5/8"
Layer 10 and 11: cut flowers
Layer 12: paper banner with the sentiment 1/2" tall then trimmed and sponged.

Stamps: Fabulous Florets
Ink: Rich Razzleberry ink pad, Tangerine tango ink pad, baja breeze ink pad
Paper: Floral district designer paper, razzleberry and whisper white card stock
Accessories: Razzleberry 1/4" striped grosgrain, dimensionals, glue dots

Okay.. some notes about this card.. it's kind of funny to stamp leaves using purple ink, but I followed the DSP.  It's really different, ya know?  I tried using just blue flowers, but I DIG the way the tangerine flower of the focal point sets off the design.  Oh such fun!  Well I'm off to the races again!  I'll be back to share very soon!

Rubbah hugs,
Selene Kempton
Thursday, June 21, 2012

Stampin' Up! Happy Hour, 3 Cheers for you Note card

Good Morning Friends!

How about another note card idea?  I used the sketch from mojo Monday to make this cute and quick note card. 

I thought it would be fun to use some of the same supplies I used for yesterday's card.  :)

I did change up the ribbon and I used a decorative label punch, but this card went together fairly quickly. 

Measurements:
Base: Note card and Envelope (sized 3 1/2” x 5”) ~ page 160
Layer 2: Real Red Cardstock 4 7/8” x 3 5/8”
Layer 3: Whisper White card stock  4 5/8" x 1 5/8"
Layer 3: Summer Smooches Designer Paper 4 1/2" x 1 1/2” 
Layer 4: Scalloped dotted polka dotted ribbon, 10" piece
Layer 5: 3 whisper white "drinks" stamped with real red and cut from scraps
Layer 6:  3 strawberries, cut out by hand, then dazzling details glitter
Layer 7: "3 cheers for you" stamped on 1/2 x 5" piece.  I used the square punch to put the "v" at the end.
Item Numbers
Stamp Set: 
US Price
Happy Hour Stamp set ~ page 36
29.95W/21.95C
Clear mount block “H” for clear stamps ~ Page 7
$8.50
Clear mount block “C” for clear stamps ~ Page 7
$6.95
Markers: 
Old Olive Marker ~ page 153
$3.50
126949 Real Red Ink Pad ~ Page 153
$5.95
Card Stock and Envelopes:
Summer Smooches Designer Paper
$10.95
Whisper White Cardstock ~ page 156
$8.50
Real Red Card Stock ~ page 153
$6.95
107311 Note Cards & Envelopes (qty 20) ~ page 160 $6.50

Accessories:
Decorative Label Punch
$16.95
Scalloped Dotted polka dot ribbon, black,  Page 173
$4.95
Mini Glue Dots ~ Page 177
$4.95
Dimensionals ~ Page 177
$3.95
Multipurpose Liquid Glue ~ Page 177
$3.95
Tabletop Paper Cutter ~ Page 180
$45.95
Paper Snips ~ Page 180
$9.95

It's supposed to be another super hot day here today.  I hope my little one does good at my mom's today, she's still under the weather and sneezy.  That's got to be hard when it's so hot out.

I have a party at Donna's house tonight! :)  Can't wait to see everyone and share a little stampin' love.

Thanks for stopping by today!

Selene Kempton

My Stamp Store
NEW: Purchase Rewards Program  
Wednesday, June 20, 2012

Stampin' Up! Happy Hour, Cheers Note card

Good Morning Friends!

Cheers to you, it's 5 O'Clock somewhere, right?  :)  This morning I'm sharing a note card that I'm doing with my private classes this month.

I love the Stampin' Up! note cards.  They are on page 160 of the idea book and catalog.  You get 20 of them for only $5.95.  They are sized 3 1/2" x 5" and come pre cut and scored with envelopes.

I like to take them as a starting point for new stampers, and show how easy it is to just layer on top.  Sometimes the idea of slicing into a piece of paper to make a card is overwhelming for new stampers, so this is a way to ease on into card making. :)


Measurements:
Base: Note card and Envelope (sized 3 1/2” x 5”) ~ page 160
Layer 2: Rich Razzleberry Cardstock 4 7/8” x 3 5/8”
Layer 3: Summer Smooches Designer Paper 3 5/8” x 2 1/4” 
Layer 4: 1/4” stitched grosgrain ribbon, razzleberry (two 4” pieces)
Layer 5: 2 3/8 x 2 5/8 Old Olive Card Stock
Layer 6:  2 1/4” x 2 1/2” whisper white card stock

Instructions:
Step 1:  Grab a precut note card and envelope out of the package and set aside.  (attaching to the base layer is the LAST step).
Step 2: Attach the Summer Smooch Designer paper to the bottom of the Rich Razzleberry cardstock using tombo multipurpose adhesive. 
Step 3: Use two glue dots to attach the ribbon to the back side of the card. 
Step 4: Tie the ribbon on to the left hand side of the card front.
Step 5:  Using the rich razzleberry ink pad, stamp the “cheers” sentiment, and then the wine glass image on to your cardstock. 
Step 6: Use the old olive marker to ink up the umbrella image and stamp so it’s inside your drink. J
Step 7: Attach the white layer with the stamped images to the old olive layer.  To attach the old olive layer to the purple, use 4 dimensionals
Step 8:  using “green glue” attach the card to the base.  

Item Numbers
Stamp Set: 
US Price
Happy Hour Stamp set ~ page 36
29.95W/21.95C
Clear mount block “H” for clear stamps ~ Page 7
$8.50
Clear mount block “C” for clear stamps ~ Page 7
$6.95

Markers: 

Old Olive Marker ~ page 153
$3.50
Rich Razzleberry Ink Pad ~ Page 153
$5.95

Card Stock and Envelopes:

Summer Smooches Designer Paper
$10.95
Whisper White Cardstock ~ page 156
$8.50
Rich Razzleberry Card Stock ~ page 153
$6.95
Old Olive Card Stock ~ page 153
$6.95
Note Cards & Envelopes (qty 20) ~ page 160
$6.50

Accessories:

Razzleberry 1/4” Stitched Grosgrain Ribbon ~ Page 173
$4.95
Mini Glue Dots ~ Page 177
$4.95
Dimensionals ~ Page 177
$3.95
Multipurpose Liquid Glue ~ Page 177
$3.95
Tabletop Paper Cutter ~ Page 180
$45.95
Paper Snips ~ Page 180
$9.95

Tuesday, June 19, 2012

Stampin' Up! Serene Silhouettes and Trust God

Good Afternoon Friends! 

I have a very sweet card share for you today.  I am in a new catalog swap and created 18 of these pretty cards.  They went together pretty quick and I love the soft, pretty colors together.

My daughter is laying down because she's sick.  It's a bad time for her or me to be sick.

I have been working very hard towards earning the incentive trip and a bonus which is equal to a year's tuition for Alexis.  The idea of traveling to Fiji is amazing on it's own, but I'm also trying for a performance bonus.  All the pieces are in place, I just need sales.  So, I have been busy doing parties, sending personal thank you notes for every order and more.  I made a few extra of this one, so if this is the card you want, let me know!   For orders in person or on my website, I'll mail you a free catalog if you need one. I will be back to regular blogging soon.  

There's an AMAZING hostess special for parties that reach $450 this month.  Hostesses are getting an extra $50 in hostess benefits.  I've already have a few hostesses take advantage.
So instead of getting $65 and a half price item.  They are getting $115 and a half price item for $450.  For $500, it's $80 + $50 and so on.  In order to qualify for this special, I have to key in your order, so if you're going to go for that, please email or call me so you get full benefits.  :)

I am loving this pretty card!  The paper banners really take it to the next level and add that "little somethin' somethin"  to my soft and simple card. 

I'm going to start off by sharing the measurements I used for this card:

Base Layer: Crumb Cake Card Stock 5 1/2" x 8 1/2", scored and folded in half at 4 1/4"
Layer 2: Crumb Cake Card Stock 5 1/4" x 4, embossed with the Fancy Fan Embossing Folder
Layer 3: 1 x 4" certainly celery cardstock.  I used a square punch to make the "V"
Layer 4: Pool Party Card Stock 3 1/2" square
Layer 5: 1/2" x 4 1/2" certainly celery, and I used the same square punch trick for the end of the paper. 
Layer 6: Whisper White 3 1/4" square

Directions: 
Step 1:  On the whisper white layer, stamp the image from Serene Silhouettes.  Ink up using a pool party and certainly celery marker so you can multicolor the image.  I stamped the image so that the image leans towards the right instead of straight up and down.
Step 2: Stamp the "God Bless You" using soft suede ink. 
Step 3:  Emboss "Layer 2" with the Fancy Fan Embossing Folder
Step 4: Assemble your layers top down using tombo multipurpose adhesive.  To attach the blue panel, I used 5 dimensionals (one for each corner and one in the middle).  I like to put all the layers on top together first, before attaching to my card base.
Step 5: Gently spritz (one or two squirts) with the Vanilla Shimmer Smooch Spritz 118772.  I'm not sure if you can see the shimmer in this photo, but the spritzed card front in real life is so pretty!  It does NOT need to take 2 hours to make a card.  I made 24 of these today in a few hours. 

Here is the supply list. 
Stamps: 
Trust God 126700 Wood / 126702 Clear
Serene Silhouettes 127322 Wood / 127324 Clear
Ink:
Certainly Celery Marker 105106, 
In color markers (pool party) 123002,
126978 Soft Suede Ink Pad
Paper:
Crumb Cake 120953
Pool Party 122924
Whisper White 100730
Certainly Celery 105125
Accessories:
1 1/4" square punch 124094
Vanilla shimmer Smooch Spritz 118772
Adhesive:
Multipurpose Liquid Glue 110755
Stampin' Dimensionals 104430

Thanks so much for stopping by today.  If you don't have a demonstrator and would like to place an order, I'd love to be your demo!  :)  Please check out my purchase rewards program.  I offer rewards to both my online customers and to my in person customers. 

Rubbah hugs,
Selene Kempton

My Stamp Store
NEW: Purchase Rewards Program  

Friday, June 15, 2012

Saturday Sketch Challenge, Stampin Up Love & Laughter, Wedding

Good Evening Friends!

With so many elements to this week's sketch challenge, I felt a little intimidated when sitting down to create my card.  I decided to keep it mostly white...  Well, did I have fun!

I don't have a wedding or shower to go to.. but I grabbed the love and laughter stamp set anyway.  hmmm how about a supply list first.

Stamps: Love and laughter
Ink: stazon black and primrose petals (for sponging on the background
Paper: Black, white and 2012-2014 in color designer paper
Accessories: stitched satin in primrose petals, the new dahlia's (my FAVORITE new thing!) the finishing touches edgelits, and floral fusion sizzlits.  (oh my!), Manhattan Flower Embossing folder, and stampin sponges.  Glue dots, dimensionals and tombo multipurpose liquid glue.  :) 

I LOVE this card!  :)

So how about some measurements:
Base: 8 1/2" x 5 1/2", scored and folded in half at 4 1/4"
Layer 2: 5 x 3 3/4" black
Layer 3: whisper white 4 7/8" x 3 5/8"
Layer 4: 1 1/2 x 5 1/2" cut with the finishing touch edgelit on the big shot. 
Layer 5: primrose petals 2 3/8" x 3 3/8"
Layer 6: 2 1/4" x 3 1/4"
Then the flowers were cut with the floral fusion sizzlit from stampin up's big shot die cutting machine.  I used a glue dot to ad the dahlia.

It's not my normal clean and simple (which I love so much).  However, I am loving the way this one turned out.  TGIF!!  I hope you have a wonderful weekend! 

Tomorrow, I'm stamping with my friends from elementary school.  I don't think any of them have ever held a stamp.  I can't wait to share what I love so much with my old friends (who are still quite young).  :)

Have a wonderful weekend! 
Selene~
Sunday, June 10, 2012

Stampin' Up! Artistic Etchings and Sassy Book Bling

Good Afternoon Friends!

My Good friend Stephany Noel drove in traffic for TWO HOURS to come and spend Friday night with me!  She didn't get home till about 3am, and I couldn't sleep until I heard she was home safe.  We had a wonderful night, laughing, talking and making these cute tags so she can put her AWESOME bookmarks up for sale at a local store!

Stephany makes these ultra cool stretchy bookmarks that are custom made with every style and personality in mind.  She also has her own etsy store that you can check out here

When thinking about making a "tag" for her book jewelery, I wanted to keep it as simple as possible.  We didn't want to spend more time making that tags, than she takes with her gorgeous bookmarks.   She needed a way to display the bookmarks so that they will hang nicely, and she can put the price on the back.

So, here's what we came up with.  First, here's the supply list. 

Stamps:
Artistic Etchings:  wood mount 118517 or clear 120573
Occasions Alphabet: (we used "S" for Sassy)
Wood Mount 117090 and Clear Mount 123598
Ink: Raspberry Ripple Ink Pad 126859 and Basic Black Marker 100082
Paper: Leftover Scrap Paper, Very Vanilla 101650
Accessories: Stampin Sponges 101610
Punches: Decorative Label Punch (folded in half) 120907, Slot punch (retired) but you could use the ticket duo, or a few small circles.  I love this retired punch for this application.  1/2" circle punch 119869, Stampin Dimensionals


Steps:
  1. First, we stamped the pretty circle design from artistic etchings for the front of the tag.
  2. Punch it out using the decorative label punch.  
  3. Make a hole at the top of the decorative label, then fold the tag in half and punch again.
    ** Note this is important because you don't want to punch through two layers with a punch, it will break it. :)
  4. Sponge this layer with the Raspberry Ripple Ink.
  5. Using the scraps from the larger stamped images, stamp the "S" from the occasions alphabet using a marker.
  6. Punch out the "S" with your 1/2" circle punch and sponge it with with the raspberry ripple inked sponge.
  7. Stick the "S" on with a dimensional and place below where it's folded so it hangs over and stands out a bit!  
What a great project!  We had a ball making these!  Steph is going to do SO well with these gorgeous bookmarks in the store.  If you want to check out some of her work, you can go to her etsy store here.  If you are looking for something specific, or want her to make you one, make sure to email her through her store. 

Thanks so much for stopping by today (and every day). 

Rubbah hugs,
Selene