Showing posts with label gift card or money holder. Show all posts
Friday, November 1, 2019

Itty Bitty Christmas Gift Card Holder Class and Preview


Hello Friends!
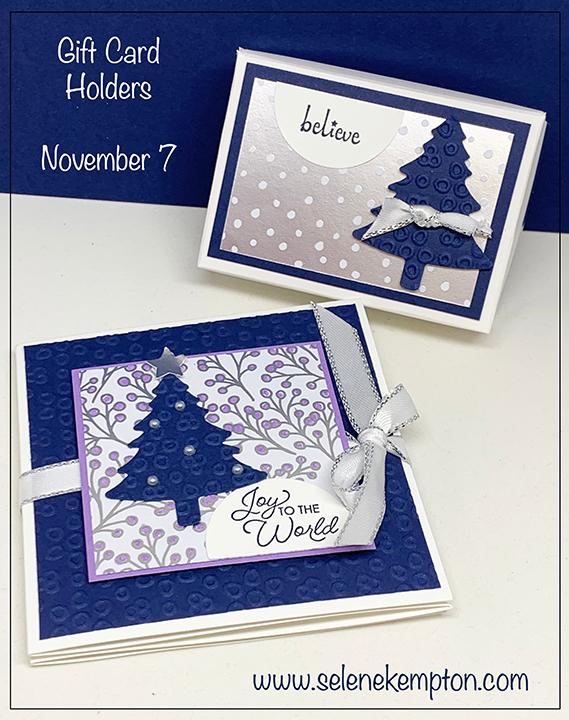
These projects are so awesome, that the photo just doesn't do them justice!  This month's card class will feature four different gift card holders and features the Itty Bitty Christmas Stamp Set.  Two of them are pictured here, and both hold multiple gift cards.

Below is a one-minute live video,
I shared on my exclusive creative group today and sent to youtube for all my friends not on facebook so you can have a sneak peek!
Here are the details for this month's class:  
When: Thursday, November 7th
  • 9 AM or
  • 6:30 PM
  • To Your Door

Pro Tip: To get your class for FREE with orders over $25 using this dedicated host code. (please also register for directions).
(Host Code) 77EVKTY3
Get your packets, pre embossed, pre-cut, so all you have to do is stamp, learn the techniques and assemble!  Note, this month you will need TWO punches to finish off your projects 1 1/2" and 1/2" circles.  They are ready for you to have fun!  
To GO? You have options, the first three options are shipped to your door.  Directions and packets will be mailed/emailed by 11/14.
  • Include the stamp set to score a sweet deal!
  • Get your pre-cut kit in person or to go.
  • Place an order in my online store to get the class packet mailed for free. (Host Code) 77EVKTY3
Note. digital file will also be sent by the 14th also.  These are my in-class directions sheets and contain full measurements and step by step directions. The photos have not been watermarked and the sheets do not have my name on them, so they are demonstrator friendly to reuse them for a class. 
Demonstrators: you may offer the sheets for free with any $50 order.
Complete supply list and shopping list will be part of the directions.
Recommended supplies to assemble these projects as shown with the packets:
  • Itty Bitty Christmas Stamp Set
  • 1 1/2" Circle Punch, 1/2" Circle punch
  • Ink Pads: Night of Navy Ink Pad, Highland Heather Marker
  • You'll also need:  Snail Adhesive, Dimensionals, Glue Dots, Liquid Glue, Paper Snips.
I hope you can join me for this month's class in person or I'll ship it to your door!
Click here to shop now: on my website, and use host code: 
77EVKTY3
Thursday, March 21, 2013

3/21 Stampin' Up! Hello Mr. Bunny Love, punch art Gift card Holder.

Good Morning Friends!
I was so surprised when I sent out the email for this Friday's class, the sheer response I would get from Mr. Easter Bunny (I've been calling him bunny love).  I saw this bunny, or a close rendition of it on Pinterest and it was by fellow demonstrator Pam Staples.  I didn't save the picture... ugh! but if you have a link to hers, please leave it for me and I'll link back to it. She had it in baby blue and pinks and I believe hers was a box. 

It's so cool how we can all inspire one another.  I used this bunny last week in scrapbooking class, and everyone loved him.. So, I thought an with an Easter Themed class we'd make one.

I used 3 colors of paper: Whisper white, Pool Party and black. All white and pool party pieces were sponged with Island Indigo classic ink.
For this project you'll need a white gel pen for sure!  It really brings the bunny to life! 

Big Shot:  Top Note Die 113463, and heart collection framelits for the nose (smallest one) 125599

Here's a list of all the punches I used:
119859 Extra Large oval x6 (whisper white ~ 4 ears, 2 feet)
119855 Large Oval x2 (pool party ~ 2 ears)
119868 1" circle (pool party ~ 2 feet)
117193 small heart punch (pool party ~ 6 feet)
119860 1 1/4" circle punch (whisper white ~ 2 nose)
119873 3/4" circle (black ~ 2 eyes)

So, for the front of the bunny, I just sponged all the pieces and stuck them together with the tombo, multipurpose adhesive liquid glue.  I sliced 3 very thin strips of whisper white on my Stampin' Up! paper trimmer, and used a dimensional to hold them down on the front of my bunny face.  Then I stuck the two center circles together to form the nose.  I also added two dimensionals to either side of the circles and popped up the nose.    On either side of the nose I added some marks with a grey marker.

If you need supplies to make this bunny, I am running an online party right now!  It's a mystery hostess event and someone is going to win some fun hostess benefits!  For more details on that click here!
Don't miss out on Sale-A-Bration!  Every single year I get someone who forgot to place an order to get their free goods!  After tomorrow, I won't be able to help them either!  For more samples with Sale-A-Bration sets, just click here!

Oh! I almost forgot!  To make the "gift card holder" piece that the bunny sticks to. I cut a piece of 12 x 12 down to 12 x 4".  I scored the paper at 2" and 6" and folded the paper up into itself and cut the holder and the base of the card all in one swoop!  (I might need a video to show that, but if you just try it... you'll see it's not that hard).  You could so do it! 

Thanks so much for the kind comments and for coming to visit!  See you tomorrow with some more fun from the class coming up tomorrow night.  Oh and don't forget to join the online party!  For more details on that click here!

If you're local and want to take this class, please hurry on signing up (click here)! At the class everything will be pre-punched for you. Signup deadline is today! 

From the heart,
Selene Kempton
Stampin' Up! Creative Coach
My Stampin' Up! Store 
Tuesday, December 11, 2012

12/11 Sweet Original Design Gift Card Holder Template, Stampin' Up! ~ 25 Days of Christmas Day 23

Good Morning!

Do not adjust your monitors!  I'm back!  I know that I have been MIA and I've started getting emails, lots of emails, {wow} asking where I am!  Well, I'm here!  (Thanks for writing!)

I have been working like a mad person with the holiday crunch, a workshop for my friend Kelci this past Sunday.  An ornament class, 10 handmade ornaments and 25 original gift card holders for the local florist who needed some things for her holiday stroll this past weekend.  I'm here, but I'm working like crazy!

Did I mention that I made over 100 Christmas cards last week for my clients and friends and I'm working on getting them in the mail this week.  For some of the cards, I even made the envelopes!  :)

Alas, but no partridge in a pear tree, thank goodness!  {chuckle here}  I wouldn't know how to take care of one!  :)

I have been busy, and I know my blog was a little neglected.  Rest assured I have SO much left to share with you!  This little prized project was one of the projects from my workshop this weekend.   All the ladies at the private class will be getting the pattern in their inbox for taking the private class/workshop.

For this simple gift card holder, I got a picture in my head, drew it out on cardstock, scanned it, redrew it in adobe illustrator, then saved it as a PDF.  Then I was able to print it out on cardstock and cut and score where I put the specific lines.  Now, it's VERY easy to put together.  Just cut on the solid lines and score on the dotted lines.

You'll need a piece of velcro to keep the box shut, or you can just make a belly band out of paper, or tie a ribbon on to keep it closed.  Super duper easy peasy!

When we assembled it this weekend at the workshop, we used the new trimmer from Stampin Up.  In some cases we could cut, then score without even moving the paper, the way the holder is designed.  This project went very quick in class even though I only have one paper trimmer.  Click here to shop in my store for this cutter and for a short video to show how it works

Now ~ I can show some more examples when I get down to the florist and snap a photo, BUT, if you want, you can substitute some of the tags from SU and they fit across the top of the gift card holder perfectly and can become the top of the box.  You would THINK I planned it, but it just worked out to be the exact same size.  Isn't that funny?  I will get you some pictures of that.

This designer paper is just gorgeous!  I had a bunch left over from the breast cancer event, and now, I'm almost out!  :)  In fact, I'm almost out of every ounce of designer paper!  I've been a busy little crafter I guess. 

The ornament was cut from a different pattern of the DSP, It's called Natural Composition Specialty DSP.  It comes already embossed.  I just added some ink with a sponge dauber and wiped the excess with a paper towel.  I cut the ornaments out with my framelits, and I was off to the races!  :)

Would you like to get this gift card pattern?  Well, I'm giving it for free with every $25 purchase this month.  So you get the pattern AND you get to shop!  Love that!  :)  For those of you who already made a purchase with me this month (minimum $25), check your email for the pattern!  I've already emailed you the PDF.  {I also send a thank you card in the mail for every online purchase, so you should look for those as well, they've all been sent}.  For the template, just print it out using your printer, cut on the solid lines and score on the dotted lines.  I put mine together with tombo liquid glue, but you could use red line sticky tape if you have that on hand too.  You can print this onto any card stock you happen to have laying around.

For those who choose me as your Stampin' Up! demonstrator, a big thank you to you!  I'm working on getting my cards in the mail over this week and next week so please watch for them and I'll see you very soon.  I've been a very busy stamper so I have LOTS to share!

Tonight is my monthly team gathering and swap.  We are swapping cards and scratch tickets!  Maybe we will all get some extra stamps for Christmas! :)  

I hope to see you again here tomorrow!  Same bat time, same bat channel!  :)  I WILL finish the 25 Christmas projects (even though I've started playing with my preorder stuff for January already! :)

Big hugs to you all,
Selene Kempton, Creative Coach


Sr. Manager
My Stampin' Up! Store / 25 Days of Christmas Projects!
Wednesday, November 28, 2012

11/28 Stampin Up! No Peeking Gift Card Holder 25 Days of Christmas Day 22

Good Morning Friends,

Today, at my stamp clubber(s) requests, I'm posting the directions for for this cute gift card holder we are making in stamp club this week. In the sample I used in club, instead of using designer paper on the back panel, I used very vanilla card stock, so that someone who was giving a gift card would have some room to write a personal message. 

So, let's get this party started!

To make the belly band:

Layer 1: Cherry Cobbler Card stock 9 1/2" x 1 1/2"
Layer 2: Be of good Cheer DSP (today is 20% off) cut to 9 1/2" x 1"
Layer 3: Very Vanilla  Decorative Label Punched "no peeking layer:
Layer 4: 1 3/8" square punch, champagne glimmer paper.

Attach the strips together using snail adhesive.  Then score the belly band at 1 1/4" and 5 3/4" and use tombo multipurpose adhesive to stick the two ends together.

Next, I used some champagne glimmer paper to punch out a 1 3/4" square, and added some cherry cobbler seam binding to make it look like a present.

I just added a glue dot to the ribbon and folded it in half to make it thinner, then adhered the ribbon to the back.  Stamp the "no peeking" sentiment on very vanilla cardstock and punch it out with the Decorative Label Punch (which is also on sale today for $11.97, save 30%).

Finally, I attached the glittery present to the  "no peeking" layer using tombo multipurpose adhesive, and stuck some dimensionals to the back of the two layers to attach it to the belly band. 

Moving on to the base.  The base of the gift card holder measures 9 x 4 1/4", so the easiest way to cut is to cut an 8 1/2" x 11 down to 8 1/2" x 9".  Then cut the remaining piece in half the long way at 4 1/4".  So, you'll get two from a piece of card stock. 

Base Layer Measurements:
Base Layer: Cherry Cobbler, 9 x 4 1/4", scored at 3 and 7 1/4"
Layer 2: (inside) Very Vanilla 4 x 4 (note, in the photo it is dsp)
Outside layers top: Be of Good Cheer DSP 4 x 2 3/4"
Outside layers bottom: Be of Good Cheer DSP 4 x 1 1/2"

So, first you want to score the cherry cobbler layer at 3" and 7 1/4".  After sticking the precut layers tot the top and inside, you'll want to use two 1" strips of sticky strip to seal up the bottom flap.  Leave the top flap so that it opens up as shown in this second photo above.

When you slide the belly band over the top, it will hold the top piece closed.  What a cute yet personal way to present a gift card to anyone on your holiday shopping list!

Just a reminder that today is the last day to save up to 50% off stamp sets accessories and more!

Thanks so much for stopping by today.  Here are the details of the sale again.

Today is the last day for the  Online Extravaganza!  Click here to check out what else is on Sale !(that's the complete list)

Today ONLY door buster products.
Wednesday, November 28, midnight - 11:50 PM (MT)


Page
Item
Description
Retail Price
24-Hour
Sale Price
7
118941 Clear Block Bundle (Blocks A-I
$66.95
$53.56
7
120279 Clear Block Storage Caddy
$16.95
$13.56
175
109127 Stack & Store Caddy
$34.95
$27.96

Shop here or email me so that you don't miss out on the deal that you want!

Rubbah hugs,

Selene Kempton, Creative Coach
Sr. Manager
My Stampin' Up! Store / 25 Days of Christmas Projects!
Wednesday, December 14, 2011

Money Holder

Good Morning Friends!

I have to go to the dentist this morning! Uggghhh.. So I'm writing a blog post when I should be getting dressed! :D I did make another card and photograph it this morning.. but alas, my card reader has finally died.

So ~ I have just a quick share for you this morning. This past weekend we celebrated Christmas with my sister and her family. We did a small gift exchange. In addition to something small, I gave my Godson John, a little money so he can pick out what he likes.

Giving money seems so **funny** for me, so I decided to make him this money holder. I'm glad I got a picture of it because he ripped it to shreds! Ummm guess I should have told him that the belly band slides off? Well, there's always next year.
I hope you're having a wonderful holiday season! I'm looking forward to Christmas now that most of my shopping is done. I'm all for going back to the REAL reason for Christmas and gathering with our loved ones to celebrate the birth of Christ!

Oops~ How did that get in here? Well, this is a picture of my fashionista on the way out to meet up with the family! She's so cool.

Much love to you all!
Selene