Good Evening Friends,
Today is the day I'm on my way home from Alaska. We'll be spending some time in Seattle today and are hopefully having dinner at the space needle right about now! :D I'll be home and in the office tomorrow morning (after a red eye back to Boston). I'm sure that I'll have lots to share with you!
This week's card is a birthday card I made for my good friend Bonnie M. Bonnie LOVES black, but she also likes a splash of color... So for this one I went all monochromatic, except for the very bright focal point. Isn't this fun? So often when I make a card, I like to make it personal. Meaning...This is SO Bonnie! :D Bright and beautiful! :D So how about some measurements?
Base: whisper white 11 x 4 1/4", scored and folded in half at 5 1/2"
Layer 2: Black 5 1/8" x 3 7/8"
Layer 3: Basic Grey 5 x 3 3/4" (on this layer I used the vintage wallpaper embossing folder)
Layer 4: 5 x 2 1/2", then I used the scallop border punch
Layer 5: 5 x 2", black polka dot DSP
Layer 6: white satin ribbon 5/8" (about 6 1/2")
Layers 7: For the black rectangles on either side 1 3/8" x 1 5/8"
Layers 8: the black writing DSP rectangles are 1 1/4" x 1 1/2"
Layer 9: (Focal point) melon mambo cardstock 3 3/8" x 1 13/16"
Layer 10: Whisper white 3 1/4" x 1 11/16"
The paper banner was made from scraps, as well as the focal point flower. I cut that out and popped it up on dimensionals.
Do you think this card will make Bonnie know how special she is? I hope so! I'm back this week, so I'll be posting! :D
Selene Kempton
Friday, May 27, 2011
Friday, May 20, 2011
Saturday Sketch Challenge 204
Good Evening Friends!
By the time you're reading this, I'll be on the boat headed to Alaska, courtesy of Stampin' Up! and so many of you. From the bottom of my heart I want to thank you all for the love, support, and orders that help me stay at home while my daughter is little.
A vacation on top of all of that is just amazing. This particular trip is on the hubby's bucket list, and I'm oh so proud to have earned something that will make him happy. (he's such a good guy). Will cut little flowers or score/cut card stock for me whenever I ask.. isn't that cool?
Today, I'm counting my blessings. I haven't been able to stamp all week, with a terrible sinus and double ear infection and after 3 days of antibiotics, I'm starting to get my head back. (yea)... Enough about that.. I just want to say Thank You. Whether you have made work that has inspired me, placed an order, or just offered a kind word of encouragement on my blog or otherwise.. Hugs to you all...
This card was made for a very special lady on my team, Colleen R. Colleen joined my group just a few short months ago and is quite the 3D artist. :D I love casing you girl! :D Hopefully Colleen will receive this card before she reads about it here. :D
Measurements:
Base: Whisper white: 11 x 4 1/4", scored and folded in half at 5 1/2"
Layer 2: Real red, 3 7/8" x 5 1/8" ***note this is only 1/8" larger than layer 3.
Layer 3: bashful blue: 3 3/4" x 5"
Layer 4: Designer paper 3 3/4" x 2 1/4"
Layer 3: real red, 2 7/8" square
Layer 4: 2 3/4" square
Layer 5: real red 2 3/4" square
Layer 6: whisper white 2 5/8"
Whew, that's a lot of layers!
I stamped the cupcake in stazon, going right off the paper on purpose. Then I stamped it on a piece of scrap white and cut the candle out. I used tombo multipurpose adhesive to "paint" my candle then sprinkled glitter on. I also did the same for embellishing the cupcakes.
I used the polka dot embossing folder for layers 3 and 4, and attached my bow with a glue dot.
I surely hope your day is the sweetest day ever, and thank you again from the bottom of my heart.
Selene Kempton
Labels:
Birthday Cards,
stamping411
Friday, May 13, 2011
Saturday Sketch Challenge 203
It's hard to believe that by this time next week, I'll be cruising along side so many of my buddies on an Alaska cruise thanks to all my stamping friends/customers and Stampin' Up! I'm really excited...
I started this card over 3 weeks ago... I did everything but the sentiment, then I went into a stall... so I put this card up on my display wall, and looked at it every day until yesterday morning. I thought it could use a flower or another embellishment, and then.. I added a sentiment and stopped! Too funny... sometimes good design is knowing what NOT to do to a card. :D It's really bright and pretty on it's own.
I really love the lattice die from sizzix and thought that it would really fit the bill for Gretchen's sketch over on stamping 411 this week. Such a cute sketch!
So ~ here are my measurements for this week's card.
Base 11 x 4 1/4", scored and folded in half at 5 1/2"
Layer 2: 4 x 5 1/4" in pacific point cardstock I'm not sure if you can see it in the photo, but it's stamped with a butterfly, then embossed with the vintage wallpaper embossing folder.
Layer 3: 3 1/2" square, whisper white
Layer 4: 3 3/8" square, pacific point
Layer 5: 3 1/4" square, whisper white
Layer 6: is the lattice die element cut from the big shot
Very simple and very pretty! I hope you have a wonderful weekend!
Rubbah hugs,
Selene Kempton
Labels:
stamping411
Tuesday, May 10, 2011
Teacher Appreciation!
Just a quick share of what I did for my daughter's kindergarten teacher and the aide. Originally, I bought them candy... then remembered the aide just had gastric bypass..
So I found these cute tins at a big box store, and cut up some paper. Two of the colors are retired, but it worked fine just the same! :D
I made a cute holder for seed packets and used some leftover paper I had.. I can share my seed packet holders another day I guess! I forgot to photograph that part. It's just a quick template I printed on card stock and cut out. I used dimensionals to hold my paper flowers together. I embossed a few of the layers, and added buttons.
Easy peasy! I have to say, I LOVE the new bakers twine! i can see myself using lots of that!
Have a great day!
Selene Kempton
Monday, May 9, 2011
Mojo Monday ~ Using up my supplies.
Good Morning Friends!
This morning will be a quick post as I have a meeting with my buddy Anne. We are going to meet with a grant writer to see if we can speed along a bit for our playground project. We are almost at the half way point, and we've got almost half our goal, so we're right on track! :D
This morning, I decided to pull out my supplies from the last mini, and pair it up with a new stamp set, on the grow. I cut a piece of watercolor paper into 4 equal pieces for the focal point, and I'm so excited that I actually use every shred of paper for making these.
The designer series paper was from the last mini, and I will make some cards to put at the florist shop up the street from my home. :D
The flowers in the top right, are satin ribbon flowers from the last mini. I just used a regular marker on top of them, and blended the color with aquapainters. I used crystal effects on the jar, to get it to look like glass. I dont think you can see that in the photo. When I was almost done making this card, my buddy Anne told me she needed a birthday card for her friend. So ~ birthday it is! :D
Finally ~ I know I strayed from the sketch a bit.. When I started to put all my pieces together, I decided to put my focal point on top, instead of behind the dsp. It just didnt fit back there! That's why I love a good sketch! It's a jumping off point, but you don't need to follow things exactly if it's not working for your project.
I am off and running (again) this morning! So ~ i hope you have a wonderful day and you have time to stamp 4 fun!
Rubbah hugs,
Selene Kempton
Labels:
mojo monday
Friday, May 6, 2011
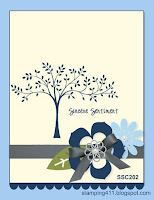
Saturday Sketch Challenge 202 ~ Target your audience
Back in my single days, I was a disk jockey (and karaoke host). One of the things that makes a GREAT dj, is reading and providing for the audience. In a way, a good DJ gives the audience what it wants, before they have to . In some respects, making "just the right card" for a very special someone, can require the same skill! When I looked at tonight's sketch... askand knew who my creation was going to be for, I made some drastic changes of the feel of the sketch, based on my audience.
My Godson John, is making his first holy communion tomorrow morning and I didn't want to make him a card that was too girly, or had too much foo foo, but masculine cards CAN BE PRETTY and still masculine! :D So here we go! I have to say... I struggled BIG TIME... not to put a big gorgeous bow, or a button.... and bling... I pulled it back so that I have the right card for the right occasion! :D
I started with the cross. I embossed it with silver embossing powder on bashful blue cardstock and cut it out... I tried laying it on top of another bashful blue layer, and it got lost. So I changed to white. :D
I cut my white cardstock (layer 3) to 3 5/8" x 4 5/8" and ran it through the big shot to emboss it.
Next I stamped the sentiment "God bless you".. So pretty! Then I REALLY ran into trouble. I wanted to put a big girly bow, or make a faux bow behind that silver embellishment, but really you have to play for your audience. So, although I decided to keep and embellishment there, I used restraint and kept it extremely simple!
Layer 2 was cut to 3 3/4" x 5 1/8" then I used the eyelet border punch to add a little decoration.. OKAY perhaps that part IS a bit girly. :D Finally I peeled the cross off the front of my card, and added the brad.. it just NEEDED to be there! I hope you enjoyed sharing a bit into my creative process, and the next time you make a card... REALLY THINK about the person you are giving it to. What will THEY like?
Please join me and my friends over on Stamping 411 for an awesome challenge and you can make a card and share too!
Rubbah hugs and please have a wonderful weekend!
Selene~
Labels:
Religious,
stamping411
Monday, May 2, 2011
Mojo Monday ~ A new mini catalog and stamping for a cause
I spent yesterday at a local spa, Beleza Spa, in chelmsford MA yesterday, witnessing beauty in action! I'm not sure what the final total was, but we were there raising money for breast cancer research. So very cool.
Today, when I saw the mojo Monday sketch challenge, I thought that it would be a good thing to use the brand new stamp set strength and hope to create a card today! I'll be donating 100% of what I make with purchases today, to the girls of the LOL team, walking to support breast cancer. In addition, stampin up donates $2 from the sale of every stamp set, strength and hope to The Breast Cancer Research Foundation. Yeaa!!!!
I'm off to volunteer at my daughter's school today, so I have to run.. but I'll have more samples to share with this stamp set this week! Thanks so much!
Selene Kempton
Labels:
mojo monday
Subscribe to:
Posts (Atom)