Friday, April 30, 2010

Saturday Sketch Challenge 149

Thanks to all for the well wishes for my mom who has pneumonia. All your prayers count!!!, so I figure I'm doing really good there! I'll be bringing her some chicken soup in the AM and hope she's well soon.

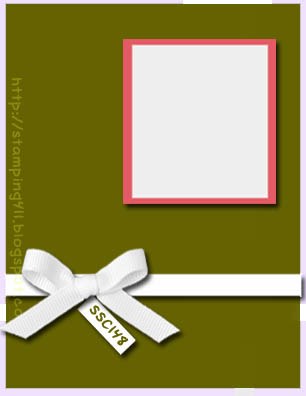
Here's my take on this week's Saturday sketch challenge. I moved the element on the far left, and flipped the sketch.. but that's just what a sketch challenge does. It inspires, it doesn't mean that you need to do it EXACTLY like the sketch! :)

I watercolored the saw in brocade blue and mellow moss. I did some sponging on the layers and used my new favorite embossing folder. Please forgive me that I'm a little short winded tonight. Got a lot going on... I hope you have a wonderful weekend and that you have some time to stamp something fun with this fantastic and simple sketch challenge from stamping 411!

Bloggers challenge ~ some type of embossing

Good Morning Friends!

I made a card for my mom this morning. She's sick in bed with pneumonia. She called me yesterday to tell me she took the BUS into Boston, then took the BUS back home after she found out. Arggghhh. I wish she would have called me.

Anyway, today's plan is to make her some soup, get some groceries and head for her house when my little one gets out of school this afternoon. Just to check on her and make sure she has what she needs. She told me yesterday that she hasn't been eating, and knowing my mom, that might be because she doesn't have any food in the fridge for herself.

It's always harder to cook when you're only cooking for yourself.
I used the color combination, from Patti's Stamping 411 color challenge from yesterday morning. The colors are garden green, certainly celery, chocolate chip, and so saffron. Thanks for the great color combo. i actually colored my doggie's face a little green!

Anyway, I just cant imagine trying to make a card without using the big shot in some form or fashion these days. One of my favorite new toys is the lattice embossing folder which will be available starting tomorrow, along with all the other goodies from the summer mini!
The embossing folders are so easy to use and make such an impact on my cards, that i forget to talk about how to use them. You simply cut a piece of paper, put it in between the folder. put your cutting pads on the top and bottom of the sandwich, and run it through on "tab 1" using the multipurpose platform.

Now ~ anything that's not a regular die (thinner) goes through on tab 1.. so once you figure it out, it's super simple to do.. and I like simple!

Speaking of simple.... I also have started playing with the new smoosh spray. I just love the lighter colors. I think the dark colors would be good with resist techniques and I cant wait to try those as well. Anyway. When I was done making my card, I simply set my card up in the color catcher and sprayed it. I used two colors here. The white, which leaves shimmery yummieness all over the card, and then a touch of the yellow.... My mom is feeling so crummy, I thought the yellow adds that touch of "you feel yucky". I know this picture is dark, but here you can see just how shimmery the new smoosh spray is! Wicked cool!

I hope this card makes my mom feel better. I'm looking forward to see what the other bloggers challenge members are up to before I head out today.

(rubbah hugs)
Selene Kempton
Thursday, April 29, 2010

Stamping club card

This week is card club here at my stamping studio. Here's one of the projects we made. I just love this stamp set from the new summer mini that will be coming out this Saturday!

Hope you're having a great Thursday!
Wednesday, April 28, 2010

Happy Mail

I got the most beautiful card in the mail last week from one of my BFF's, Robin Merriman.

What an absolute stunning creation this is! I'm so thankful for Robin and for all the friendships I have as a result of stamping. She used the finial press embossing folder here, and lots of mellow moss, with a little artichoke color mixed in.

I'm guessing that she sponged both layers of white with mellow moss ink. She used the gorgeous vintage wheel from the occasions mini (which will no longer be available this coming Friday). and some gorgeous half pearls from the pretties kit. I really love that she made it personal with my first initial. I'm not sure if you get it from the picture, but there's a touch of dazzling diamonds on the flourishes and on the S for my name.

Thanks so much for your friendship Robin and all my stampin' friends! (((rubbah hugs)))

Selene Kempton
Tuesday, April 27, 2010

Card for the Troops Night THIS SUNDAY!!!

Mo's southwest grill is a hotspot for my family and I for FRESH south west style food, at prices we can afford. About a month ago, I noticed that they had no events on their community event board.

So we're taking our card night for the troops this month to Mo's!

Please be our guest and join us this Sunday night at 6:30. I have a whole bunch of card front (swaps) that were donated by my good friend Robin, to be remade into full size cards. I'm supplying everything to finish the cards.

I'm always looking for cards and card fronts to convert if you'd like to help us out! In addition, I'm always in need of envelopes! If you'd like to help, please send me an email at e.selene@verizon.net.

These cards will go right to the front lines, thanks to our friends at Helping Our Troops, Stoneham, MA. Click this link to check out their website.

This motorcycle card is most certainly going in the bin for the troops.. I'm sure there's a few people who ride motorcycles over there, that would be excited to see a card like this one. I made this for a recent swap that I was in with some very talented ladies.

We hope to see you at Mo's this Sunday night, May 2nd at 6:30 PM.. and don't be surprised when we hollar "welcome to MOOOOOooooooo's"

Oh ~ something else.. My team and I are meeting there at 5:30 for dinner first. If you'd like to join us, it's going to be a fun night out!
Monday, April 26, 2010

Big Bow Mojo :)

What a beautiful mojo Monday sketch!

On a personal note: I'm a little sleepy eyed this morning. I'm still recovering from a late night team meeting here last night.... We got to talking and lets just say that 4 of us were here till midnight. I was so wound when everyone left, I didn't get to sleep until sometime after 2am. I have to say... I feel so totally blessed by the friendships that I've developed with the most amazing women ever all as a result of crafting together... This morning when I saw the mojo sketch, I used some of the left over supplies still in one of the boxes from my meeting last night.

We covered all types of faux bow's I could think of, and learned a few new techniques in the process! So fun!

On to the projects.... First, the big bow.. I laid the ribbon down on the table, like it was tied in a bow, but i just draped each side over itself and layered it. I added some linen thread to a button, and "captured" the ribbon, using the linen thread on the back of the button and just tied it. I used glue dots to adhere it to the card.

I've been neglecting the crushed curry color from SU this year... Boy, when you put it with old olive, it's just gorgeous! I added just a touch of ruby red to the flowers, and the used up ALL my ruby red buttons... I may have to get some more before they retire.. This is so darn pretty!

I recently attended a baby shower (where we didnt know the sex of the babies) and I made similar bows for the tops of the baskets we made. This is a really pretty way to make a bow and not feel like you need to tie one.

I ran the green layer through the big shot twice with the lattice die (new in the summer mini catalog from SU) and when I was done, I had a funky edge, so my center images, all needed to be cut down so you wouldn't see the flaw... Love that! When in doubt, cut it off or add another layer of paper to cover it up and keep going! :)

I inked all the images with markers (my favorite way to stamp). What a great way to kick off the week... It's club week here, so i need to get moving on projects today! Happy Monday!
Selene Kempton
Friday, April 23, 2010

Saturday Sketch Challenge 148 ~ My First Christmas Card of the Year

On a personal note: I'm sure to a few of the 411 operators, today feels a little like Christmas Eve. Three of our fabulous 8 team members have earned the Stampin' Up! incentive trip to the Caribbean! Kerin, Robin and Tiffany ~ I wish you "God's Speed" getting to the ship on time, and Safe Travels! Earning the incentive trip is a HUGE accomplishment and I wish you all an AMAZING week of being pampered!

On to the sketch! It's very unusal for me to create a sketch based on a card, but this week, that's what I did. At the end of last month's team meeting at my home, one of the girls on my team asked me about my "brad bow" which I've been DYING to bring to everyone on a video tutorial, I just need to become "up" on the technology first! :)

I created this quick and beautiful card and thought after, how unusual it is for me to put a focal point off to the side like this.. It almost makes the card "difficult" but in it's simplicity, and not over thinking.. I think it really works!

I didn't tie that bow, I actually made a faux bow, by looping the bow over itself and pushing onto the brad. I used a pair of snips and the matte pack to make a horizontal hole through my ribbon and layers 2 and 3 of card stock and put the brad, with the ribbon sitting on it through the hole. I hope to have a video on this... cause it's much easier to see it. I actually have customers and friends saying they'll never tie another bow! (thanks ladies for building me up like that).

Base: Whisper white 11 x 4 1/4", scored and folded in half at 5 1/2"
2nd Layer: Real red, 5 3/8" x 4 1/8"
3rd Layer: Whisper white 5 1/4" x 4" (with the big shot polka dot embossing folder)
4th Layer: Real red, 2 3/8" x 2 5/8" (1/8" larger than layer 4)
5th Layer: Whisper White2 1/4" x 2 1/2"

TGIF~ Have a great weekend!

Selene Kempton
Thursday, April 22, 2010

Bloggers challenge ~Color Challenge Orange/Blue/Moss

It's been quite a week here. We've completely done over the bedroom, made some changes to our living room and my stamp room. This is the first time I've been able to sit down and stamp all week..

Brocade blue is a color I struggle with... but I have to tell you, I'm VERY happy with the way this turned out. This is going to make me play some more, I can tell!!

The photo doesn't show the pumpkin button in the right color for some reason, but it's an identical match to the paper behind the focal point.

I'm really loving this embossing folder, that will be available in the summer mini. I really love this color combination, one I would have never chosen on my own. I'm also looking forward to seeing what the other bloggers challenge members are up to this week. I can't wait to see the creations this week! Have a great weekend.
Wednesday, April 21, 2010

Stepping into 2010 with Style

Stop the presses!!! Stampin' Up! has announced a shake up in color! Amazing new colors are being added, some of the most BEAUTIFUL In Colors from the recent past are returning, and we're saying goodbye to some of the current colors forever!

So ~ First of all, here are some important things to know:
  • The color change will be complete on July 1st
  • Demonstrators will be able to pre-order the colors on June 1st ~ see more about this below
  • Retiring colors will be available through the end of May, and possibly into June. These colors will eventually run out and stampin up will only stock the retiring colors until June 1st. After that, you may not be able to stock up on some of your favorite colors.
  • There will be 5 new in colors introduced every year (that have not been announced yet) and those colors will be available for TWO years
  • There will be new starter color kits, for new people who may attend a workshop and want to try stamping without a huge investment. Which means, it will be much easier to get started stamping right away! Isn't that wonderful?
Click on the sheets below for a printable copy:

First ~ here is the list of colors that will be going out. If you are looking to get any of these colors, I recommend ordering them BEFORE June 1st. After that time, they will be AS SUPPLIES LAST! So you won't want to miss out. I'll be ordering a case of bordering blue.. my favorite with Razzleberry. :)
The retiring colors are: Almost Amethyst, Apricot Appeal, Ballet Blue, Barely Banana, Blush Blossom, Bordering Blue, Brilliant Blue, Brocade Blue, Cameo Coral, Close to Cocoa, Creamy Caramel, Gable Green, Glorious Green, Going Gray, Green Galore, Handsome Hunter, Lavender Lace, Lovely Lilac, Mellow Moss, Only Orange, Orchid Opulence, Pale Plum, Pink Passion, Pixie Pink, Really Rust, Ruby Red, Sage Shadow, Summer Sun, Taken with Teal, YoYo Yellow. click the picture above for a printable sheet.
Now ~ Below is the new list.. Aren't they GORGEOUS??? I will tell you that the Crumb Cake color, is the same as our "Kraft" color right now and it's going to be available in ink and paper, and pastels... Oh so much fun! That's one of my favorite colors ~ and like Chocolate Chip... will match EVERY color in the new collections.It is my understanding that if you own all the markers or pastels, there will be kits available for purchase for you to upgrade to add the new colors if you choose..

If you're like me, and can't imagine your life without the 5 new DELICIOUS colors, Daffodil Delight, Early Espresso, Cajun Craze , Cherry Cobbler, Marina Mist ~ you may want to consider becoming a demonstrator so that you can get all the new goodies (and your retiring favorites) starting at a 20% discount and depending, maybe even saving more than that!

So ~ the in colors that are returning into our CORE colors are...

Right now, when you join the Stampin' Up family you also get two workshop WOW training video's absolutely free! (value $42) I have an amazing team of every day ladies that want a discount on all their supplies, wonderful women who want a part time job so they can take that vacation with their families, and folks who are building a career! Not to mention, the relationships that you build, will last a lifetime!

The friendships I have formed with my customers and team have changed my life. If you already stamp with me, you have a taste of how fun stamping can be. My team meets monthly for card swaps and training, plus we just get together and have fun. If you would like more information on how to join my team, just send me a quick email at e.selene@verizon.net with your phone number and I'll call you to answer your questions, or click here to view a short video.
Monday, April 19, 2010

Mojo Monday ~ just my speed...

This morning's mojo sketch is very cool to work with.. I actually didn't care for my first creation... I pulled it apart and this is what I came up with. I used the smallest oval from my sizzix die, and then used two scalloped circles behind it.

I flipped my white scallops over, so the "scoops" were facing up, like a good ice cream should be! :) I used the flower brad, and cut most of the prong off, then I opened it up, and took some taffeta ribbon and threaded it around the base (which was open. I stuck some glue dots to the bottom and adhered the whole thing to my card. I added dazzling diamonds to the top of my ice cream and the brad.. and I also put a floating stone on top of my brad to add some bling.

A close up of my ice cream cone shows that I used two markers to ink my stamp, close to cocoa for the whole background, then I added the accent lines with chocolate chip.

The island oasis paper.... I only ordered one pack because I wasn't sure that I was going to love it, and I most certainly will be ordering a few more packs... Working with these colors are so summer, and that's the time of year I just love!

School Vacation week, so I'm all done talking! I hope you all have a great week!
Friday, April 16, 2010

Saturday Sketch Challenge 147 ~ Farm Life

Hey Everybody! I'm very excited to bring you another awesome sketch from the operators at stamping 411.

In March, we took a long road trip to northern New Hampshire, and I was flipping through a Stampin' Up catalog... when I realized there was a stamp set that I missed! I had NEVER seen this set, Farm Life, located at the bottom of page 93, used by anyone, nor do I remember seeing it in the book.. Isn't that strange? So ~ I ordered it! :) When I looked at today's sketch I thought that this set would fit the sketch perfectly, although I had something completely different in mind when I created the sketch. I'm so pleased with the outcome of this...

I stamped the image in my timber brown stazon ink, and started adding colors with markers and a waterbrush from there. I colored on a ziplock bag, and picked up the color adding colors to make the ground and the sky.. I think I used about 8 colors from the earth elements color family. After adding diluted color, I drew in some darker lines and diluted that with the waterbrush... When I got to a certain point, I stopped.. Good design is sometimes knowing when to stop. :)

The background is the medallion stamp set, and I used versamark ink on Ruby Red cardstock to make a slightly darker impression/water mark.

Measurements:
Base: 11 x 4 1/4" scored and folded in half at 5 1/2"
Layer 2: 4 x 3 1/2"
Layer 3: 3 3/4" x 3 1/4"
Layer 4: 3 3/4" x 1 1/2"

The ribbons... I got the idea from Karen who played along with the operators last week and I loved what she did with her grosgrain ribbon.

I'll be away this weekend, but I cant wait to see what you all come up with when I return!
Have a Great Weekend!
Selene Kempton

BK's in the HAOUUSE!

Okay.. If you know my husband (aka BK) this is SO him! He does have the cool Hawaiian garb that he sports when we're vacationing.. and he's an all around great guy.. When I saw this paper.. I couldn't help to put it with King of the Grill to make yet another BK inspired creation.

This week's bloggers challenge is a sketch challenge from our list mom Lisa! Gorgeous sketch! I had fun, and I'm headed away this weekend to watch the hubby bowl up in Burlington VT.

Have a wonderful weekend~
Tuesday, April 13, 2010

A Sympathy Card for Elisa's Cousin

I think that if my stamp set "lovely as a tree" were to ever make the retirement list, I would never part with my set.

I have had a very good customer for the last 8 months.. She's returning home to France in just a few weeks. She came over to pick up some gifts for coworkers this past week and told me she needed a sympathy card for her aunt. She has only met her aunt once, but there was a very bad car crash and her male cousin of 19 years, didn't make it.

So ~ what else could we do? We sat down and made this card.I used the thumping technique to ink up this Mighty Oak.. Meaning.. I used 3 colors.

The first color (more mustard) I just colored the entire top of the tree. Then I added two other colors, ruby red and pumpkin pie and "thumped" them onto the stamp in a drumming type motion. I inked the bottom of the tree in chocolate chip and added some details to the branches that you can see in the detail of the stamp.

I "huffed" my stamp to remoisten the ink (remoisten similar to cleaning your eyeglasses) and stamped it onto very vanilla cardstock. Next, I spritzed this layer with water, and spritzed the back also so my cardstock wouldn't curl up...

***note, whenever you do something to paper that makes it warp (heat or water), if you do the same thing to the other side, it will fix the problem. :) We set that aside to dry and worked on the rest of the card.

We toyed with adding other colors to the base, but the chocolate and ruby red really pops against the vanilla.
We added ribbon, but didnt want a bow, to keep the card more on the masculine side. We used the finial press to dry emboss the front of the card after we stamped the most appropriate sentiment. I'm so going to miss my friend Elisa when she returns to France.. There's something about sitting and creating a card together for something so personal that brings a couple of crafters together.

Making a card with a friend is much better than doing it alone!
Monday, April 12, 2010

Mojo Grillin


Here's a sneak peek at some of the goodies that will be available next month.. First.. King of the Grill!

For those of you that know us personally, my husband Brian, really is the king of the grill. He astounds our friends with his latest culinary creations!

His greatest dream is to some day open a diner for Breakfast and Lunch.. This would be a perfect card for him.

When he saw this stamp set, he said.. Oh "I have to have that! The grill looks like a hot rod." Because he'll only ever admit to "helping me" I'll did a quick double take with that one!

I love this designer series paper in this case.. it looks like flames from the grill. I still might go back and add crystal effects to the grill... if I do that, I'll swap the picture out tomorrow. :) The embossing folder is a new one from the summer mini... I really like the masculine feel of the design. I got the color combination from my friend Tiffany. I explained that somehow I ended up with quite a bit of brocade blue on the shelf ~ and she suggested this color combination.

Happy Monday!
Sunday, April 11, 2010

Oh Baby, Baby, BABY!!!

Today was a wonderful day. I spent some time with family celebrating new babies on the way. My hubby's cousins (who are sisters) are both pregnant.

One sister is pregnant with one and does not want to know what she's having, and her sister is pregnant with twin boys!

Stamps:
Fox and friends, page 31 of the occaisions mini
Paper: Whisper white, bermuda bay, soft suede, and Bride DSP.
Ink: Bermuda bay, soft suede
Accessories: latte buttons, soft suede polka dot grosgrain ribbon, glue dots.

I cut two giraffes, (one for each baby) and then attached them with dimensionals.The striped irridecent pattern on the front is from the "bride" designer series paper. So Darn Pretty to work with!!! I ran regular sewing thread through the button to tie my "faux bow".. Meaning.. I didnt actually tie a bow. I looped it over onto itself to make it look like i tied a bow.. I think the thread on top, coming throught the button makes it so delicate looking!

I really love the triple tag... Hello Baby.. Baby... It's going to be fun to have 3 new babies in the family!

Friday, April 9, 2010

Saturday Sketch Challenge 146

Another fabulous sketch from the ladies at Stampin411! This week, I decided to play with crystal effects. One of my Most FAVORITE tools in the studio.

I have done all sorts of fun things with crystal effects... Would you like more information?? Well... I actually did an inspiration sheet ALL about crystal effects for my customers (a long time ago). Click here to check out the printable sheet, and discover why I will ALWAYS Love working with Crystal Effects!

So moving right along. First, here's the measurements.

Base: rich Razzeberry 11 x 4 1/4", scored and folded in half at 5 1/2".
Layer 2: Bordering Blue 5 1/8" x 3 7/8" ** note this is 1/8" larger on two sides than layer 3.. don't over think it.. :)
Layer 3: 5 x 3 3/4", then embossed with the big shot using the polkadot embossing folder.
Layer 4 3 1/8" x 4 1/8" and eyelet border punched across the top.
Layer 5: Shimmer white, sponged with razzleberry ink, 3 x 3 3/4"
Layer 6: Embossed and cut out flower from 5th avenue floral stamp set
Layer 7: Celebrate, stamped from Matchbox Messages, and punched with the mini tag from the mini

Other supplies: Whisper white satin ribbon, clear rhinestone brads, paper peircing matte, paper snips, stampin dimensionals, tombo multipurpose glue, crystal effects, blender pens, bordering blue and rich razzleberry ink pads, and versamark.

Now lets talk about this gorgeous, crystal effects, shimmer white cardstock flower!

Here are the directions for my crystal effects flower.

  1. I embossed the flower from 5th avenue floral on whisper white cardstock and cut out the image.
  2. Use a blender pen to add bordering blue ink (from the ink pad) to the "inside" edges of the flower.
  3. Draw a line with the rich razzleberry marker on the inside edges, and lightly spritz the whole thing with water to get the colors to bleed. Let dry.
  4. Sponge the outside of the flower with rich razzleberry.
  5. stick this to the sponged layer of shimmer white cardstock.
  6. Paint a thin layer of crystal effects to seal the top. Walk away and let this dry completely for at least 1 hour.
  7. Come back and drop a LOT of crystal effects on the top so you're covering the whole flower and finish assembling your card.

Bloggers challenge ~ Altered item

This was SO simple to do, I feel like I cheated! I've had this plain jar floating around my stamp room. I put all my ribbon scraps in it, then when I'm looking for a small piece, I go to the jar first! Well, I got my preorder for the summer mini catalog that will be coming out in about 3 weeks. Sitting in my preorder were these decor elements chalkboard labels.

Well you're in a craft studio... My ribbon jar shouldn't go undecorated, now should it? Now I just need to work on my "chalk" handwriting. :) I was thinking I could do wine bottles and jugs that end up at my house from my great customers who like a little vino while they stamp. When the wine is gone, i'll be able to reuse those containers and have them labeled appropriately. If I decide to turn this jar into something else, I'll just use my stampin mist to remove the word ribbon, and using {my daughters sidewalk chalk again} write something else on the jar! Way fun!

I'm so looking forward to see what the other bloggers challenge members are up to this morning. TGIF!

I'll be in the studio stampin this morning!
Rubbah hugs,
Selene~
Wednesday, April 7, 2010

Published!!!

Well I finally got my complementary copy of Just cards, April, Issue 17, Page 40..... A few of my good stamping buddies let me know that, I'm published!!

Now that I've been able to confirm which card it is... I thought I'd give it a post here! It was one of my sketch cards for stamping 411! Way cool! Here's the original post..

~~


Well, it's Saturday morning, and that means it's time for a little stamping with the operators. This weeks sketch is so easy, it should be illegal!

No, really, it's very simple.

Sometimes I think it's actually easier to make a card with more embellishments. It takes a certain amount of self control and discipline to know when to stop.. That can be the fine line between good design and disaster!

With that in mind, my creation this week uses 3 different stamp sets.. Chalk pastels, sponges, a chocolate chip ink pad, and crystal effects with a paint brush...

I started with a piece of cardstock measuring 3.5" x 4.75" I stamped the new medalion background stamp with versamark. I then took a stamping sponge and picked up three different colors of chalk pastels and used a swiffer~dry cloth to remove any excess.

Once i was happy with the medalion, I stamped my horse 3 times. I did not ink up in between. I stamped the darkest horse on the far right, stamped one in the middle and then the lightest horse towards the left.. Doesn't this horse look like he's running? I stamped my sentiment, used a few layers and stuck everything together and i was done in under 20 minutes!

I applied the crystal effects liberally, and let it dry overnight.
Monday, April 5, 2010

Easter Monday

My little one has today off from school due to Easter Monday.. I snuck a quick mojo card in before we head out for "mommy and me" day. I really love how this card came together. I made a new friend over the weekend and plan on sending this card her way. She invited me and the family up for dinner on Saturday. We colored eggs, and had fun with the kids. Sometimes, it's just nice to send a note along to say thank you. We had a wonderful day.

I will say, to make the "hill" I used the negative, from the big shot oval I cut out and just used my marker to draw the line. I had left over bling from the easter egg kits, so that's all the stones on my tree and the three stones for following the sketch on either side..

So ~ We're off.. Have a wonderful Easter Monday!
Friday, April 2, 2010

Saturday Sketch Challenge

I hope everyone has a wonderful Easter and Passover this weekend. I'm wishing you great times with family and/or friends!

It's time for another Saturday Sketch challenge from the operators at Stamping 411!

Cardstock and Measurements:

Base Layer: Whisper white, 11 x 4 ¼” scored and folded in half at 5 ½”

Layer 2: Old Olive 5 ¼” x 4”

Layer 3: Pink Passion 2 1/8” x 2 5/8”

Layer 4: Whisper White 2 x 2 ¼”

Layer 5: Bashful Blue Modern Label Punch

Layer 6: Whisper White “very thankful” punched with the word window punch


I had a blast making this card. I used versamark for the medallion background. Then I ran a piece of 1/4" white grosgrain ribbon across, and cut a little piece off on the back to tie my knot, which I attached with a glue dot. I used my Stampin Up Tabletop paper trimmer to slice a tiny piece of whisper white, which I threaded through my button to make it look like thread.. I used a glue dot to stick the paper on the button on the back, once it was through the holes. Then I used one more glue dot to fasten that to my card. The focal point was sponged, top and bottom with bashful blue (for the sky) and old olive for the ground.

Because I can't seem to put a good sketch down, I made a second card I need in the next week.

The approaching holiday makes me thing about, and take stock in all the beautiful people in my life, from family, to friends and customers, to internet stamping buddies, I wish you all a blessed holiday.

Rubbah hugs,
Selene


Bloggers Challenge ~ Easter and my pink bunny

Happy Easter Everyone! After my team meeting this month. One of my girlfriends was asking me about fun things to do with glossy paper. I showed her this fun and cool polished stone technique.

I have a thing for making this traditional Chocolate bunny stamp PINK! She needs to be pink!

When we were done with the polished stone, I covered the entire piece with glassy glaze embossing powder, so I wouldn't need to heat set my silver metallic ink, which doesn't seem to show up as well in this photo.

I can't wait to see what my girlfriends from the bloggers challenge have come up with for this week. I hope you have a nice relaxing weekend with family and/or friends.

Rubbah hugs,

Selene Kempton~