Showing posts with label 3d. Show all posts
Thursday, September 23, 2021

That was so fun! FREE Halloween Giftable Online Workshop Replay

Hello Friends!

Last night's online workshop was SO much fun! My awesome daughter, Alexis, helped by manning the keyboard and we had a wonderful time sharing four 3D projects and laughing the night away.


Below is a replay of the live video. If you haven't subscribed to my YouTube channel, please click the bell while you're there so you don't miss a thing! 


It's not too late to grab a kit. The party will remain open until next Wednesday night. 


Want a precut kit and PDF for this class? 


  • Spend $35 Merchandise using host code EVUEHATD: Get the pre-cut packets in the mail, with the pdf directions emailed
  • Spend $60 Merchandiseusing host code EVUEHATD: Get the pre-cut packets in the mail, with the pdf directions emailed, plus a full pack of the Matte Black Dots as a bonus.


Don't forget there's one week left to Sale-A-Brate, so you'll also get a free item with any $50 or $100 respectively.


LINK TO ORDER

COMPLETE SUPPLY LIST PDF WITH LINKS


Want to join my team and pick out your free bundle? 


Click here for details about being a part of my team. Why not grab a discount on all your stamping purchases and join the best team community in Stampin' Up!?


Here is the video replay from last night's party!


Thank you so much for stopping by!  I hope you love these projects as much as I do!


Love,

Selene

Friday, July 28, 2017

Stampin Up 3D Thailand Swap using A Little Wild Clear Mount Bundle, Post It Note Holder

Hello Friends!

What a crazy trip it was on the Thailand incentive trip.  We easily came home with $500 in Stampin' Up Products, that I can't wait to break into and start showing you, but first things first.

I am committing to you, my readers to do a Friday Fun Video, once a week!  This is my very first one and I am showing you how to make these cute Post It Note holders.  They were my swaps for the incentive trip.

Here is a shot of the front of the post it note holder:

And this is one of the cute bum bow:  Isn't he cute?


Here is a shot of the inside of the post it note holder: 

Finally, here's a video that shows you all the measurements and how to put them together quickly:  These videos will come out every Friday night!  

Thank you so much for stopping by tonight!  Below are the links if you need any of these Stampin Up products. Thank you in advance for your purchase if you're feeling inspired. 

Love,
Selene Kempton


Wednesday, April 22, 2015

Stampin Up Hawaii Grand Vacation Blog Hop


Aloha!  Welcome to our Hawaii Grand Vacation Blog Hop! 

 You arrived here from BJ Peters blog.  I just love her work!  

This blog hop was created to celebrate our achievement for earning the Grand Vacation.  I have been a demonstrator for 9 years, and I'm so grateful to have the opportunity to take amazing vacations with some really wonderful people!  

My husband Brian has always said that it's too bad that more people don't have the opportunity to experience a trip with Stampin' Up because they would try for it every single year.  I couldn't agree more.  It's more than just a vacation.  It's time spent with amazing people that I appreciate and value.  Over the years, many of them have become like my family.  I am inspired by them and totally grateful.  When I go on vacation, although I'll be on a trip somewhere crazy-awesome, I always seem to turn around and know the people sitting beside me.  That is such a blessing and comfort.  Not to mention the countless stories of people helping each other out.  
"Oh your a demonstrator, can you hold my purse?" 

We've been lucky enough to travel to some pretty exotic locations and this one is no exception.  

With all of that, being on a blog hop with all of them...

No pressure, right?  

Let's just say that I made this cute bookmark and box first, and decided to make another Hawaii themed project before deciding which one to post.  Then, just went for it.  So, I'm going to share both of them.  This time of year, I always try to do something with my clubs to thank them for their friendship and business.   We will be making three projects this month, including these two.

To start, how about a pretty bookmark for the plane?  With about 12 hours of plane time to look forward to, I will be catching up on the reading I've been putting off forever.  

 I started this project by taking 4 pieces of 8 1/2 x 11 and cutting them in half.  I used a half of a sheet of


  • Whisper White
  • Hello Honey
  • Mossy Meadow
  • Blackberry Bliss


I just ran them through my big shot (all at the same time, one swipe) with the Flower Frenzy BigzL die.  (133728)

When it came out of the big shot, i just crumpled up all the layers, grabbed a bone folder and started manipulating the leaves with my fingers.  The crunchier you can get the layers, the prettier it looks (like in real life).


In between the layers, I attached some with Stampin Dimensionals (for height), and some with fast fuse (flat).  To attach the ribbon, used fast fuse, then put paper in between and fused the paper layers together so it wouldn't come apart.  About 6 of the layers went together with dimensionals, I just put them in intermittently and didn't spend too much time making it perfect.

Next, I pulled some of the leaves apart and used some liquid glue to adhere them in between the layers.

When I finished making my bookmark I had a ton of layers left over, and wanted to make this into a gift item.

I grabbed my window boxes (note**these are on the retirement list that released yesterday), and stamped the side with the Bordering Blooms Stamp Set.  I did that before I put the box together, and stamped it right across the seam on the side of the box.

I love how it was instantly decorated.  I stamped it twice and added a flower, and it is so pretty!  (happy dance).
Here's a look at the front of the decorated box with the bookmark inside.  I finished the top of the flowers with a large Vintage Faceted Button 127555, and just used white bakers twine to make a bow.  I attached those buttons with glue dots.
 I hope you like it!  They are so fun to make!

I also wanted to make a card.  It started out as a "matching" project, and now, not so much. I still love it and wanted to share it with you!  I have tiki lights hanging in my studio that have Hawaiian Hibiscus Flowers on it.  Here's what I came up with .  I did something I rarely do and used 3 different stamp sets on this card.  It was about making the flowers...

124207 Flower Patch
126447 Summer Silhouettes
134300 Blessed By God


I started by stamping the sentiment in Blackberry Bliss.  I used Rich Razzleberry Ink to stamp the base of my flower, and added the dark center with Blackberry Bliss,  I added the long stem to make my own hibiscus flower.  Finally, I added the cute flower images in the background with Lost Lagoon Ink.  They remind me of the flowers you blow to make a wish!  

Next stop on the hop is my friend Georgia Giguere.  I can't wait to see her project!


Blog Hop List

1. Brian King  
13. Dena Rekow 
15. Alisa Tilsner  
16. Tami White 
18. Bec Ross 
19. Ann Craig 
 26. Betty Button 


Thank you so much for stopping by today!
Love,
Selene Kempton

Stampin' Up! Creative Coach
My Online Store

Wednesday, June 4, 2014

6/4 Gratitude Jar, MDS

Good Afternoon!

I have a few minutes here so I thought I'd share another project with you.. That's two in one day! Gasp!

This jar didn't take me too long to make today, but it's been in my studio since JANUARY earmarked for this project.  Guess I was just waiting for stampin up to come out with a 2" circle punch, which I received today!  

I typed up the "count your blessings" in My Digital studio and printed it on shimmer white paper.  It fit the brand new punch that arrived this morning, via Mr Brown with a big red sticker (for overnight delivery).  I couldn't wait to get my new goodies.  I have two stamping events left this week, and I want to make some samples!!

This is a very special project that I stamped for my best friend, to let her know how much I think about her.  I completed it with the first slip of paper for her jar with my gratitude for her friendship.  The idea behind a gratitude jar is, you write what you are thankful for and stick the papers inside the jar.

Then, when you're having a bad day, you can take all the slips out and remember what matters most.  I love that.  This one is a gift, but i'll be making a replica to sit in my studio so I can write all the things I am grateful for too, like YOU. 

Thanks so much for stopping by today!!


Love,


Selene Kempton
Stampin' Up! Creative Coach
Thank you for your orders with me  Shop here anytime!

Thursday, February 6, 2014

2/6 Stampin Up Starburst bundle Pouch, Valentine's Day Treat DIY

Good Morning Friends!  

Just a quick project share that I made with the Starburst Sayings bundle.  Once a month I go to housing in a town nearby me and stamp with the residents in two locations.  That day really fills me up!  I love the people there and it warms my heart to see them.  This month, I wanted to make some projects that THEY could have themselves and to let them know how I feel about them. 

I snapped this photo with my phone, and enhanced it when I got home so I could share the project with you. 
1) I started with a 12 x 12 sheet of real red cardstock and scored it at 5 and 7".
2) Then, I flipped the paper and cut at 4" twice.  So that gave me 3 bases to work with for my candy.
3) I attached the topper to the back of the package which is just the largest Oval Collection Framelit Dies and that was cut from the Fresh Prints Designer Paper pack.  They are cut to 4 1/2" x 6 1/2" so I could cut one piece per person, with almost no waste
4) Next I cut a medium cello bag down to 4x5" and just used sticky strip to stick it inside my pouch.
5) the front layers are 5x4 in coastal Cabana and 4 3/4" x 3 3/4" whisper white.
6) the coastal cabana 2 3/8" scalloped circle punch
7) the sentiment comes from the Starburst Sayings bundle.
8) We attached the front with a piece of velcrow
**tip** if you're ever making a paper craft project and your velcro is too sticky, just trim the fuzzy side a little with your scissors and it makes it easier to open and close your treat pouch!
9) Finally I have each resident 3 Ghirardelli chocolate pieces to put inside their pouch.  Many ate the first one!  :)  Can you blame them? 

Do you have someone that might like a little treat so they know how much you care?  Try this fun little pouch with a surprise inside! 

Thanks so much for popping in here today.  See you tomorrow!

Love,

Selene Kempton
Stampin' Up! Creative Coach
Thank you for your orders with me  Shop here anytime!
Wednesday, March 27, 2013

3/27 Everybunny Scalloped Envelope Die, Easter Basket.

Hey There Stampers! 

How about a little Easter basket for you?  This basket is made from the scalloped envelope die.  I made this in my Easter class last week.  It's really fun to make these boxes. I cut 4 of the envelope dies, cut one of the flaps off and glued the 4 of them together. 

I layered some 2 x 3" pieces of designer paper on the outside of the box to decorate it! 

The chickadee is from the Everybunny stamp set.  Isn't this the cutest little box ever?
It goes together in just a few minutes and is oh so adorable!  :)   I just love the colors here!  baja breeze, tangerine tango, and rich razzleberry!

Thanks so much for stopping in today!

Love,
Selene Kempton
Stampin' Up! Creative Coach
My Stampin' Up! Store
 
Thursday, March 21, 2013

3/21 Stampin' Up! Hello Mr. Bunny Love, punch art Gift card Holder.

Good Morning Friends!
I was so surprised when I sent out the email for this Friday's class, the sheer response I would get from Mr. Easter Bunny (I've been calling him bunny love).  I saw this bunny, or a close rendition of it on Pinterest and it was by fellow demonstrator Pam Staples.  I didn't save the picture... ugh! but if you have a link to hers, please leave it for me and I'll link back to it. She had it in baby blue and pinks and I believe hers was a box. 

It's so cool how we can all inspire one another.  I used this bunny last week in scrapbooking class, and everyone loved him.. So, I thought an with an Easter Themed class we'd make one.

I used 3 colors of paper: Whisper white, Pool Party and black. All white and pool party pieces were sponged with Island Indigo classic ink.
For this project you'll need a white gel pen for sure!  It really brings the bunny to life! 

Big Shot:  Top Note Die 113463, and heart collection framelits for the nose (smallest one) 125599

Here's a list of all the punches I used:
119859 Extra Large oval x6 (whisper white ~ 4 ears, 2 feet)
119855 Large Oval x2 (pool party ~ 2 ears)
119868 1" circle (pool party ~ 2 feet)
117193 small heart punch (pool party ~ 6 feet)
119860 1 1/4" circle punch (whisper white ~ 2 nose)
119873 3/4" circle (black ~ 2 eyes)

So, for the front of the bunny, I just sponged all the pieces and stuck them together with the tombo, multipurpose adhesive liquid glue.  I sliced 3 very thin strips of whisper white on my Stampin' Up! paper trimmer, and used a dimensional to hold them down on the front of my bunny face.  Then I stuck the two center circles together to form the nose.  I also added two dimensionals to either side of the circles and popped up the nose.    On either side of the nose I added some marks with a grey marker.

If you need supplies to make this bunny, I am running an online party right now!  It's a mystery hostess event and someone is going to win some fun hostess benefits!  For more details on that click here!
Don't miss out on Sale-A-Bration!  Every single year I get someone who forgot to place an order to get their free goods!  After tomorrow, I won't be able to help them either!  For more samples with Sale-A-Bration sets, just click here!

Oh! I almost forgot!  To make the "gift card holder" piece that the bunny sticks to. I cut a piece of 12 x 12 down to 12 x 4".  I scored the paper at 2" and 6" and folded the paper up into itself and cut the holder and the base of the card all in one swoop!  (I might need a video to show that, but if you just try it... you'll see it's not that hard).  You could so do it! 

Thanks so much for the kind comments and for coming to visit!  See you tomorrow with some more fun from the class coming up tomorrow night.  Oh and don't forget to join the online party!  For more details on that click here!

If you're local and want to take this class, please hurry on signing up (click here)! At the class everything will be pre-punched for you. Signup deadline is today! 

From the heart,
Selene Kempton
Stampin' Up! Creative Coach
My Stampin' Up! Store 
Friday, February 15, 2013

2/15 Stampin' Up! Hello Kitty Punch Art Box, Oval Framlits, Heart punch, Flower punch, Valentines


Good Evening Friends!  

I made 22 of these cute little "Hello Kitty" Boxes for Alexis to bring to school yesterday on Valentines Day! 


  1. The base of the box is the Fancy Favor Box by Stampin' UP!
  2. I cut the largest sized oval (that's not a scallop) from the new Oval framelits.
  3. Then punch two full hearts and stick them to the back of the oval to make Hello Kitty's ears.   
  4. Next, I took some pretty in pink ink, and sponged it all around my kitty to add some color. 
  5. Her nose is the small oval punch.  I sponged it with Summer Starfruit ink. 
  6. Her eyes are the 3/4" circle punch. I added the eyelashes with a black marker, and the white lines to make her eye's sparkle with a white gel pen. 
  7. The bow, is one of the petals from the flower punch, I cut the bottom of the petal off and it sort of looked like a hershey kiss.  Then I cut the tips off, connected them and added a 1/2" circle on top.  That was all made with the real red glimmer paper.  
  8. The whiskers, I cut on my table top paper cutter.  First I cut strips to 4 1/4" down the middle, then cut 1/8" strips to make my whiskers.
  9. I grabbed my scalloped dotted border punch to make  the handles.  I made them all out of one 12 x 12 inch piece of whisper white card stock.    
  10. The tags for the boxes were so easy!  I just cut them out of the valentine paper which had these gorgeous hearts already cut!  Easy peasy!  I stuffed them with toys and candy (peanut free for one of the children to be safe).
I snapped the two photos with my phone.    Here's a photo of all the handwritten tags for the children.  Alexis wrote them out.  She also cut all the big shot stuff and helped get the packets ready for assembly.  I was up till midnight on the 13th with my big strong hubby who helps me knocking these out!  :)


Here's another view that shows the handle better.  Isn't she cute?!?


Thanks so much for stopping by today!!
Much Love,
Selene

Friday, February 1, 2013

2/1 Catholic School Week and Teacher Appreciation Gifts with Pretty Petites from Stampin' Up!

Good Afternoon!

I'm SO excited to finally start to be able to share some of the things I've been working on!  What a busy bee I have been. 

This week was Catholic School Week and today was the Teacher Appreciation Luncheon.  It started out with a notice that came home from school asking for help at school during the lunch, so that the teachers could share a meal together.

I happened to be working today during lunch with my fabulous stamp club meeting ending today, so I couldn't help during lunch, but I called the coordinator to see if I could help donate something anyway. 

During the course of my conversation I found out that they really didn't have anything to give the teachers and I asked if I could make them a little something crafty so they know that they are appreciated.  In my daughter's school, there  are 20 regular teachers and 5 specialties, so I made 30 of these boxes to cover administrators and substitute teachers too.  What, might you ask did I give them a little box of "stuff" for?  Well, I found a few of these online and did a little shopping.  For the items I could find, I made a little poem so the teachers would feel the love and appreciation.  Really, this project took more time collecting my scavenger hunted items than it did to put the 30 boxes together!

Here's a look at the poem:
Again, these are just the items I could find.  If you search for "teacher survival kits" on pinterest you could probably find a whole bunch more items to fit what you have in your pantry already!

So, I mentioned that these 30 boxes went together pretty quickly?  Well, me and my stampin' pit crew (Brian and Alexis) were able to assemble and decorate these on Saturday in about 2 hours!  Here's what we did. 

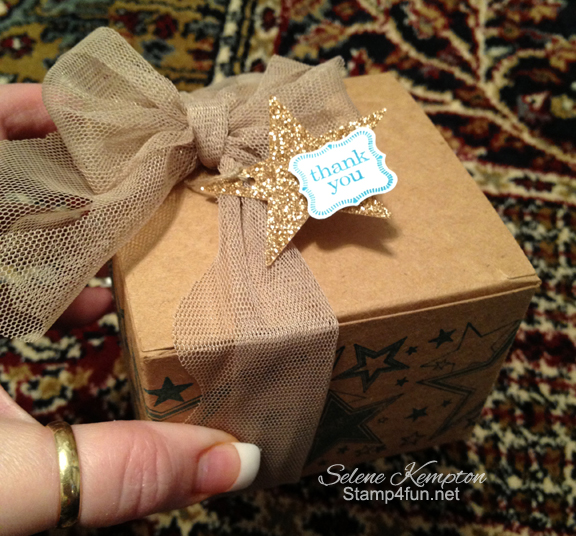
We started with a wheel.  I know this one is retired, but I wanted stars for the school teachers.  They are so amazing and each star transforms our children into future stars.  I always chuckle when my daughter comes home from school and I can hear her "sound like" her teacher Mrs. Sech.  It's very subtle but so adorable how her phrases imitate what she hears from a mentor.    I didn't have any ink for my wheels, but it didn't matter.  I used an ink pad and it was perfectly long enough to wheel up half my box at a time.  So two zips of my wheel and I had a decoration on my box! 

Next, I added a piece of blue card stock to the bottom of the box.  I didn't want the paperclip to make it's way out of the box or fall.  Plus it made my box a little more sturdy.  I cut the paper to just a little smaller than 3.5" square.  Do you see the blue paper in the bottom of the box?  It's in there! 

These kraft colored boxes are absolutely fabulous!  You get four of them in a package for only $2.95.  How can you beat that?  It comes with directions on assembly, and you really do want to take a second to look at the sheet because they fit together perfectly that way.  It would be very easy to decorate these boxes with a strip of designer paper, or stamp on them, cover them, put them in a bag and tie them up with a bag topper! the possibilities are endless!
Sorry to show retired products that you can't buy again, but I found some leftover ribbon from the holiday mini to package them up with.  I love tulle because you just need to know how to tie your shoes, then fluff and you have a bow that is boutique beautiful!  

Next, I added a star punch.  I know we don't sell those anymore but I have a few if my local ladies need one.  :)  I got them on the clearance rack.  Speaking of, there are some amazing deals on the rack this week including $1 content disks for my digital studio!  Click here to check it out.   

Finishing the box, I pulled out my BRAND NEW stamp set from Sale a bration called pretty petite's (item # 129642 for clear)  It matches the SAB punch perfectly!  :)  I stamped and punched the thank you's, then added them to the stars with a dimensional.  Punch a hole in the star and tie them on with the easy fluff ribbon!  Yea Buddy! 

The BEST part of my day today was a text I got from my good friend Pam who teaches kindergarten at my daughters school thanking me for her box.  She said they didn't have to tell her who made them (my name wasn't on them).  She just knew it had to be me because of the quality of the gift.  Wow! 

I feel totally blessed to be able to share what I love and help others enjoy creativity while helping my family.  I can do all of this as a stay at home mom and be here for my daughter after school and through dance class.  I'm very grateful to Stampin' Up! for the vehicle to make a difference, even for something as small as an appreciation gift.

LOTS more to share over the coming week!  I've been a busy bee with my split coast "creative crew" design team things!  I cant wait to share more!  See you tomorrow!

Love,

Selene
My Stampin' Up! Store
Tuesday, December 11, 2012

12/11 Sweet Original Design Gift Card Holder Template, Stampin' Up! ~ 25 Days of Christmas Day 23

Good Morning!

Do not adjust your monitors!  I'm back!  I know that I have been MIA and I've started getting emails, lots of emails, {wow} asking where I am!  Well, I'm here!  (Thanks for writing!)

I have been working like a mad person with the holiday crunch, a workshop for my friend Kelci this past Sunday.  An ornament class, 10 handmade ornaments and 25 original gift card holders for the local florist who needed some things for her holiday stroll this past weekend.  I'm here, but I'm working like crazy!

Did I mention that I made over 100 Christmas cards last week for my clients and friends and I'm working on getting them in the mail this week.  For some of the cards, I even made the envelopes!  :)

Alas, but no partridge in a pear tree, thank goodness!  {chuckle here}  I wouldn't know how to take care of one!  :)

I have been busy, and I know my blog was a little neglected.  Rest assured I have SO much left to share with you!  This little prized project was one of the projects from my workshop this weekend.   All the ladies at the private class will be getting the pattern in their inbox for taking the private class/workshop.

For this simple gift card holder, I got a picture in my head, drew it out on cardstock, scanned it, redrew it in adobe illustrator, then saved it as a PDF.  Then I was able to print it out on cardstock and cut and score where I put the specific lines.  Now, it's VERY easy to put together.  Just cut on the solid lines and score on the dotted lines.

You'll need a piece of velcro to keep the box shut, or you can just make a belly band out of paper, or tie a ribbon on to keep it closed.  Super duper easy peasy!

When we assembled it this weekend at the workshop, we used the new trimmer from Stampin Up.  In some cases we could cut, then score without even moving the paper, the way the holder is designed.  This project went very quick in class even though I only have one paper trimmer.  Click here to shop in my store for this cutter and for a short video to show how it works

Now ~ I can show some more examples when I get down to the florist and snap a photo, BUT, if you want, you can substitute some of the tags from SU and they fit across the top of the gift card holder perfectly and can become the top of the box.  You would THINK I planned it, but it just worked out to be the exact same size.  Isn't that funny?  I will get you some pictures of that.

This designer paper is just gorgeous!  I had a bunch left over from the breast cancer event, and now, I'm almost out!  :)  In fact, I'm almost out of every ounce of designer paper!  I've been a busy little crafter I guess. 

The ornament was cut from a different pattern of the DSP, It's called Natural Composition Specialty DSP.  It comes already embossed.  I just added some ink with a sponge dauber and wiped the excess with a paper towel.  I cut the ornaments out with my framelits, and I was off to the races!  :)

Would you like to get this gift card pattern?  Well, I'm giving it for free with every $25 purchase this month.  So you get the pattern AND you get to shop!  Love that!  :)  For those of you who already made a purchase with me this month (minimum $25), check your email for the pattern!  I've already emailed you the PDF.  {I also send a thank you card in the mail for every online purchase, so you should look for those as well, they've all been sent}.  For the template, just print it out using your printer, cut on the solid lines and score on the dotted lines.  I put mine together with tombo liquid glue, but you could use red line sticky tape if you have that on hand too.  You can print this onto any card stock you happen to have laying around.

For those who choose me as your Stampin' Up! demonstrator, a big thank you to you!  I'm working on getting my cards in the mail over this week and next week so please watch for them and I'll see you very soon.  I've been a very busy stamper so I have LOTS to share!

Tonight is my monthly team gathering and swap.  We are swapping cards and scratch tickets!  Maybe we will all get some extra stamps for Christmas! :)  

I hope to see you again here tomorrow!  Same bat time, same bat channel!  :)  I WILL finish the 25 Christmas projects (even though I've started playing with my preorder stuff for January already! :)

Big hugs to you all,
Selene Kempton, Creative Coach


Sr. Manager
My Stampin' Up! Store / 25 Days of Christmas Projects!
Wednesday, November 28, 2012

11/28 Stampin Up! No Peeking Gift Card Holder 25 Days of Christmas Day 22

Good Morning Friends,

Today, at my stamp clubber(s) requests, I'm posting the directions for for this cute gift card holder we are making in stamp club this week. In the sample I used in club, instead of using designer paper on the back panel, I used very vanilla card stock, so that someone who was giving a gift card would have some room to write a personal message. 

So, let's get this party started!

To make the belly band:

Layer 1: Cherry Cobbler Card stock 9 1/2" x 1 1/2"
Layer 2: Be of good Cheer DSP (today is 20% off) cut to 9 1/2" x 1"
Layer 3: Very Vanilla  Decorative Label Punched "no peeking layer:
Layer 4: 1 3/8" square punch, champagne glimmer paper.

Attach the strips together using snail adhesive.  Then score the belly band at 1 1/4" and 5 3/4" and use tombo multipurpose adhesive to stick the two ends together.

Next, I used some champagne glimmer paper to punch out a 1 3/4" square, and added some cherry cobbler seam binding to make it look like a present.

I just added a glue dot to the ribbon and folded it in half to make it thinner, then adhered the ribbon to the back.  Stamp the "no peeking" sentiment on very vanilla cardstock and punch it out with the Decorative Label Punch (which is also on sale today for $11.97, save 30%).

Finally, I attached the glittery present to the  "no peeking" layer using tombo multipurpose adhesive, and stuck some dimensionals to the back of the two layers to attach it to the belly band. 

Moving on to the base.  The base of the gift card holder measures 9 x 4 1/4", so the easiest way to cut is to cut an 8 1/2" x 11 down to 8 1/2" x 9".  Then cut the remaining piece in half the long way at 4 1/4".  So, you'll get two from a piece of card stock. 

Base Layer Measurements:
Base Layer: Cherry Cobbler, 9 x 4 1/4", scored at 3 and 7 1/4"
Layer 2: (inside) Very Vanilla 4 x 4 (note, in the photo it is dsp)
Outside layers top: Be of Good Cheer DSP 4 x 2 3/4"
Outside layers bottom: Be of Good Cheer DSP 4 x 1 1/2"

So, first you want to score the cherry cobbler layer at 3" and 7 1/4".  After sticking the precut layers tot the top and inside, you'll want to use two 1" strips of sticky strip to seal up the bottom flap.  Leave the top flap so that it opens up as shown in this second photo above.

When you slide the belly band over the top, it will hold the top piece closed.  What a cute yet personal way to present a gift card to anyone on your holiday shopping list!

Just a reminder that today is the last day to save up to 50% off stamp sets accessories and more!

Thanks so much for stopping by today.  Here are the details of the sale again.

Today is the last day for the  Online Extravaganza!  Click here to check out what else is on Sale !(that's the complete list)

Today ONLY door buster products.
Wednesday, November 28, midnight - 11:50 PM (MT)


Page
Item
Description
Retail Price
24-Hour
Sale Price
7
118941 Clear Block Bundle (Blocks A-I
$66.95
$53.56
7
120279 Clear Block Storage Caddy
$16.95
$13.56
175
109127 Stack & Store Caddy
$34.95
$27.96

Shop here or email me so that you don't miss out on the deal that you want!

Rubbah hugs,

Selene Kempton, Creative Coach
Sr. Manager
My Stampin' Up! Store / 25 Days of Christmas Projects!
Monday, November 26, 2012

11/26 Stampin Up! Holiday Wreath Home Decor ~ 25 Days of Christmas Day 21

Good Morning Friends!

I made this paper wreath for my front door, with a 5 pieces of designer paper in various blues.  With the holiday season upon us, you may feel like leaves and fall colors are gone.  I love the idea of bringing the leaves in with the cool blue and silver hue's that makes you know that snow is on it's way! 

It went together in about a half an hour and I just used hot glue to stick it all together. 

At this time of year, when I am considering decorations, I sometimes think about using decorations that would work moving forward into January and February.

I started with a wreath I found at the dollar store, made out of twigs and just used that to hot glue all the pieces on.  The banner itself is two pieces of 11 x 2" cardstock, that I glued together, then just trimmed the excess off the sides.  I love the addition of the silver glimmer paper and the way it looks from the street, when you're looking at the front door of my house. It's so sparkly and that makes me happy.

Here are the big shot dies that I used  

Although this would make a wonderful gift for someone, it's currently hanging on my front door.  :)  I like that it's versatile to stay there until March!

Here's a snapshot I took with my phone.


Don't forget that there are only a few day's left for this year's Online Extravaganza!  Click here to check out what else is on Sale between now and November 28th! (that's the complete list)


I already have a few orders going in on the 28th for the last of the door buster specials.  Here they are!

Wednesday, November 28, midnight - 11:50 PM (MT)

Page
Item
Description
Retail Price
24-Hour
Sale Price
7
118941 Clear Block Bundle (Blocks A-I
$66.95
$53.56
7
120279 Clear Block Storage Caddy
$16.95
$13.56
175
109127 Stack & Store Caddy
$34.95
$27.96

Shop here or email me so that you don't miss out on the deal that you want! I'll be standing by to help you!

Rubbah hugs,


Selene Kempton, Creative Coach
Sr. Manager
My Stampin' Up! Store / 25 Days of Christmas Projects!
Thursday, November 15, 2012

11/15 Stampin' Up! First Christmas & Jewish Celebrations Ornaments ~ 25 Days of Christmas Day 19

Good Evening Friends!

My very good friend Christina came over yesterday.  Christina teaches school at a local catholic school (and I just love her).  When she is here, she makes the studio happy and lights up the room immediately when she arrives.  Christina came over to play to learn how to make the "lollies" with the Designer Rosette Bigz XL die.  She has two students in her class that are Jewish.  She asked if I purchase the Jewish Celebrations set (Of Course I did!).  :)

So here's samples for both the Catholic and Jewish children that we came up with.
The lollies are a snap to put together with hot glue.  I fold the whole thing up like an accordion and hot glue the center first.  When it's almost stuck together, I attach the two sides of the lolly, again with hot glue.  So, I found, when I was using the die, it was almost impossible to cut it straight.  so I cut it first, then put it through the paper cutter to make sure that the strip is all one measurement.  If there is a 1/4" difference from one side to the other, your lolly may come out a little frumpy.  :)
Here is the back of our ornament.  We stamped the star on the back of the glimmer paper (silver) using stazon ink, waited a second for it to dry, then cut the star out.  Isn't it stunning?  The baby Jesus was stamped in stazon and embossed with silver embossing powder.

The strip for the lolly is 1 1/2" (making the lolly 3" across).  and the punch on the back is the 2 1/2" circle punch. 

The Jewish Celebrations Ornament uses all the same products, just different stamps.  I did add some silver dazzling details to the top of the midnight muse ink.  Just adding enough to make it shimmer, so it dried fairly quick. 

I just love the back image of this one.  it also uses the 2 1/2" circle punch.  I also love that every religion is honored. 
I hope you enjoyed this post today.  I used ALL hot glue to stick it together!  I'm loving my hot glue gun (low temperature for paper) lately!  :)

Thanks for stopping by today!
Rubbah hugs,


Selene Kempton, Creative Coach
Sr. Manager
My Stampin' Up! Store / 25 Days of Christmas Projects!
Money Raised for Breast Cancer last month with my stamping buddies $3855 ~ Making Strides