Tuesday, January 31, 2012

Lucky Leftovers

Good Morning Friends!

It's card club week here at my studio, so my clubbers are all coming over the next 4 days.  :D

And for those of you who have been asking I'm working on my first kit for customers/directions for demos.  It's really taking me a bit of time, but I'm plugging away at it. 

In  the process of getting the room ready I found an element from the the "inspire" card shown on a previous post.  I didnt want to throw it out, so I made a clean and simple leftovers card.

After more investigation, I found a strip of paper from the DSP pack for sale-a-bration.  and made this uber quick card.

I do have white card bases hanging around in the studio, already scored for occasions like these, but I decided to emboss this layer with the houndsooth embossing folder.  I used a little multipurpose adhesive to glue that down (in pieces because I only had a few short strips. 

I cut a decorative "ribbon border" into my card stock to give it a more current feel and added some self adhesive pearls.  Very easy, very quick card!

Measurements:
Base: 8 1/2" x 5 1/2", scored and folded in half at 4 1/4"  
Layer 2: 1" strip of leftover dsp
Layer 3: 2 1/8" x 3 1/8", lucky limeade
Layer 4: 2x3 vanilla
tucked layer is just a punched shape from some scraps.

Have a wonderful Tuesday!
Rubbah hugs,

Selene Kempton

Need Stamps? Click here to visit my online store

Stamps:
Fresh Vintage stamp set 125115W/125117C (Free With a $50) purchase
Loving Thoughts 125843W/125845C
Ink:
123002 2011-2013 In Color Collection Markers
(I used Pool Party and Lucky Limeade)
122935 Lucky Limeade Ink Pad
Paper:
Lucky Limeade Card stock 122926
Very Vanilla Card Stock 101650
Everyday Enchantment Designer Paper 126154
Accessories:
Every Day Enchantment Ribbon and Brad Pack 127279
Stampin Sponges 101610
 

Monday, January 30, 2012

Mojo Monday ~ Bouncing Brayer

Good Morning Friends,

I just love the simple sketch over on Mojo Monday this morning.  I grabbed a quick cup of java and headed to the studio. 

I started to clean up first (something I skipped yesterday) and found this leftover piece of Wisteria wonder designer paper.  It really says Easter to me!  I love this purple!  I walked around to see what other gems I left out for myself (while I was putting stuff away, i swear).  Then picked up that pretty so saffron taffeta ribbon that I left laying out.  I must have crafters ADD because I forget to clean up when I see something pretty I want to play with.  :)

Anyway, now I was really feeling Easter!  I went over to my stamps and found this stamp "Easter Dove" by Stampin' Up!, then I remembered the bouncing brayer technique.  I embossed the focal point using Vanilla scented embossing powder. 

So, this card also used the emboss resist technique.  The clear embossing powder "resists" the ink that's applied over so the image can pop out.  Isn't that fun?  This card smells so yummy.  Then, I pulled my brayer out, and just bounced all the way around.  I should have stopped after the first round, but I got excited and kept going a bit in the top right hand corner.  Next I pulled out some stampin sponges and sponged the ink on the center.  I wanted that focal point to really pop so I added some concord crush. If you want to see another sample with this technique, just click the label bouncing brayer below.  :D

For the "i" in Risen, I used a self adhesive rhinestone.  it really adds some sparkle.

Measurements:
Base: 10 1/2" x 5 1/4", scored and folded in half at 5 1/4"
Layer 2: 5 x 5" (so saffron)
Layer 3: 4 7/8" square whisper white, embossed with the hound sooth embossing folder
Layer 4: Berry Blossoms Designer paper 4 7/8" x 2 1/2"
Layer 5: was cut with the new framlet dies.  (Love those!)

That's it for today!  I hope you have a great week and have time to stamp 4 fun!
Rubbah hugs,

Selene Kempton

Need Stamps? Click here to visit my online store
Sunday, January 29, 2012

Vintage Fun

 Post update**

I got quite a few emails asking about the white layer.  This is actually the card base.  It is Stampin' Up! Designer Cut Note Cards 125414

Good Morning Friends!

I've been a bit of a slacker for this ONE card swap I signed up for a week or two ago.  Honestly, I signed up for this BEFORE I saw the sketch that is WAY outside my comfort zone.

I am more of a clean and simple chick!  :D However, after making this card, I'm digging the vintage~ness of this card. (Yea! a new word!)


I started with some strips I had leftover from prepping my club cards this week.  and just used the random pieces to shadow the sketch.
I used a piece of blushing bride 5 3/8 x 4 1/8" for the inside, so you could see the pretty note card die cut layer.  These cards come already die cut and ready for your vintage embellishments. 

The focal point is actually a detachable book mark.  I stuck it on the front with ONE glue dot, just to hold it there, but I hope that my friend who gets this card will pull it off and use it as a book mark.  So Let's talk about the leaves on the side of my flower for a second.  I took some seam binding, and tied it on my card, making a bow.  Then behind my flower, I made one loop and attached a 1 3/4" circle with some dimensionals.  When you lay it down, the seam binding looks like gorgeous sparkly leaves coming out behind of my shimmery flower.

I cut that big gorgeous flower on the big shot with my fancy flowers die.  I also put a piece of white doily that I cut just before.  I crumpled all the layers that came out of the big shot, then spritzed them with the blushing bride shimmer spritz.  To me, it looks a LOT darker than blushing bride.  I used red riding hood on the flower, and it's a closer match to that in my opinion.  In between each layer, I put a small circle (also cut with the die) and put dimensionals on both sides of each circle to make my flower really pop!  On layer 2  of my flower, I attached the doily that I cut, and just used snail to attach it to the flower below.  I think it adds a whole bunch of interest to the card.

Not too shabby!  I broke out of my comfort zone and made this pretty vintage card!  I'm very happy with it considering I usually struggle with the vintage style of stamping.  Hey!  I didn't stamp at all on this!  That's so funny! 

Happy Sunday!  Thank you for visiting today.
Selene Kempton
Saturday, January 28, 2012

Thoughts of You

Good Morning Friends! 

Here is the last card in the set of the sale a bration samples I did with my team at our monthly meeting last month.

How about some measurements:
Base: Lucky Limeade 8 1/2" x 5 1/2", scored and folded at 4 1/4"
Layer 2: Very Vanilla 4 x 5 1/4"
Layer 3: 4 1/8" x 2 1/8" soft sky card stock
Layer 4: 4 x 2" designer paper
Layer 5: Lucky Limeade scalloped circle
Layer 6: 1 3/8" circle, soft sky
Layer 7: 1 1/4" circle very vanilla with the last image from the set.

I love the doily looking lace border that is a part of the set, and peeking out from behind the designer paper layer.  I used the same ribbon technique to triple my layers of ribbon for a decorative effect, that I did on the other 3 cards.  I sponged the entire vanilla (layer 2) after embossing it, to get the color to really pop! 

This morning we're having some work done on the power for our house, so I need to run, but I'll be back soon to share more stamping inspiration with you.

Thanks for visiting today.  Selene~
Click here to visit my online store

Stamps:
Fresh Vintage stamp set 125115W/125117C (Free With a $50) purchase
Loving Thoughts 125843W/125845C
Ink:
123002 2011-2013 In Color Collection Markers
(I used Pool Party and Lucky Limeade)
122935 Lucky Limeade Ink Pad
Paper:
Lucky Limeade Card stock 122926
Very Vanilla Card Stock 101650
Everyday Enchantment Designer Paper 126154
Accessories:
Every Day Enchantment Ribbon and Brad Pack 127279
Stampin Sponges 101610


Friday, January 27, 2012

Winter Blues ~ Saturday Sketch Challenge 240

Good Evening Friends!  It's time for another sketch challenge from the stamping 411 operators! 

This week, Gretchen Barron is at the sketch board again. 

I really struggled with this sketch, there are two separate focal points.. I suppose one of mine is now flying away!  :D  Too funny!

How about some measurements!
Base: (oh yea, shimmer white baby!)11 x 4 1/4", scored and folded in half at 5 1/2"
Layer 2: 4 x 5 4 1/4"
Layer 3: two pieces of The Gorgeous Sweet Shop designer paper (mini catalog) cut to 3 7/8" x 1 7/8" each
Layer 4: Island Indigo 3 1/8" x 2 1/8"
Layer 5: Shimmer white 3 x 2"
Layer 6: Island Indigo stamped on shimmer white and cut out.

I actually made this card with Gretchen Barron on the phone!  :D  This brand(y) new set Just Soaring just arrived in the mail yesterday and of course, I was LATE submitting my card!  Tisk tisk tisk.  I had an especially challenging week and I joked with Gretchen after I stamped the sentiment.  Is it weird to make a card for yourself?  But I suppose it's nice to give back once in a while! HA!

I just love the big soft bow, and once I actually sat down to do it, I was really happy with the result!  I love the big frumpy bow on the side.  It's so soft! I took an aqua painter and water colored the sky, with soft sky ink, I just left the sparkly clouds there to glisten. 

So tomorrow, my family and I have to leave our house for 6 hours while they turn the power off and do some work... Any thoughts on what we should do in a cold rainy New England with my hubby and 7 year old?  I've been writing directions and crafting like a mad woman.  So, it will be good to take a break. Who's got a fun family idea for me?

Until tomorrow,
Selene~


Create

Good Morning Friends!

This morning's card is another card from the set I did with my team at the monthly meeting last month. It features all the same supplies as the previous two cards in a clean and simple format.

I love the way the designer papers look here. it's such an easy way to make a card when you have a smaller focal point. This card is featuring two different designer papers from Everyday Enchantment Designer Paper, front and back.

The postage stamp was inked with 4 different colors, pool party, calypso coral, lucky limeade and riding hood red.

Measurements:
Base 8 1/2" x 5 1/2", scored and folded in half at 4 1/4"
Layer 2: 4 1/8" x 3 1/8"
Layer 3: 3 x 1 (four pieces) ~ so it matte's perfectly! Love that!
Layer 4: Lucky limeade postage punch (to matte the 1 inch stamped image)
Layer 5: Stamped image and punched with the 1" square punch

The ribbon was attached to the back using snail adhesive and then I used a glue dot on top.

Stamps:
Fresh Vintage stamp set 125115W/125117C (Free With a $50) purchase
Loving Thoughts 125843W/125845C
Ink:
123002 2011-2013 In Color Collection Markers
(I used Coral, Pool Party and Lucky Limeade)
120971 Riding Hood Red Marker
122939 Calypso Coral Ink Pad
Paper:
Calypso Coral Cardstock 122925
Very Vanilla Card Stock 101650
Everyday Enchantment Designer Paper 126154

I'll see you tonight for the stamping 411 sketch challenge! TGIF!
Selene~
Thursday, January 26, 2012

Inspire

Good Morning Friends!

Here's another card in the set I made with my team this month. I also used this card as a swap for my friend's swap group.

How about some measurements to get started?
Base: 8 1/2" x 5 1/2", scored and folded in half at 4 1/4"
Layer 2: 5 x 3 3/4" lucky limeade
Layer 3: 4 7/8" x 3 5/8" very vanilla
Layer 4: 4 7/8" x 1 1/2" designer paper
Layer 5: Lucky limeade 3 1/8" x 2 3/8"
Layer 6: Vanilla 3 x 2 1/4"

Stamps:
Fresh Vintage stamp set 125115W/125117C (Free With a $50) purchase
Loving Thoughts 125843W/125845C
Ink:
123002 2011-2013 In Color Collection Markers
(I used Coral, Pool Party and Lucky Limeade)
122935 Lucky Limeade Ink Pad
Paper:
Lucky Limeade Card stock 122926
Very Vanilla Card Stock 101650
Everyday Enchantment Designer Paper 126154
Accessories:
Every Day Enchantment Ribbon and Brad Pack 127279
Stampin Sponges 101610
Mat Pack (to make the holes for the brads)

Between the card yesterday and today, this only changes two items for the supply list. we went from coral ink and paper to limeade! :D So cool to make so many awesome cards with the same set!

Thanks for visiting! Selene~
Click here to visit my online store
Wednesday, January 25, 2012

Dream Big! Sale A Bration Showcase Project

Good Morning Stampers!

It's here! The start of Sale-A Bration was yesterday and I couldn't be more excited!

This week I'm going to share what I did at my last team meeting. Every month at my meeting, I like to show a family of products and showcase their possibilities. I do have a few long distance ladies in my down line and I'm working on ways to get them to be able to "attend" the meeting without actually being here. So, this week I purchased a high quality HD camera and I'm going to be working on doing video's for them to be able to be here, even if they cant sit across the table from me. Isn't that wonderful?

Stampin' Up! has really outdone themselves with this amazing reward of products for hostesses who have a $400 workshop. It includes the BRAND NEW products shown in this cute card set:

  • Fresh Vintage stamp set 125115W/125117C
  • Everyday Enchantment Designer Paper 126154
  • Every Day Enchantment Ribbon and Brad Pack 127279

So, hostesses get the opportunity to earn all three, plus! you get a free item from the Sale-A-Bration book (link is on the right hand sidebar at the top) for EVERY $50 in purchases you make! Isn't that amazing? So there's more.. You get all the usual hostess benefits, plus the new tote for SAB (this is for hostesses who achieve a $150 party). There is truly so many rewards for placing orders or hosting a workshop that I can't imagine why anyone wouldn't want to have a girls night out! :D So cool!

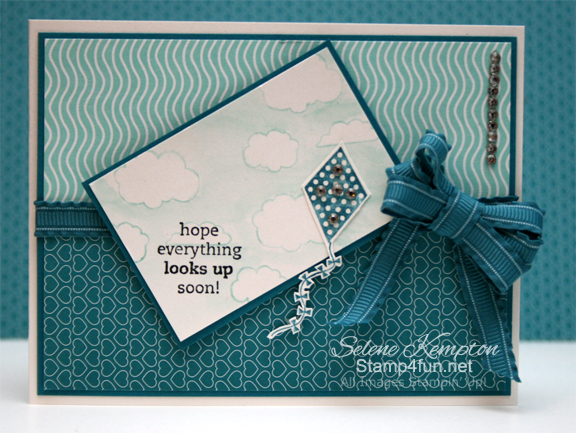
So ~ to get this party started, let's break down this card. :D

First, some measurements with a supply list.

Base: 5 1/2" x 8 1/2", scored and folded in half at 4 1/4" ~ In Calypso Coral Card Stock
Layer 2: 4 x 5 1/4", embossed with the elegant lines embossing folder, Very Vanilla
Layer 3: a strip of calypso coral card stock 4 x 2" (that gorgeous scalloped edge was cut with our new edgelets)
Layer 4: Every Day Enchantment DSP 4 x 1 1/2"
Layer 5: Ribbon from the Ribbon and brad pack (you get 10 yards of each of the two colors)!
Layer 6: Calypso Coral 3 1/8" x 3 3/8"
Layer 7: Very Vanilla 3 x 3 1/4"

Supplies!
Stamps:
Fresh Vintage stamp set 125115W/125117C (Free With a $50) purchase
Loving Thoughts 125843W/125845C
Ink:
123002 2011-2013 In Color Collection Markers
(I used Coral, Pool Party and Lucky Limeade)
122939 Calypso Coral Ink Pad
Paper:
Calypso Coral Cardstock 122925
Very Vanilla Card Stock 101650
Everyday Enchantment Designer Paper 126154

Accessories:
Every Day Enchantment Ribbon and Brad Pack 127279
Stampin Sponges 101610
Adorning Accents Edgelet Dies 125595
Elegant Lines Embossing Folder 119277
Big Shot Die-Cutting and Embossing Machine 113439

Step By Step.
  1. On this card I started with stamping the cute border on the bottom of layer 2.
  2. I took this same layer and used the elegant lines embossing folder to put the background design on my card stock.
  3. Using the Calypso Coral Ink Pad and 1/8 of a stampin sponge, use a circle motion to pick up some ink from the ink pad. Use the same circle motion to sponge over the embossed card stock.
  4. Start inking up the main image for layer 7. Start with the pool party (the lightest color) then ink the coral, and finish up with lucky limeade. As a rule, you always want to go light to dark. If you put the darkest color on first you could pick up a red or green in your light blue marker.
  5. Once you've stamped your focal image, you can attach the coral matte and put 4 dimensionals on the back (one for each corner and set this piece aside.
  6. Next, you want to attach your designer paper, to the 4 x 2" strip, leaving a 1/4" border at the top showing. Using the big shot, cut the decorative border.
  7. While you are still working with this piece, put a small amount of snail adhesive (tape runner) on the back of the strip. I attached my ribbon to that and then first went straight across my card, then went to the top, then the bottom to make the cool pattern with this gorgeous ribbon! :D When I was done with the 3 layers, I just stuck the other end to the same strip of adhesive on the back. Easy Peasy.
  8. Once this was done, I used the tombo multipurpose adhesive to put these layers on my card. This will keep your ribbon from coming loose.
  9. I just put the card together like the picture from there and tied a bow on my friend Lee Conrey's fabulous bow maker. I used a glue dot to put the bow on.
  10. Simple and pretty!

Join me tomorrow and I'll show you another beautiful and simple card from the suite! Have a wonderful Wednesday!

If you are inspired by what you have seen here and would like to place your sale~a~bration order, here is a link for you or you can just send me an email @ e.selene@verizon.net . I'm here to serve.

Rubbah hugs,

Selene Kempton

Tuesday, January 24, 2012

Stinkin Cute Embossing with Markers Class

The name of this class doesn't just come from the ADORABLE projects shown here. They are actually scented with Stampin' Up's latest line of scented embossing powders! How fun would it be to give this to a friend as a stinkin' cute gift?

Come this Friday and learn how to emboss with markers.

Date: This Friday, January 27th, 2012
Time: 6:30
Cost: $25 ~ please bring your own adhesive
Place: My Stampin' Studio

I hope to see you all!

Rubbah hugs,
Selene
Monday, January 23, 2012

Mojo Monday ~ Doggie Bereavement card

Hey There Friends!

I have been trying to make a card all day! I started about 8 am this morning looking at the cutest block sketch over on Mojo Monday. I just love sketches. Well, then my hubby decided to work from home, so I took the truck for new tires. We were in desperate need of them, and now that there's "that terrible stuff" on the ground, we couldn't put it off any longer. :D
Then stuff happens, my little one got out of school, homework, and so on...

So here we go.. When I saw the sketch I was going to use a cool new set from sale a bration (which starts tomorrow morning). But I saw this little doggie set and went in a completely different direction. It's funny where the creative process will take you.

I started with some measurements that Julee gave for the sketch. each of those panels are 1 1/2" x 1 5/8" I cut a 1 inch strip for the center panel and ran a ribbon across the inside. I stuck the ribbon to the front of the card before adding my espresso layer cut to 5 x 3 3/4". Pretty cool card! I'll put this one over at the florist for sale I think. it really will make someone happy I think.

Oh~ One last detail.. I took a self adhesive rhinestone brad and colored it with a red sharpie, then placed that on the dog, for his collar. so cool.

That's it for today.
Rubbah hugs,
Selene~
Friday, January 20, 2012

Saturday Sketch Challenge 239

Good Evening Friends! It's time for another fun sketch from my buds at stamping 411. This week Gretchen Barron took a turn at the sketch board. I (of course) took some liberties with the sketch. I had so much fun!

I made this pretty card for a friend who has taken a bit of a break from stamping. I got a note from her that she received the card and that it brightened her day. That makes my heart happy! It's actually very sparkly in real life. For this one, it's most certainly prettier in person.

I struggle with some of the new brighter in colors, but this new ribbon is just to die for! The ribbon will be a sale a bration reward when SAB starts this coming Tuesday. So fun! The butterflies took the place of the 3 circles from the sketch (below). I could see them braking out of the "circle" and flying off.. :D The designer paper is the gray pattern from the Twitterpatted designer series paper pack. it's so pretty!!!

So let's talk measurements.

I started with a Calipso coral base 8 1/2 x 5 1/2", scored and folded in half at 4 1/4"
Layer 2: 5 1/4" x 4", whisper white
Layer 3: 5 1/8" x 3 7/8", basic grey. I cut a 3 inch circle from this layer to expose the layer below. Then stamped the leaves on the white layer.
Layer 4: 3 3/4" x 1 1/2" twitterpatted dsp
Additional layers are all cut out flowers and butterflies. The "inspire" was stamped on a 1/2" piece of scrap paper, then sponged. I added LOTS of glitter on top.

So, here is the fabulous sketch we got to work with. Pretty fun! If you have time to play along this week, just post your card somewhere online and link back to us over on stamping 411. We cant wait to see what you come up with!

Thanks for stopping by to see me and for those of you who leave me comments, just know I appreciate you more than you know! (((hugs)))

Selene~
Wednesday, January 18, 2012

Stampin' with my girl

It's been a stressful couple of years when it comes to me, staying at home and still being able to contribute to my family and what they need.

Sometimes, it all weighs a little heavy and I've been feeling it especially these past few weeks. Today, escaped with my girl for some much needed stamping time. I'm thankful for my stamping business that gives me a way to give back to my family, but for the past couple of years, it's just not cutting the mustard.

I'm still trying to find a creative way to earn her tuition, for the school she loves and deserves. It is what it is. I guess it's time to get a bit more creative! Alexis at 7 years old wants to be in and around everything crafty, electronic, and fun! If I want t know what colors are in style, I just take a look at her latest wardrobe, because (thanks to her memere) she's just a little fashionista!

A chip off the old block, she loves her stamping! Can you blame her? Today, I let her use "mum's good paper snips" and she did REALLY well! Guess she's getting old enough to have some fun with dear old mom in the studio! :D

So let's get started! First ~ I just LOVE the sketch challenge over on split coast stampers today! Here's the card Alexis made! She did pretty good cutting out her hot air balloons considering it was the first time I let her use the "big girl snips".

Ooops, I think that banner ended up, upside down... but she didn't notice! hey, look at that scissor work! I was very impressed at her handling the self adhesive rhinestone brads.

Alexis showed me very carefully how you put your finger on top of the rhinestone you want to pick up and gently slide the snips under the adhesive (that's under the rhinestone) until it sticks to the tip of your snips. Gheesh! I think I may have a potential recruit sign up during Sale-A-Bration. She's got me sold! :DStep 2 of applying the rhinestone is to use the tip of the snips to place the rhinestone where you want it, put your finger on top and pull the scissors out! Thanks for the tutorial little one! :D My girl is growing up so fast!
"Okay now mom! Take my picture with MY CREATION!! You know this is the best card I've ever made.... You know WHY MOM?? Because WE made it TOGETHER! How lucky are we to be able to spend time together like this?"

Mom will be back in a minute! I need a tissue!
Yea.. she gets "IT" This is her concentrating look while she assembled the card.. "Mom, I'm gonna need some snail over here!"

Yes you are my dear! :D

Finally, here's the very clean and simple creation that I made, with my daughter's posted above. She's so cool, I just had to share. For me, this is what it's all about. :D

She started her own card bin of cards to have on hand so that she'll have one to send out if she needs it. Wait a minute! I think that means she's officially better than me! Proud mama moment...

We went a little crazy with the bling on this, but we had fun. :DThat's it for tonight!

Rubbah hugs,
Selene Kempton
Saturday, January 14, 2012

My Digital Studio Baby Announcements

Good Morning Friends!

For those of you who know me well, you know that I briefly took a job this year to help pay the tuition for my daughter's school. I was very good at the photography... but let's just say I needed a monkey to come out of my cart and do the sales piece. I could use a sales person behind me on my shoulder. :D All in all, it wasn't the right place for me. I made another difficult decision to leave.

Recently I was asked by a few friends to take some pictures of their new grandchild for them. I got the equipment I needed for my camera from Santa and it seems I'm on my way! It's hard to know what God has in store for me.

The ability to capture one of God's greatest gifts on film couldn't be a better gift to me. I count my blessings every day that God had given me a way to stay at home and take care of my daughter while giving me a way to make a few bucks here and there and help pay for her education. More importantly, I thank God for the friendships that I have built as a result of crafting. A card is a pretty powerful thing, it's the biggest little thing you can do for someone. Anyway, I'm excited to share with you some of the photos I took and two different birth announcement samples. I took all the photos, and used My Digital Studio to create the Birth Announcements.

This first design is a "case" of my favorite birth announcement from my old job. Of course I changed it quite a bit and put the Stampin up spin on it! They will be printed post card style 5 x 7 and will be printed both sides. So, the two pictures shown here, will be one postcard.


The second is an alternate announcement to show a different design. I really like them both and hope that my friend will like one of them. Although she said she wont be needing many. I still had fun playing with the pictures of this new little miracle.

That's it for today. Watch out for those little blessings!
Rubbah hugs,
Selene~

Friday, January 13, 2012

Saturday Sketch Challenge 238

Good Evening Friends!

I love a nice clean and simple sketch challenge and I had a lot of fun with this sketch!

First, I'd like to to tell you about the focal point. The main images are from the stamp set sweet cake and stamped with cherry cobbler. I used a marker to ink it up. I stamped it on my piece of whisper white and used the ticket corner punch on the edges. Next, I sponged the edges with bashful blue ink, by laying my card stock on the table, and using a circular motion to get the ink on the edges, this makes sponging so soft! Next, I stamped my sentiment, again, using markers. I may have gone a teeny bit too low on this one. :D It happens. :D

Next, I took Illuminate top coat (with the pink top) and ran some of the top coat through my ink on the top of the cupcake. I used it to move the ink and make the cupcake look faux frosted. Next, I added some cherry cobbler glitter to each of the lines on the frosting of the cupcake. I went very heavy handed on the cherry and heart and added the cherry cobbler glitter there too.. You really need to set this stuff aside and let it dry for a bit. At least you do when you add a TON like I do. {smiles}

So how about some measurements for this project:
Base Layer: 8 1/2" x 5 1/2", scored and folded in half at 4 1/4" (bashful blue)
Layer 2: 5 x 3 3/4" (whisper white)
Layer 3: 4 7/8" x 3 5/8" (cherry cobbler, embossed with the finial press embossing folder)
layer 4: 3 1/2 x 2 1/2" whisper white.

Please take a look and see what the other operators are up to this week. Their work always inspires me! If you have time play along. I'd love to see what you come up with for this clean and simple sketch.

Have a wonderful weekend!
Rubbah hugs,

Selene Kempton
Friday, January 6, 2012

Saturday Sketch Challenge 236

Good Evening Friends!

It's time for another sketch challenge from your stamping 411 operators. This week's sketch is a simple one and gave me the opportunity to play with some of the new stamps and accessories from stampin up!

I started this card with a strip of designer paper cut to 1 1/2: inches wide and used a square punch to make my ribbon banner. I used the
new scalloped edge die for either side of my DSP Banner, and just ran it through the big shot.

The edge of the card was cut with a different new edgelet (from the same pack, then embossed with the coordinating embossing folder, and stamped! Whew!)

The base layer of my card is 8 1/2 x 5 1/2" scored and folded in half at 4 1/4". This card was quickly converted into a calendar by adding one more score line @ 2 1/4" to my base layer and adding a card sized topper.
Some really cool projects came out of this weeks sketch! Sorry to be so brief, I'm running out the door to meet a stampin buddy!
Until later, rubbah hugs,
Selene Kempton