Monday, July 20, 2020

Stampin' Up's Forever Greenery and #MailACardMonday

Hello Friends!

Today's #MailACardMonday is going out to a dear friend who is trying to earn her third incentive trip.  She is really pushing this year with the state of things in the world, it's been difficult for everyone.  I hope that she feels totally encouraged and shatters her goals!  

More one sheet wonders are coming, they are a LOT to document, but I will be posting more!  

Thanks for stopping by today!


Love,
Selene

Here is a complete supply list if you need anything.


Friday, July 17, 2020

Boho Indigo Medley - One Sheet Wonder #2

Hello Friends!

TGIF!  I am so happy to be bringing you the second set of cards I made from the boho collection. This set also came out of a single sheet of designer paper.  I used one that I designed for a past class that I offered called Strong & Beautiful.  I had a lot of fun with this medley!  This blog post is cards 3 - 8 of (36) that I'll be posting in total, so stay tuned! 


For this one, I used both sides of the paper, and I even used the pieces marked "scrap" on the drawing.  


Directions for the designer paper: 
Step 1: Take a 6” x 6” piece of cardstock and cut a 1 ½” strip off one side.
Step 2: Trim that 1 ½” strip to 4 ¾”.
That will give you the designer paper for this sweet project.  

Card 1 Measurements:
Base Layer: Misty Moonlight 11" x 4 1/2"
Layer 2: Crumb Cake 5 1/8" x 3 7/8"
Layer 3: Vanilla 5" x 3 3/4"
Layer 4: DSP 4 3/4" x 1 1/2"
Embellishments came from the boho medley.


Continued directions for the designer paper:
Step 3: Trim the square that is left to 4 ½” x 4”.
Step 4: Cut the 4 ½” side at 2.  
Step 5: Cut the 4” x 2”, down to 3 ½” as shown.


Card 2 Measurements:
Base Layer: Crumb Cake 11" x 4 1/2"
Layer 2: Misty Moonlight 5 1/8" x 3 7/8"
Layer 3: Vanilla 5" x 3 3/4"
Layer 4: DSP 4 1/2" x 1 1/2"
Embellishments and die cut pieces and stamps came from the boho medley.


Card 3 Measurements:
Base Layer: Misty Moonlight 11" x 4 1/2"
Layer 2: Crumb Cake 5 1/8" x 3 7/8"
Layer 3: Vanilla 5" x 3 3/4"
Layer 4: DSP 4" x 2 1/2"
Embellishments and ribbon came from the boho medley.


Card 4 Measurements:
Base Layer: Misty Moonlight 11" x 4 1/2"
Layer 2: Crumb Cake 5 1/8" x 3 7/8"
Layer 3: Vanilla 5" x 3 3/4"
Layer 4: DSP 3 5/8" x 2"
Die Cuts and stamps came from the boho medley framelits.

Card 5 Measurements:
Base Layer: Seaside Spray 8 1/2" x 5 1/2", scored and folded at 4 1/4"
Layer 2: Misty Moonlight 5 1/8" x 3 7/8"
Layer 3: Vanilla 5" x 3 3/4"
Layer 4: DSP "Scrap Strips" from the drawing above
Die Cuts, Stamps and embellishments came from the boho medley framelits.

I hope you're having fun and are enjoying this series of blogging posts so far.  If you missed the first set, here's a link

Well, that's a wrap for today. Here is a complete supply list of the items I used for today's projects!

Thank you for stopping by!
Love,
Selene


Last Call for the Nothing's Better Than Card Class

Tomorrow is the last day for registration on this sweet class that is shipped to your door.  Who wouldn't love to get one of these fun cards from you that YOU made!  
You can get the pre-cut kit for this 4 project class for free with any order over $27 on my website and use host code F3GFZAHN
 (Please also register for the class so you get the directions emailed).
Packets and/or emailed directions will be mailed this week by July 17th. Get your packets, pre embossed, pre-cut, and your bow's all tied, so all you have to do is stamp, learn the techniques, and assemble!  See the supply list below to assemble these as shown, or create your own cards from the stamps you already own with the kit.
  • Add on the stamp set to discount the class price.
  • Place a qualifying order ($27 retail or more) in my online store to get the class packet mailed for free. (Please Use Host Code) F3GFZAHN
  • Want extra kits?  I've got those too!  
Let's have some fun with these!  I just love them!

Demonstrators:
 you may offer the sheets for free with any $50 order. Complete supply list and shopping list will be part of the directions. These are my in-class directions sheets and contain full measurements and step by step directions. The photos have not been watermarked and the sheets do not have my name on them, so they are demonstrator friendly to reuse them for a class, but please take your own photos if you are planning to use them in a class.
Recommended supplies to assemble these projects as shown with the packets:
  • Nothing's Better Than Photopolymer Stamp Set (English) - 152507
  • Ink Pads: Early Espresso, Just jade, Cinnamon Cider, Bumblebee and Magenta Madness
     
  • You'll also need: Wink of Stella Glitter Brush, Seal Adhesive, Dimensionals, Glue Dots, Liquid Glue, Paper Snips.
Click here to shop now: on my website, and use host code: F3GFZAHN
Per Stampin' Up's rule, please just email me for the registration link if you would like to sign up. :)

Love,

Selene
Thursday, July 16, 2020

Boho Indigo Medley - One Sheet Wonder #1

Hello Friends!

As promised,  have 36 samples coming your way over the next few weeks with the Bojo Indigo Suite of products.  I did add a few things to the medley to make these projects and I included them in the complete list below.  


I hope you love these as much as I do.  For this first Designer Paper sheet, I decided to make it into just two cards.  


Let's Get Cutting:

I cut a 1" strip off the top of the 6"x 6" paper.

Then, I flipped it and cut one piece to 5" x 3 3/4".

This left me with one piece left and I cut it down to 4 3/4" x 2 1/4"


The first card uses two of the pieces. 

Measurements: 

Base Layer: Seaside Spray 8 1/2" x 5 1/2
Layer 2: Very Vanilla 5 1/8" x 3 7/8"
Layer 3: DSP 5 x 3 3/4"
Layer 4: Very Vanilla 5" x 1 1/4"
Layer 5: DSP (backside) 5" x 1"
Layer 6: Very Vanilla Die Cut Shape (3 3/4" long from point to point)
Layer 7: Seaside Spray Die Cut Vase


Technique:  There certainly is a really super cool technique on this card.  To see it in full swing, you can check out the video from my free FB live video from two weeks ago.  Here is that video!


The second card that came from the one sheet wonder is next!

Measurements:
Base Layer: Thick Very Vanilla 8 1/2" x 5 1/2
Layer 2: Misty Moonlight Cardstock 5 1/8" x 3 7/8"
Layer 3: Very Vanilla 5 x 3 3/4"
Layer 4: DSP  4 3/4" x 2 1/4"
Ribbon: Tied around layers 2-4
Layer 4: Shape from the elements that come with the boho suite, stamped with Misty Moonlight Ink
Layer 5: Misty Moonlight Cardstock, die-cut mini flower, behind the white flower.
Layer 6: Flower that comes in the kit, just put on with a mini glue dot.


Here are a few close up shots.  I just love this whole suite and can't wait to show you all the samples I made.  36 in all!  


That's all for today!

Thank you for stopping by.  If I can help with an order just message me or any of the links below will take you into my online store.  The current host code is posted on the top right-hand side of my blog!  

Thank you for supporting my crafty world!

Love,
Selene

Wednesday, July 15, 2020

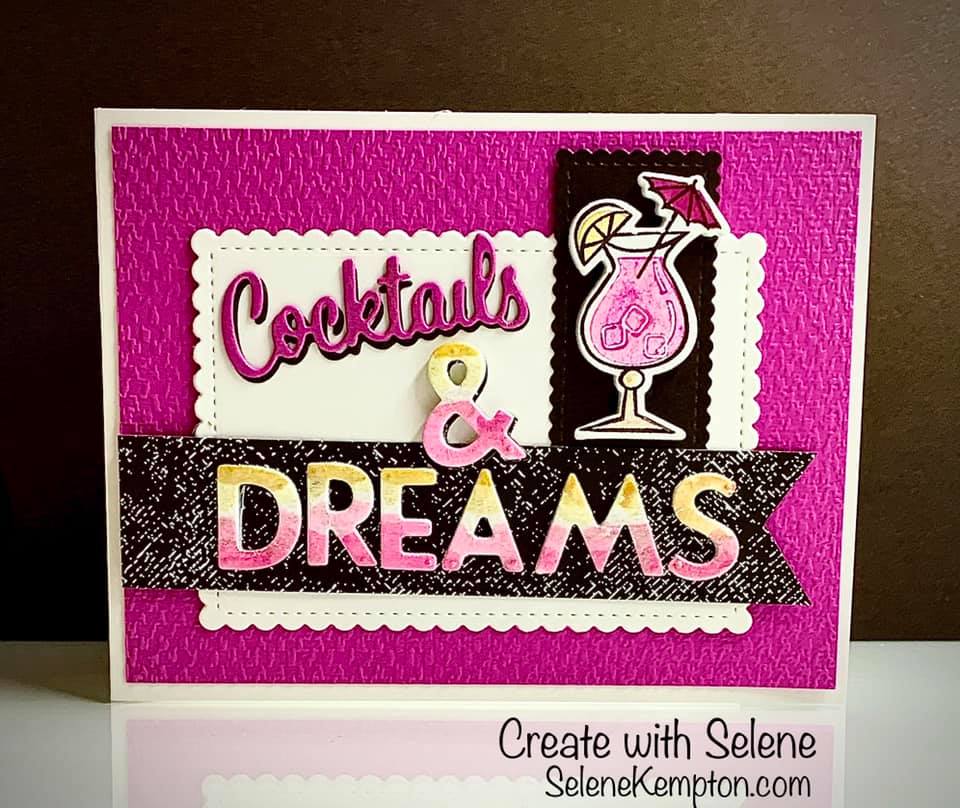
Stampin' Up's Nothing Better Than Bundle - Cocktails & Dreams

Hello Friends,

I'll admit it, when I was a kid, I was a HUGE Tom Cruise fan.  From the movies Top Gun to Risky Business, I think I've seen all the movies with Tom!

Yesterday, I shared the "coffee is life" card, after having a funny conversation with my husband about how every day is a latte day at my house!  :) I got to thinking about the other fun uses for this sweet bundle and got to work with it yesterday on my live video.  The inside of the drink is "stamped off" and basically everything is painted with Wink of Stella!

Yeah, buddy.


In this week's video, I shared THIRTY-SIX samples with the new boho medley, that I will be sharing here with you over the next few weeks.  Then, I showed my process for working with these new foam adhesive sheets.

You need them! Just sayin' -  look at how cool they are!

If you want to see the adhesive sheets in action, only, just go to about minute 12 and 30 seconds, and that's where I show the new sheets.  Up till that, it's all about the Boho Medley, which I'll show you here more clearly in the next few weeks.

Here's this week's free live demonstration from my Facebook page.  If you like the video (below)  over on youtube and you want to see more when I post them, please subscribe to my page. I am unable to do youtube live videos until I have 1000 subscribers, and I'm not there yet.

Maybe, someday! Thanks for the support to get me there! We all need goals.


It was a pretty, fun, and whimsical card for today.  I did add a rhinestone to the top of the word "cocktails" after I snapped the photo, so just imagine that sparkle in there!  lol.  You should also know when I was done with the live video, I didn't love it.  So, I pulled it all apart to come up with the card above from the pieces.  We don't always hit a home run on the first swing, but since we are making cards, we can just have some fun and keep going!  Stay tuned it's going to be One Sheet Wonders and Boho Medley cards here for a bit!  I'm so excited to share my marathon card making days with 36 boho cards.  On their way to your inbox.

Thanks for visiting today!

Love,
Selene

Supplies I used:
Tuesday, July 14, 2020

Stampin' Up!'s Nothing's Better Than Bundle Card

Hello Friends!

I have been playing with the "Nothing's Better Than" bundle from Stampin' Up, all week!  I had so much fun creating this one last night during our weekly Zoom Chat on Monday nights.  We meet, chat and craft in our own spaces, every single Monday night, virtually from 7-9PM EST.  Everyone is welcome, you can join us next week at this link.  


This week I worked on my Cas-ing Tuesday Card.  Every single week the design team snags a layout from the Stampin' Up catalog, and we all use our own supplies to make a card!  

This week's card uses a few different supplies, and I had so much fun making it, The full supply list is below.

Quick Steps/Tips/Commentary:

  • Stamp the coffee cup in Early Espresso ink.
  • Ink up the "filler" stamp with Cinnamon Cider ink, stamp off on a scrap paper, then stamp the "coffee" inside the cup with the ink left on the stamp for a lighter color.
  • Add Whisper White Cardstock to the Foam Adhesive Sheets, then run the cut letters thru your die cutting machine.  (yes, the dies cut the foam adhesive sheets!) 
  • Add some Cinnamon Cider ink to a plastic bag or something you can throw away.  Then, use a Sink of Stella glitter brush to pick up the ink and paint on the letters.
  • Adhere the layers together using Stampin' Up Seal adhesive, (except for the foam shapes which you can just peel the backing off of and adhere to the front of the card). 
  • Adhere the bow with a glue dot.
  • Use a small amount of Liquid glue to adhere the die-cut word "coffee".
The complete supply list is below!  I will be showing this on today's fb live along with 36 projects I created using the Boho Indigo Medley!  You can check out the live video in my private facebook group at 3PM, every Tuesday.  Here's the link to join in the fun.


So this week, our cards were CASE’d from page 72 of the 2020-2021 Annual Catalog. You can join our CASE-ing Tuesday Facebook Group to see more samples and/or share your own card with us. Below is everything I used on this wonderful project!  I hope you will join us, it's so fun to play along!


Monday, July 13, 2020

July Card Class featuring Nothing's Better Than, by Stampin' Up!

Hello Friends,
I am so excited to bring you this month's card class.  The images are super cute! It offers fun sentiments that you can put in the mailbox to friends and family just to make them smile! 
You can get the pre-cut kit for this 4 project class for free with any order over $27 on my website and use host code F3GFZAHN
 (Please also register for the class so you get the directions emailed).
Packets and/or emailed directions will be mailed this week by July 17th. Get your packets, pre embossed, pre-cut, and your bow's all tied, so all you have to do is stamp, learn the techniques, and assemble!  See the supply list below to assemble these as shown, or create your own cards from the stamps you already own with the kit.
  • Add on the stamp set to discount the class price.
  • Place a qualifying order ($27 retail or more) in my online store to get the class packet mailed for free. (Please Use Host Code) F3GFZAHN
  • Want extra kits?  I've got those too!  
Let's have some fun with these!  I just love them!

Demonstrators:
 you may offer the sheets for free with any $50 order. Complete supply list and shopping list will be part of the directions. These are my in-class directions sheets and contain full measurements and step by step directions. The photos have not been watermarked and the sheets do not have my name on them, so they are demonstrator friendly to reuse them for a class, but please take your own photos if you are planning to use them in a class.
Recommended supplies to assemble these projects as shown with the packets:
  • Nothing's Better Than Photopolymer Stamp Set (English) - 152507
  • Ink Pads: Early Espresso, Just jade, Cinnamon Cider, Bumblebee and Magenta Madness
     
  • You'll also need: Wink of Stella Glitter Brush, Seal Adhesive, Dimensionals, Glue Dots, Liquid Glue, Paper Snips.
Click here to shop now: on my website, and use host code: F3GFZAHN
Per Stampin' Up's rule, please just email me for the registration link if you would like to sign up. :)

Love,

Selene