Thursday, April 7, 2011

A study in Four Frames....

So ~ I admit it... I cant seem to put these new materials down. This month there's a sneak peek AVAILABLE for purchase and it's paper and a great new stamp set from the new Idea book and catalog which wont be out until July!

(told ya I was excited!)).. So i had made some of these for stamp club, then just kept playing with the same packets.. so there's two card layouts using the same measurements, but a whole bunch of different cards!

Here we go.... These three cards all have the same measurements! Isn't that cool? In fact, this layout would be good for ANY card you're designing that uses a punched shape.

So ~ For this first card (above), I used the image from the 4 frames set that has the bird, and omitted the bird by inking with my marker. Then I stamped the sentiment using markers. (which comes from the level 3 hostess set Occasional Quotes).

So first.. I know I've posted it, but I think it's SO Helpful.... The colors that coordinate with the paisley petals designer paper are:
Baja Breeze
Cherry Cobbler
Chocolate Chip
Marina Mist
Not Quite Navy
Old Olive
River Rock
Soft Suede
Tangerine Tango

So how about some measurements.
Base 11 x 4 1/4", scored and folded in half at 5 1/2"
Layer 2: 5 x 3 3/4", cherry cobbler
Layer 3: whisper white (1/8) smaller than layer 2) 4 7/8 x 3 5/8"
Layer 4: Cherry Cobbler 3 1/8" square
Layer 5: Whisper white 3" Square
Layer 6: The punched shape of you choice...

For this next card (above) I stamped the focal point with a different 4 frames image, then added a few words from (clear mounted) 120501, fabulous phrases... I sponged the stamped and punched image with cherry cobbler ink, then took a piece of cherry cobbler seam binding (120992) and folded over on itself. Next, I used a 1/16" circle punch to punch through the 3 layers (two layers ribbon and one paper). Then I put a gold brad through.. I attached that top layer with dimensionals.This one (above) was stamped with yet another image from the 4 frames set... Same measurements... This time I used some pretty organza ribbon 114319, and used the something to celebrate stamp set to stamp the Easter wishes, The "perfect bow" was made with Lee Conrey's amazing Bow maker!

Onto the next layout... I did SUPER detailed measurements for a similar laid out card the other day..

Base Layer: 5 1/2" x 8 1/2", scored and folded in half at 4 1/4". If you score your paper first... THEN CUT, you get two bases from one sheet of regular computer sized paper.
Layer 2: 5 1/4" x 4" (note, this is just 1/4" smaller than the "base" layer. We ran this layer through the big shot using the vintage wallpaper (120175), and at the same time, embossed the flap part of our envelope. :D
Layer 3: 4 1/4" x 3 1/4"... Now, because this layer is 4 1/4", when we cut an 8 1/2" down the middle, we can get six pieces from one sheet of whisper white!
Layer 4a: 1x4" DSP
Layer 4b: 2x4" DSP
Layer 5: is the punched shape!

And here's another sample....


Okay~ For more information on the items available (shown), click here for a pdf of the flier.
For MORE projects you can download and try with these products, click here.
AND finally if you would like to order your very own stamp set and designer series paper (after a $20 purchase), click here to go to my online store!

While you're there, make SURE you check out the clearance rack. All clearance rack orders MUST be placed online. I'm unable to order those for you. :D
Tuesday, April 5, 2011

Easter Wishes Card

Good Morning!

My good friend Kelly was here last night for a "cutting your paper" demonstration, so she can get moving when making her own cards.. :D (((Hi Kelly!))).

Anyway, we made this GORGEOUS vintage style card and I thought it would be good to share with you!

This card uses two stamp sets. One is from the current mini (good until the end of the month, nature walk, and the level 2 hostess set something to celebrate.

How about some measurements... After all this WAS a cutting class! (so to speak)

Base Layer: 5 1/2" x 8 1/2", scored and folded in half at 4 1/4". Kelly learned that if you score your paper first... THEN CUT, you get two bases from one sheet of regular computer sized paper.
Layer 2: 5 1/4" x 4" (note, this is just 1/4" smaller than the "base" layer. We ran this layer through the big shot using the Finial Press embossing folder (115963), and at the same time, embossed the flap part of our envelope. :D
Layer 3: 4 1/4" x 3 1/4"... Now, because this layer is 4 1/4", when we cut an 8 1/2" down the middle, we can get six pieces from one sheet of very vanilla!
Layer 4: 3x4" (gotta love that!) No waste! From a 12 x 12 sheet, you get 12 pieces of 3x4.
Layer 5: Very vanilla, 3 1/2" x 2 1/2"
Layer 6: We cut this based on the image we used to 3 1/4" x 2 1/4" (then made the matte for layer 5 a quarter inch larger).
Layer 7: The Easter Wishes Banner was made from the leftovers after cutting layer 2.. it's a 1/2" strip of vanilla. Save those scraps!!

Directions..
  1. We stamped the flower image, with rose red and artichoke markers, then added a little pearlized accent ink on top of the pink flowers.. it's shimmery in real life, but you dont see it in the photo. Very subtle (page 195, 121084 Illuminate top coat).
  2. We assembled all the layers to down to the Layer 2. We used tombo multipurpose adhesive for most, we used snail adhesive for the ribbon and designer paper, and two of the layers use dimensionals.. then ran a piece of Artichoke Seam binding through (in between the layers with the dimensionals. We stuck the ribbon to the back of layer two, Then put that layer on the base layer... ***Placement tip... Notice how all the layers are centered at the top? If you trying to center something on purpose, it always works out best when three sides at the top are the same.. Then it looks "centered on purpose".. That's an old art school trick when mounting your artwork.. :D
  3. We cut another piece of artichoke ribbon and used the "bunny ears" method to tie it on.. So make two loops that look like ears and tie them together.. play with it and it will look good! I dont make AWESOME bows right away, I have to take a little time and work with it.. :D
  4. I added a little rose red ink with my marker to the paper banner to help it "pop"
  5. I used the tombo multipurpose adhesive to adhere the paper banner.. and we were done!
Wow! That was JUST like you were here in class!! Hopefully if you've been reluctant to get out your goodies and cut into them, you'll be ready to go now, like Kelly is!

Have an AWESOME Tuesday!
Rubbah hugs,
Selene Kempton
Monday, April 4, 2011

My Digital Studio Updates and Hybrid Project Share!

Good Afternoon Stampers!!

There is some exciting news from Stampin' Up! Yet another FREE update with new projects available.. I found the information over on mydigitalstudio.net which I recommend you check out and join if you own your copy.. So you dont have to go looking, here are the downloads available.

**tip** MAKE SURE YOU DO THE 1.0.1 FIRST, then the 1.0.6 updates. :D I only did the first download and was confused why I didn't see the GORGEOUS project options below added to my copy of MDS!


Need your own copy of MDS? Click here to purchase it through my online store.

Updating your software:

  • If you have installed the initial update (version 1.0.1), simply click "Help" and select "Check for Updates" in the My Digital Studio software. The update will be performed automatically.


New Color Updates (Must be downloaded individually):

Windows


MAC


Also, I just saw this wonderful video from the Stampin' Up Home office and thought that I would share. First, a hybrid project, when you're talking about my digital studio, is a project that is started digitally, then finished with textile "toppings" or embellishments.

I really love doing this and have made many cards using a hybrid method. this one is really worth watching..


Have a wonderful day!!!

Selene Kempton

Mojo Monday ~ Happy Birthday

Good Morning Friends!

Today's mojo creation needed to be a 20 minute creation... and so it is.. :D

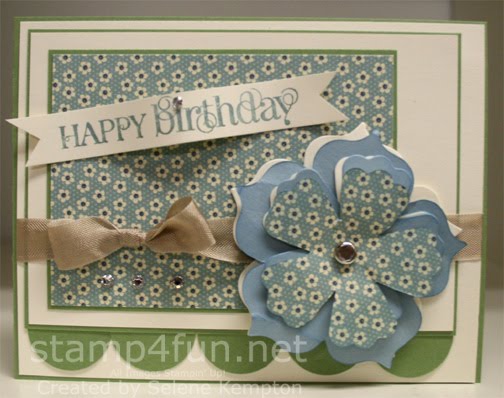
I'm really loving the layout and imagine I'll be playing with this one again for sure! From making the baby card yesterday I still had some vintage floral designer paper left out on my desk. So this card was also, primarily made from scraps! :D Love that!!

I used the fun flowers die from sizzix to cut the cool flowers, then I crumpled em' up, and lightly sponged them with not quite navy ink. I put the whole blend of flowers, there's 5 layers there, and stuck them with a push pin using my mat pack. Then I was easily able to push my rhinestone brad through.

So how about some measurements
Base layer: 11 x 4 1/4", scored and folded in half at 5 1/2", wild wasabi
Layer 2: 5 3/8 x 4 1/8" very vanilla
Layer 3: Five 1" circle punches... note I laid layer 4 down on my grid paper, and place the 1 inch circles by using the grid. :D
Layer 4: 5 x 3 1/2", wasabi
Layer 5: 4 7/8" x 3 3/8", spring vintage dsp
The remaining 5 layers are from the fun flowers die from sizzix..

To make the gorgeous bow without tails, I used Lee Conrey's amazing bow maker. (of course). :D

That's it for now, I'm off to school with my daughter.

Have a wonderful week!

Selene Kempton
Sunday, April 3, 2011

Welcome to the World ~ John David!

Oh Happy Morning!!!

My sister in law Amy had her baby this morning and boy am I excited!

I've been making baby cards all week, thinking of them, but felt especially inspired when I saw this morning's sketch challenge over on Sweet Sunday and after hearing the good news!

This one is heading with us to the hospital! So ~ I've got quite a few layers going on here! I used the Springtime Vintage DSP.

Here we go with some measurements:
Base: 10 1/2 x 5 1/4" scored and folded in half at 5 1/4"
Layer 2: Very Vanilla 4 7/8" square
Layer 3: Blue Floral DSP 4 3/4" square
Layer 4: 1 x 5 1/4" strip
Layer 5: 3 1/8" x 4 1/8 wild wasabi
Layer 6: 3 x 4" Floral DSP
Layer 7: Scalloped Circle die cut (wasabi)
Layer 8: Large clear Circle die cut from the big shot.
Layer 9: Wasabi cardstock 2 7/7 x 3 3/8"
Layer 10: 2 3/4" x 3 1/4" with the onsie cut out and mounted on top of the carriage so it would pop up
Layer 11: Scallop oval punch
Stamps Sets Used:
120576 Baby Bundle, clear mount
120528 A word for you, clear mount

I used the masking technique for all the items in the carriage with the baby.

To get the shimmer paper just right, I stamped on the back and cut it out, then just pasted it onto my card.

I'm so excited to meet John David this afternoon!

I hope you all have a wonderful Sunday!

Rubbah hugs,
Selene Kempton
Saturday, April 2, 2011

More Baby Steps!!

Good Morning!

I had fun playing with the baby sets stamp set this week, and the sketch over on split coast.. Well, I had enough cut to make 4 cards (for the new rack at the florist shoppe).

So several of you have been emailing me about how all that is going to work. So ~ I'll let you know that I am bringing the rack in.. She will charge $5 for my cards, and I will get $2.50. She also is putting out my invitations and favor samples! :D I have taken all the cards off my rack and made sure that they have the angel stamp on the back. These are located on page 144 of the idea book and catalog.

...and that's about it! Boy, I hope they like my work! :D

Measurements for both (even though they are laid out differently):
Base: 11 x 4 1/4" scored and folded in half at 5 1/2"
Layer 2: Marina Mist Card Stock 5 x 3 3/4"
Layer 3: Whisper White 4 7/8" x 5 5/8"
Layer 4: 3 1/8" x 4 5/8" Melon Mambo Card stock
Layer 5: 3 x 4 1/2 Regal rose DSP
Layer 6: 1 5/8" x 4 1/8" Melon Mambo Card stock
Layer 7: 1 1/2" x 4" Regal Rose DSP
Layer 8: 3 1/8" x 2 1/2" Melon Mambo Cardstock (I used the pinking hearts border punch on this layer)
Layer 9: 3" x 2" Whisper White


I inked the main image with markers... I'm loving these baby cards!

Off to stamp some more! Have a WONDERFUL weekend!

Rubbah hugs,
Selene Kempton
Friday, April 1, 2011

Saturday Sketch Challenge 197 ~ Fun Fabric Flowers

Good Evening Friends!

I'm so excited about this weeks sketch challenge from the operators at stampin 411. Why? Well, I was stumbling on my own sketch... Thinking ugghhhh, putting off making my card... Then, something sort of happened!

This card came together in about 20 minutes, and I really think it's the bomb! (now that it's done) LOL I stamped the medallion on crumb cake cardstock on crumb cake paper. I ran that piece through the big shot with the cute tulip embossing folder.

Then, I pulled out my fabric and big shot. I love that the fabric matches the paper below. Total happiness!!

I ran the fabric through the big shot using the fun flowers die. I started to sponge my fabric with not quite navy ink and realized that my flowers were still blending together. so I cut some vanilla flowers out of paper.. I sponged those layers also.. In keeping with the sketch, I cut half of my large flower off, then put the layers down, including the ribbon and grabbed a push pin and my mat pack. i pushed through all the layers and attached the fabric with a small gold brad.

Next, I pulled out my buttons.. I tried a few colors, off white, crumb cake, and settled on this not quite navy button.. You don't see how pretty it is in this picture.. there's lots of variation in color in the button.. Total eye candy! I used the other half of my flower as scrap, and stamped "friends" on it, then punched it with the small tag punch. I tied that all up with some linen thread... I had a ball making this card!

Measurements:
Base: Not Quite Navy, 11 x 4 1/4" scored and folded in half at 5 1/2"
Layer 2: Baja Breeze 5 x 3 3/4"
Layer 3: Crumb Cake 4 7/8" x 5 5/8"
Layer 4: DSP 2 x 4 7/8" (scallop border punched)
Layer 5-9: All die cut flowers from the big shot, paper and fabric mixed.

That's all for tonight! Come play along with your Stampin' Up! 411! operators this week, won't you?

Rubbah hugs,
Selene Kempton