Thursday, February 28, 2013

2/28 Team Swap Samples

Good Afternoon!

I've been cooped up in the studio making samples to share with you soon.  For today, I'd like to share with you the samples from my team meeting this month.  I hope you like them as much as I do!

This beautiful card is by Bonnie Merrill and Uses the Bloomin Marvelous stamp set and Sycamore street Designer series paper.
 Such a fun shape to stamp the word "brother", this card was created by Debbie Thomas.


 The wonderful clean and simple stamper Christine Crutcher made this cute project to share!

 This one was created by Diane Windrom

 Here's one by Regina Maginnis

And finally the headliner.  Joanne Cardone was gracious enough to present this gorgeous card that she cased from pinterest.  The girls had a ball putting them together!


I hope you found a little inspiration here today.  Thanks so much for stopping by! 


Love,
Selene
My Stampin' Up! Store
Tuesday, February 26, 2013

2/26 New Online Class! Stampin' Up! Basics!

Good Afternoon! 

Two posts in one day??  Well, I just had to share this exciting new opportunity I have to share with you!  How about oodles of information at your fingertips outlining the stampin' basics?  Well, that's exactly what I have to share with you today.

This online class features so many stamping basics:

Inking stamps, stamping off, creating lighter shades, how to use markers on your stamps, omitting, two step stamping, adding dimension, how to use the stamp-a-majig, masking, heat embossing, dry embossing, using stampin up markers for watercoloring, using the bigshot and more!

There are 6 comprehensive documents and 7 videos packed with information!  Click here to get your copy now. 

Please note, when you download this product ~ download it as a zip file and all the documents will be inside the one file.  So very cool!

Thanks so much for stopping by and for shopping with me today!

Love,
Selene
My Stampin' Up! Store

2/26 Vintage Verses, Sale A Bration Wedding Card

Good Afternoon Friends!

Boy, I've been a bit of a blog slacker this week!  I had my open house on Saturday, and then I prepped 3 projects for 40 women so that we would be ready to go this morning, for this week's stamp club activities. 

I just love taking time to stamp with a few people at a time, so my stamp club runs for a whole week, in one hour sessions.  I just love to visit and spend time with folks.  Anyway, check out this pretty card I made for a friend last week.  I am so bummed I'm just getting around to post it now, isn't it a Vintage beauty?  

I'm playing around with some wedding cards for next weeks stamp a stack and think this might make the "cut" into the class. 

The base is crumb cake card stock 11 x 4 1/4" and embossed with the tulip embossing folder. 
I added a vanilla and crumb cake layer on top of that.  I also put some newsprint (1/2" strip) for my ribbon/banner/bow with the gorgeous vintage brad and pearl in the middle.  The "day as perfect as you" stamp came from a FREE sale-a-bration stamp set I got with a $50 merchandise purchase. 

The butterflies were punched out of some cherry cobbler paper and attached to my card front with glue dots.  I added 3 small pearls to each.  Do you think my customers might like to make this one at next week's class? 

Thanks so much for stopping by today!  I have much more to share!  I've been a busy little bee!  :)

Love,
Selene
My Stampin' Up! Store
Monday, February 18, 2013

2/18 Stampin' Up! By the Tide and Sassy Salutations with the polished stone technique

Good Morning Friends! 

Yesterday, I spent the day at the bowling ally with my stud muffin to watch him in a bowling tournament and spend some time with friends.  It was a really fun and silly laughing kind of day.  On the way home I was playing on pinterest and found some artwork that I thought would make a cool card.  The photo here is what I found. 
Kind of cool, and dark, like a sunset or I'm not sure what, but I like it!  Today, I'm hosting a chat and challenge over on the demonstrator group SUDSOL, and decided to to a challenge around my inspiration piece. 


Not too shabby!  I think you could use the sketch for all sorts of cards.  Color blocking where you put maybe a cupcake on the right, happy birthday across the top and a balloon on the slim panel on the left?

Fun times.  :) 

So I got up before everyone in the house this morning to make my card for the challenge.  Here we go:


What do you think??
I think it's kind of funky, artsy.  :)  so I'd like to talk about the process.  In person this card is so shiny and there's gold towards the top (which I saw in the art piece at the top).

I started with a piece of glossy white paper, cut to 3 7/8" x 5".  Then I started with the polished stone technique.  To do this technique, you need some reinkers, rubbing alcohol and cotton balls.

For best results you'll want to buy the 91% alcohol.  Really soak few cotton balls with the alcohol and put a few drops of the reinkers on top.  I started with baja breeze, certainly celery and gold.  I also heat set the ink with setting 1 on my stampin up heat gun. 


After adding those three colors to my glossy cardstock, this is what my paper looked like.  

 Then, I added some night of navy and baja along the bottom to lookk more like the sample. 
 At this point, I went back to the celery and baja and filled it in.  I kept blending until I got my cardstock to the desired effect. 
Then, I grabbed my stamp sets, By the Tide and Sassy Salutations and started Stamping.  I cut my cardstock, and on the bottom panel I chopped 1/8" out of the middle to make it easy to matte on my 4 x 5 1/4" Black Card Stock.

So here's the inspiration piece, and my card again.  I hope it leaves you feeling inspired to stamp something for fun today! 
Thanks so much for stopping by today!!
Much Love,
Selene
Friday, February 15, 2013

2/15 Stampin' Up! Hello Kitty Punch Art Box, Oval Framlits, Heart punch, Flower punch, Valentines


Good Evening Friends!  

I made 22 of these cute little "Hello Kitty" Boxes for Alexis to bring to school yesterday on Valentines Day! 


  1. The base of the box is the Fancy Favor Box by Stampin' UP!
  2. I cut the largest sized oval (that's not a scallop) from the new Oval framelits.
  3. Then punch two full hearts and stick them to the back of the oval to make Hello Kitty's ears.   
  4. Next, I took some pretty in pink ink, and sponged it all around my kitty to add some color. 
  5. Her nose is the small oval punch.  I sponged it with Summer Starfruit ink. 
  6. Her eyes are the 3/4" circle punch. I added the eyelashes with a black marker, and the white lines to make her eye's sparkle with a white gel pen. 
  7. The bow, is one of the petals from the flower punch, I cut the bottom of the petal off and it sort of looked like a hershey kiss.  Then I cut the tips off, connected them and added a 1/2" circle on top.  That was all made with the real red glimmer paper.  
  8. The whiskers, I cut on my table top paper cutter.  First I cut strips to 4 1/4" down the middle, then cut 1/8" strips to make my whiskers.
  9. I grabbed my scalloped dotted border punch to make  the handles.  I made them all out of one 12 x 12 inch piece of whisper white card stock.    
  10. The tags for the boxes were so easy!  I just cut them out of the valentine paper which had these gorgeous hearts already cut!  Easy peasy!  I stuffed them with toys and candy (peanut free for one of the children to be safe).
I snapped the two photos with my phone.    Here's a photo of all the handwritten tags for the children.  Alexis wrote them out.  She also cut all the big shot stuff and helped get the packets ready for assembly.  I was up till midnight on the 13th with my big strong hubby who helps me knocking these out!  :)


Here's another view that shows the handle better.  Isn't she cute?!?


Thanks so much for stopping by today!!
Much Love,
Selene

Wednesday, February 13, 2013

2/13 Stampin' Up! Soda Pop Tops and A Little Bit of Spring CAS Baby Card

Good Morning Friends! 
Before I get started, I just want to do a hoot hoot and a shout out to Jeannette Gauthier who left me the most wonderful comment yesterday ~ you really made my day better Jeannette!  I followed the link to her blog here.  She's got some really cute projects there!  Thanks Jeannette for your kind words!  :) 

Today, I'm sharing another card that I'm going to make with my SANS Valentine's class attendee's tomorrow night.  It's really adorable and easy to reproduce.  I have some folks who have never stamped with me coming and I want to make sure that:
  1. They LOVE stamping!!
  2. They know that they can reproduce it if they wanted to make their own samples, ey?
So, I have employed the KISS method.  = Keep it simple, stamper!  What were you thinking??  :)

The base layer is Marina Mist  8 1/2" x 5 1/2", scored and folded in half at 4 1/4"
Layer 2 (inside and out): whisper white 4 x 5 1/4", and embossed with the polka dot embossing folder
Layer 3: 5" piece of Marina Mist Striped Organdy Ribbon
Layer 4: Soda Pop Tops, squished in the big shot (I'll write more about that down below).
Layer 5: 1/2" punched circles, from the A little bit of spring stamp set
Layer 5a: That's the sweetest punch from Sale-A-Bration called the petite curly label punch (item number 129405 is FREE with any $50 purchase in my online store).  The punched image "cute as a bug" measures 3/4' square.  Wicked cute and wicked simple!  :) 
 So, let's talk about the Soda Pop Tops for a moment.   In the package, you get two sizes. The large one fits the 1" circle punch and the small one is 1/2" an inch. 

To smash them down make them decorative, I ran them through the big shot with no tabs.  When you run them through you still need cutting pads so I used an old one that I snapped in half due to use.  :)  Take the oldest looking one you have and put the sharper edge (in the picture above the sharp edge is up facing you) down against the old cutting plate.  then you're ready to roll so to speak.  :)

I couldn't help myself and ran one two more times and made one completely flat by re-running on tab 1, then tab 2.  They look like little wheels all flattened.  I'm going to have to make something with them.  (smiles).

So here is a close up of the "smashed" soda pop top bottle caps.  They are designed for crafters and at $3.95 for 16, they are inexpensive and fun to work with.  I'm in!  :)
 
Can I just say that it makes me so happy to use a set that's intended for a holiday like Easter and make a non-Easter card!  (breakin the law)  :)  This A little bit of spring stamp set is so useful for so many different things and for demonstrators, I just love the "bug me anytime" sentiment!  I'll be playing with this one for sure in the weeks to come!  

Thanks so much for stopping by today! 

Love,
Selene
My Stampin' Up! Store
Tuesday, February 12, 2013

2/12 Swallowtail & Curly Cute with the Spotlighting Technique, Singles Awareness Night ~ Girls Night Out!

Good Evening Friends!  

Tonight I have a pretty simple card share.  Have you ever tried spotlighting?  It's a technique that I don't do often enough, but I love it with my Swallowtail Stamp!  We will be making this very simple card at my SANS Valentine (Singles Awareness Night Special) class.

The idea for my class came from a few friends who are Single talking about Valentine's Day.  I've always joked that it's Singles Awareness Day because those who don't have someone to snuggle up beside someone are VERY aware when the girl in the next cube gets flowers!  just sayin' :)

Thus, an idea was born!  I wanted to keep the cards simple enough so that my non-crafty friends might want to come hang out for some laughs, stamping, and of course chocolate!  (okay, maybe a glass of wine too).  Friends can come and make the 4 projects for a $10 supply fee, which is waived with a purchase (min $25).  Sound like fun?  Well, if you're in the area, you're invited.  Just click here to register

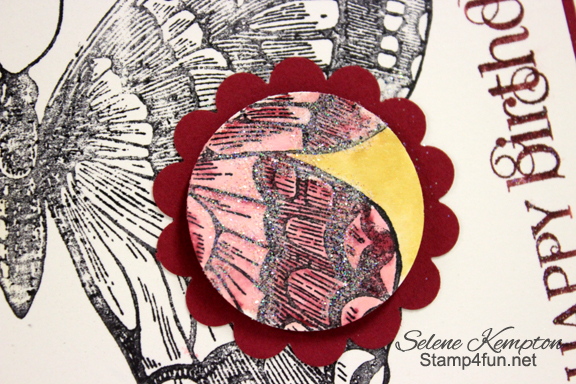
This card features the new BAH-UU-TI-FULL Swallowtail background stamp and the curly cute sentiment set from Stampin' Up!  I used a few circle punches to cut out the part of the butterfly I wanted to spotlight (and cover a big black mark on my card) to emphasize the beauty of this stamp in just the right way.

I used shimmer white and raspberry Ripple Card stock and Stazon Black Ink with 3 markers, pink pirouette, raspberry ripple and so saffron for coloring and highlighting.  I also used my aqua painter to move my Raspberry highlights. 

I punched the 1 3/8 circle punch right beside the big black mark I made by accident when I stamped my image where I could safely reach with my punch, so that the raspberry ripple 1 3/4" scallop punch would cover my mistake highlight the beautifully water colored area. HA!  Then I added some dazzling diamonds glitter with a 2-way glue pen.  Make a mistake?  Add a layer of paper and keep going! 


Thanks so much for stopping by today and for those of you who place orders with me regularly, thank you so much!  I wouldn't be able to continue without every single glue dot!  For those of you who offer words of kindness, I am so very lucky.  Thank you for leaving me comments too!   I so appreciate you all.

Love,
Selene
My Stampin' Up! Store