Showing posts with label Valentine's Day. Show all posts
Thursday, February 6, 2014

2/6 Stampin Up Starburst bundle Pouch, Valentine's Day Treat DIY

Good Morning Friends!  

Just a quick project share that I made with the Starburst Sayings bundle.  Once a month I go to housing in a town nearby me and stamp with the residents in two locations.  That day really fills me up!  I love the people there and it warms my heart to see them.  This month, I wanted to make some projects that THEY could have themselves and to let them know how I feel about them. 

I snapped this photo with my phone, and enhanced it when I got home so I could share the project with you. 
1) I started with a 12 x 12 sheet of real red cardstock and scored it at 5 and 7".
2) Then, I flipped the paper and cut at 4" twice.  So that gave me 3 bases to work with for my candy.
3) I attached the topper to the back of the package which is just the largest Oval Collection Framelit Dies and that was cut from the Fresh Prints Designer Paper pack.  They are cut to 4 1/2" x 6 1/2" so I could cut one piece per person, with almost no waste
4) Next I cut a medium cello bag down to 4x5" and just used sticky strip to stick it inside my pouch.
5) the front layers are 5x4 in coastal Cabana and 4 3/4" x 3 3/4" whisper white.
6) the coastal cabana 2 3/8" scalloped circle punch
7) the sentiment comes from the Starburst Sayings bundle.
8) We attached the front with a piece of velcrow
**tip** if you're ever making a paper craft project and your velcro is too sticky, just trim the fuzzy side a little with your scissors and it makes it easier to open and close your treat pouch!
9) Finally I have each resident 3 Ghirardelli chocolate pieces to put inside their pouch.  Many ate the first one!  :)  Can you blame them? 

Do you have someone that might like a little treat so they know how much you care?  Try this fun little pouch with a surprise inside! 

Thanks so much for popping in here today.  See you tomorrow!

Love,

Selene Kempton
Stampin' Up! Creative Coach
Thank you for your orders with me  Shop here anytime!
Friday, February 15, 2013

2/15 Stampin' Up! Hello Kitty Punch Art Box, Oval Framlits, Heart punch, Flower punch, Valentines


Good Evening Friends!  

I made 22 of these cute little "Hello Kitty" Boxes for Alexis to bring to school yesterday on Valentines Day! 


  1. The base of the box is the Fancy Favor Box by Stampin' UP!
  2. I cut the largest sized oval (that's not a scallop) from the new Oval framelits.
  3. Then punch two full hearts and stick them to the back of the oval to make Hello Kitty's ears.   
  4. Next, I took some pretty in pink ink, and sponged it all around my kitty to add some color. 
  5. Her nose is the small oval punch.  I sponged it with Summer Starfruit ink. 
  6. Her eyes are the 3/4" circle punch. I added the eyelashes with a black marker, and the white lines to make her eye's sparkle with a white gel pen. 
  7. The bow, is one of the petals from the flower punch, I cut the bottom of the petal off and it sort of looked like a hershey kiss.  Then I cut the tips off, connected them and added a 1/2" circle on top.  That was all made with the real red glimmer paper.  
  8. The whiskers, I cut on my table top paper cutter.  First I cut strips to 4 1/4" down the middle, then cut 1/8" strips to make my whiskers.
  9. I grabbed my scalloped dotted border punch to make  the handles.  I made them all out of one 12 x 12 inch piece of whisper white card stock.    
  10. The tags for the boxes were so easy!  I just cut them out of the valentine paper which had these gorgeous hearts already cut!  Easy peasy!  I stuffed them with toys and candy (peanut free for one of the children to be safe).
I snapped the two photos with my phone.    Here's a photo of all the handwritten tags for the children.  Alexis wrote them out.  She also cut all the big shot stuff and helped get the packets ready for assembly.  I was up till midnight on the 13th with my big strong hubby who helps me knocking these out!  :)


Here's another view that shows the handle better.  Isn't she cute?!?


Thanks so much for stopping by today!!
Much Love,
Selene

Saturday, January 26, 2013

Please Read: Stamping top 50 and Valentines Scrapbook Pages with Henry and glimmer paper!

Hello Friends ~

Just a quick note, I got a message from a few friends who follow my blog that stamping top 50 is having some issues!  (it's them!, not me, promise!!) 

I've removed them from my site, so problem solved for now.  They have been on my blog for years, so I'm not sure what's up.  Better to be safe than sorry! Until they get it sorted out, I'll keep the link to them off my blog.  :)

So, how about some cute projects from scrapbook class this month? 
We made these LOVEABLE pages with Henry (etta), Henry is such a girl with those cute painted toenails! 


Every month at scrapbooking class we make 4 pages, that's two, 2 page spreads for $20.  Spend at least $25 at the class and take $10 off the class fee!

The next three dates are: (all Friday's): Feb 15th, March 15th and April 12th.
Wanna join us?  
Here's a close up of the loveable sparkle.  Sigh.. :) 

Hope you are well today!  Earn a free Sale-A-Bration reward with every $50 purchase in my online store!  Thanks for checking it out!  :)

Selene Kempton
My Stampin' Up! Store
Saturday, January 5, 2013

1/5 Stampin' Up!, Henry Says take a SIP, Valentine, Split Coast Creative Crew

Good Morning Friends!  

Here is another challenge card that I made for Split Coast Stamper's Creative Crew Challenges.  This was the most difficult for me of the 4 challenges.  Here's the way it the challenge was written. 

CCREW0113CF, CreativeCrew, SUO or SUM -- Creative Focus: Do you remember what it's like to be a beginning stamper and wondering how in the world to create a card with just the basics? Create a card using just stamps, inks and paper that will win over the beginner and advanced stampers alike!

WHAT?? No Ribbon?  No brads?  No embellishments?  What's a girl to do? 

I know it's probably no big secret, to those of you who know me well, but many times I use the colors that are in my Designer paper.  So, in this gorgeous new DSP (Designer Series Paper), More Amore, they selected the colors for me.  Basic Black, Pool Party, Primrose Petals, Real red and Very Vanilla!  I do that when I am buying products for myself as well.  One couldn't possible own every single color of every product that we sell.  (At least I understand that not everyone does, wink).  So, what to do when your considering what to buy so everything matches? 

Start with your designer paper, then purchase a few colors of ink and paper to match.  So SIP = Stamps, Ink, and Paper. 

I most certainly start with the stamps, and marry that up to designer paper that suits the set, then finding paper and ink is easy peasy, and I don't need to purchase every color in the catalog.  (although I think I may have most ~ don't tell my hubby).

So, more about the card.  How about some measurements?

Base layer: Very Vanilla 8 1/2" x 5 1/2" scored and folded in half at 4 1/4"
Layer 2: More Amore Specialty Designer series paper 5 1/2" x 1"
Layer 3: Basic Grey 4 x 3
Layer 4: Very Vanilla 3 7/8" x 2 7/8"
Layer 5: scrap of very vanilla

Basic Directions:

1.  Using a primrose petals inkpad, stamp the hearts over and over on the base layer so that it covers the top 2/3rds of the card.

2.  Attach the 1" strip of Designer paper using snail adhesive.

3. Stamp "Henrietta" using a black stazon inkpad.

4.  Using a basic grey marker, add some color to the elephant.

5.  Ink up the chickadees in pool party ink, and the hooray sign with a black marker and stamp them so they are walking on the trunk of the elephant. so cute!  Stamp a second flag on scrap paper and cut it out with snips, then set it aside.

6.  Using the primrose petals ink pad, stamp it's your birthday sentiment. 

7.  Use a primrose petals marker to color her fingernails. 

8.  Attach all the rest of the layers to the front of the card.  Use dimensionals to pop up the "hooray" banner. 

So wicked cute!!

Here are the item numbers for Henry Says if you need them! 
Wood Mount, Item 128090, $29.95
Clear Mount, Item 128093, $21.95 


Happy Saturday! 

Rubbah hugs,
Selene Kempton
My Stampin' Up! Store

Friday, January 4, 2013

1/4 My Little Valentine Special from Stampin' Up!

Feel the love with two sweet offers until January 21st!
We certainly have some sweet treats for you!! 
Through January 21st, you can order these Valentine Bundles.
My Little Valentine Bundle #132242 $9.95
Happy Heart Bundle #132771 $5.95


This exclusive four-piece stamp set, My Little Valentine is only available through January 21, 2013—has every valentine sentiment you need to share your love with your significant other, best friend, favorite child, or coworker.

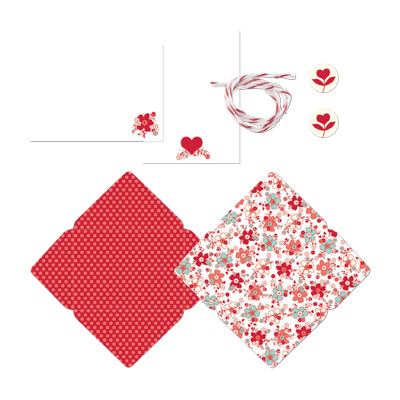
Plus, you’ll get the Sealed with Love Simply Sent Kit FREE ($7.95 value) when you purchase this brand-new stamp set! The kit indludes 10 notecards, 10 double sided envelopes, 20 paper buttons and Real Red Baker's Twine for the closure. 

How cute is this FREE kit you get!?!?!?  
My Little Valentine Bundle #132242 $9.95


The Valentine Treat Bundle —available only through January 21, 2013—contains the exclusive Happy Valentine Heart Single Stamp and a package of 1" x 8" cellophane bags. Use this sweet little bundle to create precious valentines for your child’s classroom, your favorite neighbor, or even the hot little number in your life! Single stamp coordinates with the Full Heart Punch. Clear-mount. Only available in English.

Clear blocks sold separately.
Happy Heart Bundle #132771 $5.95


Selene Kempton, Creative Coach
My Stampin' Up! Store