Friday, September 29, 2017

How to watercolor with Blender Pens, Stampin' Up Bella and Friends Stamp Set #FridayFun

Hello Friends!

It's time for the #FridayFun video for this week!

I had a few stampers down for the count this week in my stamp club.  
So, I decided I would bring the class to them and you!

This week starts a 3 week "club" series of videos for the cards we did in stamp club this month.  We did watercoloring 2 different ways and a very different spin on an old technique that makes it WAY easier!

This week I'll show you how to watercolor using ink pads and blender pens from Stampin Up!

Here is your video link:


If you loved this week's video and need any supplies, here is the list of what I used. Please reach out if you have any questions at all!

Leave me a comment or share this blog post and I'll draw a winner to send this card to and announce it next week!  Be sure to use the #FridayFun hashtag so I can find your share!

Thank you for stopping by today!

Love,
Selene
Tuesday, September 26, 2017

Stampin' Up! Spooky Cat Project Class!


I am so in love with this Halloween Class using the Spooky Cat bundle. I don't know how, but i've fallen in love with that baby rat image too. 
It really makes me giggle! 
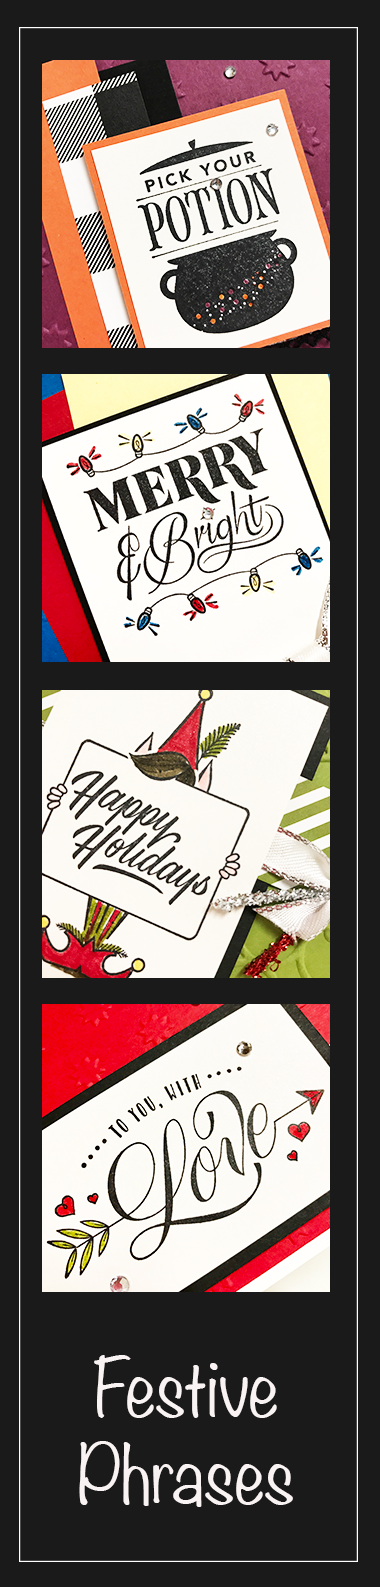
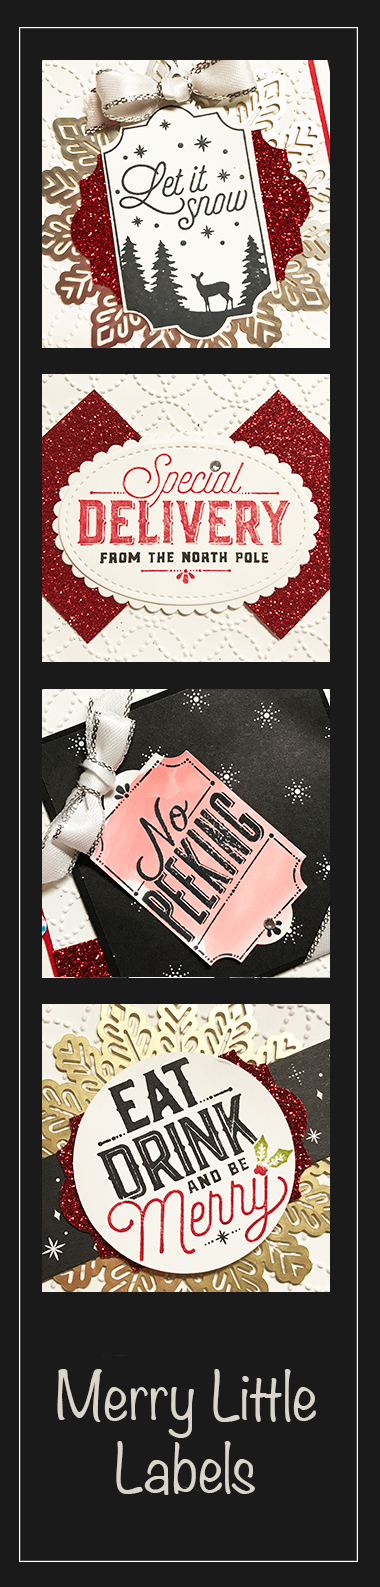
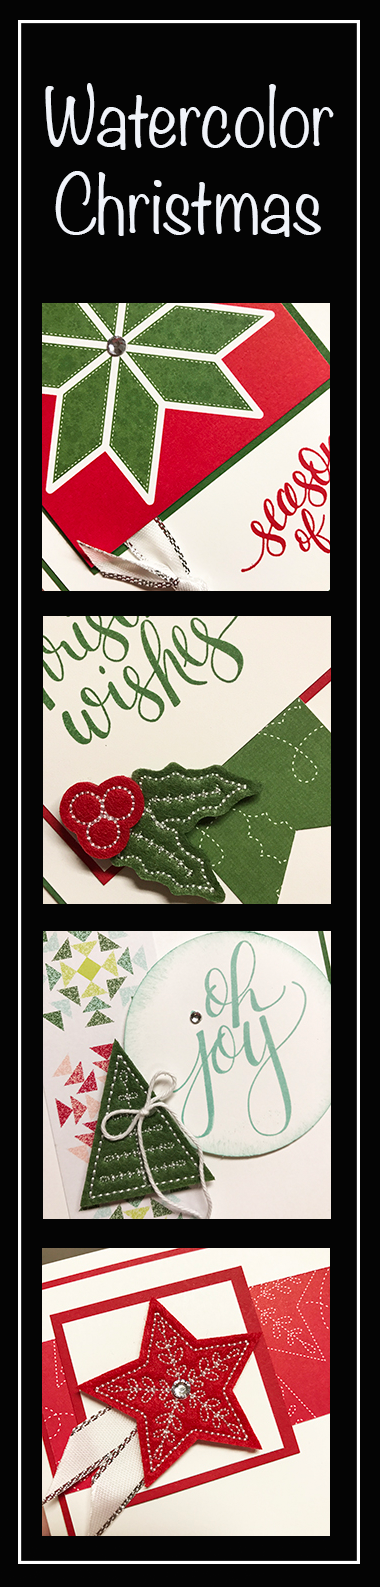
Please join us for this class next week, or grab your kit to GO!  It includes these 4 great projects that you can recreate for any season!
If you are not on my customer list, just sign up on the right to be added or email me and I will get you the link to sign up! 
Thursday October 5th!
  • 9 AM or
  • 6:30 PM
  • To GO
Get your packets, pre embossed, pre cut, bows tied, so all you have to do is stamp, learn the techniques and assemble!  They are ready for you to have fun!  
To GO? You have options, the first three options are shipped to your door.
  • Include the bundle (stamp set and punch) for $42
  • Include the stamp set for $25
  • Get just the pre-cut kit for $15 
  • Get just the directions for $10
Optional Supply Kit Add on ~ this is as my cost (retail value 18.02):
  • Pumpkin Pie Reinker
  • Berry Burst Reinker  
  • Wink of Stella (Clear)
 Four Ways to get this class:
In person: at 9 AM or 6:30 PM, Thursday Oct 5th
Get the Kit to Go: Same price $15 or waived with a minimum order.  Just place your qualifying online order on my website, and use host code: NDA9A2KR
I'll mail you the packets and email directions the following week (by Oct 12th ~ pending supplies availability).  Please note** Do Not Choose - No Contact - when you place your order.  So I can see where to ship your packets!  :) I cannot see who is ordering when your online account is set up with no contact.

Online Directions Only:
  Receive the printable PDF directions, and video directions by Oct 12th for all the cards with complete supply and shopping lists for only $10 ~
If you want the pre-cut, embossed, packets to go, it's only $5 more (no brainer!)  **US shipping only on that please.
Note. digital file will also be sent by the 12th also.  These are my in-class directions sheets and contain full measurments and step by step directions. The photos have not been watermarked and the sheets do not have my name on them, so they are demonstrator friendly to reuse them for a class. 
Demonstrators: you may offer the sheets for free with any $50 order.
Complete supply list and shopping list will be part of the directions.
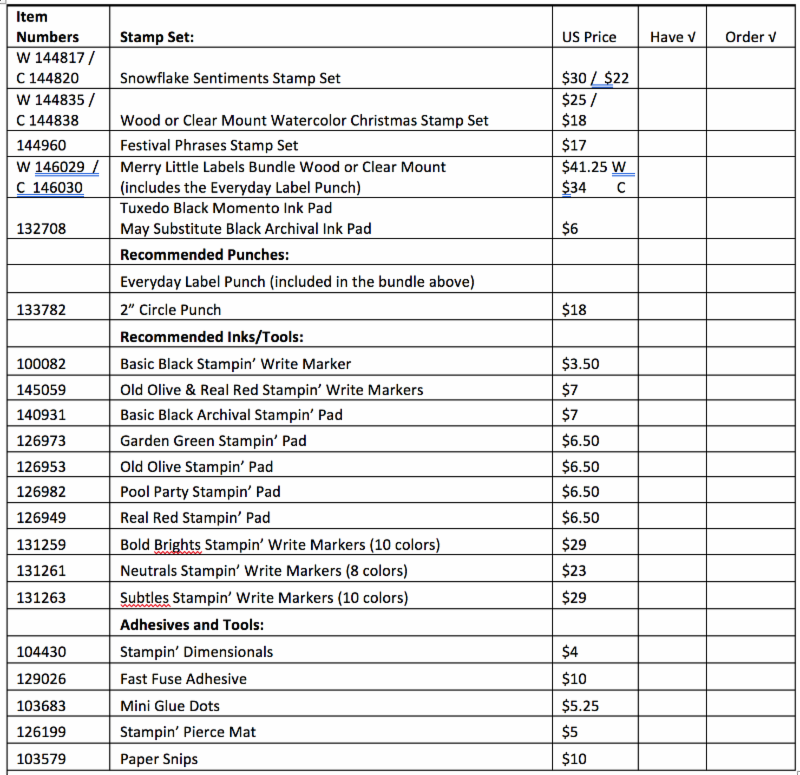
Recommended supplies to assemble these projects as shown with the packets:
Stamps: 
144749 Spooky Cat Photopolymer Stamp Set
Ink: 
Pumpkin Pie Ink Pad
Tuxedo, Momento Black Ink Pad
Supply Kit Add on (retail value 18.02):
Pumpkin Pie Reinker
Berry Burst Reinker
Wink of Stella (Clear)

You will also need from the drugstore:
91% Rubbing Alcohol
Cotton Balls 
Recomended to have on hand:Fast Fuse
Sponge Dauber 
Dimensionals
Glue Dots
Paper Snips 
For To Go packet customers all cardstock will be prepunched, precut, scored to make assembly as simple as possible.  I will also pre-tie any bows to make it easy to assemble.
Friday, September 22, 2017

Sudden Response Turns 9! Stampin Up Demonstrator Disaster Emergency Network

Who would have thought that sending one little box, could have started a chain reaction of goodness?
Nine years ago today, I cofounded a group called SUDDEN Response to help demonstrators get their businesses back on track after a disaster.
It started with a box that I mailed to someone I barely knew. I heard about a fellow crafters flood and the loss she took to her business. All her business supplies, catalogs, all her samples, cardstock and more. I walked out into my studio and imagined my craft room under water and my heart broke!
I stuffed a flat rate box to capacity of things I thought she would need to get back on her feet. I took my baby girl Alexis by the hand (who was 3 at the time), and showed her what we do when someone needs us.
A few days later I got a phone call. It was my new friend! She was crying, and then so was I. I was teaching a class and painting with crystal effects... She said she wanted to pay it forward. So, within a few days, SUDDEN Response was born.
SUDDEN is an acronym for Stampin Up Demonstrator Disaster Emergency Network.
Just this week we have sent boxes of love to three different people who experienced catastrophic flooding after the recent hurricanes and we stand ready and united to help each other after the storms.
SUDDEN Response is celebrating 9 years today! I asked my friend Sharon Armstrong to share her story. She did a video for the group and I wanted to share it with you!
If you are on Facebook and a current demonstrator residing in the US, and you would like to help, just click here to join us! If you are a Stampin' Up! customer, ask your demonstrator how you can help and go in on a gift. We do have a current open need for help to rebuild a business.
Just when you think the world has gone crazy, look around!  
There is goodness everywhere! Thank you for letting me share Sharon's story with you (and mine).
Here's a link to Sharon's video.


Love, Selene

Stampin' Up! Seasons of Whimsy, Seriously Easy Card Box And Wink of Watercolor Tutorial #FridayFun

Hello Friends!

It's time for some #FridayFun!

This week, I would like to share my card box with you!  It is so seriously easy and I have my normal regular weekly video here for you!


It features the Season of Whimsy Stamp Set from Stampin' Up! 

Here is a LINK to the video for those of you seeing this via email.  

Thanks so much for letting me share with you!  I think my mom is going to love her box of cards! 


If you're looking to get your own Season of Whimsy Stamp Set?  Here is the info on a FLASH SALE that I am running.

I have a FLASH SALE running till the September 28th!
Check out what YOU can earn!
  • Place a $25 order using host code W3DCZA9D and receive 5 cards in the mail from me!
     
  • Place a $50 order using host code W3DCZA9D and receive the 5 cards plus the Season of Whimsy Stamp Set (shown above). Plus, ONE FREE TUTORIAL from  
  • Place a $100 order using host code W3DCZA9D receive the 5 cards, the Season of Whimsy stamp set AND a $20 grab bag of selected retired products based on your order!  Plus, TWO FREE TUTORIALS from
     

You MUST apply the host code W3DCZA9D to the order so I can get you your goodies!  
  Thank you for all your help every month, so I can continue to do what I LOVE as a job!


Here are my three latest videos (three part series, on what I did with my team for a reward night).


Wednesday, September 20, 2017

Stampin' Up Seasons of Whimsy Stamp Set

Hello Friends! 


I am in love with this stamp set from Stampin' Up!, Seasons of Whimsy.  

Add some markers and Wink of Stella and rhinestones and it makes my heart beat faster!

Measurements:

Base: Pool Party 8 1/2" x 5 1/2", scored and folded in half at 4 1/4"
Layer 2: Basic Black Cardstock, 3 7/8"x 2 5/8"
Layer 3: Bermuda Bay Cardstock 3 7/8" x 2 5/8"
Layer 4: Watercolor Paper 3 3/4" x 2 1/2"
Layer 5: Bow, tied from Bermuda Bay Ribbon, cut to 1/8" to Make it thinner
Layer 6: Three small Rhinestones.


Directions:


  1. Stamp the ornament to create a background with Bermuda Bay ink on the base layer of the card.
  2. Stamp the string to the ornament, then the ornament using the Basic Black Archival Ink Pad onto the Watercolor Paper layer.  
  3. Scribble Daffodil Delight and Bermuda Bay Markers onto a plastic bag to make a paint palette.  
  4. Pick up the daffodil delight Ink, and watercolor outside the ornament to create a yellow background. 
  5. Once the background is colored, switch to the Wink of Stella Glitter brush, Continue to paint the inside of the ornament with the Daffodil Delight ink pad.
  6. Pick up the Bermuda Bay with the Wink of stella Brush and finish painting the ornament.
  7. Using a stampin sponge, sponge Bermuda Bay ink onto the outside of the watercolor paper layer.
  8. Cut a piece of 3/8" ribbon up the side so that it is only 1/8" of an inch thick.  
  9. Tie the ribbon in a bow.
  10. Finish by adhering the layers together as shown above with Fast Fuse adhesive.
  11. Use a glue dot to adhere the bow.

Thank you for stopping by!  Did you see the special I am running until September 28th? You can earn this stamp set for FREE.


Check out what YOU can earn!
  • Place a $25 order using host code W3DCZA9D and receive 5 cards in the mail from me!
  • Place a $50 order using host code W3DCZA9D and receive the 5 cards plus the Season of Whimsy Stamp Set (shown above). Plus, ONE FREE TUTORIAL from my class/planner  library.
  • Place a $100 order using host code W3DCZA9D receive the 5 cards, the Season of Whimsy stamp set AND a $20 grab bag of selected retired products based on your order!  Plus, TWO FREE TUTORIALS from my class/planner library. 

    You MUST apply the host code W3DCZA9D to the order so I can get you your goodies!  
  
Thank you for all your help every month, so I can continue to do what I LOVE as a job!

Love, 
Selene


Sunday, September 17, 2017

Flash Sale From Stampin' Up! with Selene, Featuring the Season of Whimsy Hostess Set

Flash Sale from Selene
Hello Friends!

The "stud muffin" and my support system Brian Kempton has decided he's going to
come with me this year to "onstage" which is a training and awards event in Salt Lake City!  It has me looking at my numbers, which is different for me.

However, I am a little out of reach to hit a year end goal.  I am so close, but so far away from my career milestone of $400K in sales!  

Because of THAT ~ 

and because I appreciate YOU ~ i'm going out on a limb that feels about this high up!...


I have a FLASH SALE running till the September 28th!
Check out what YOU can earn!
  • Place a $25 order using host code W3DCZA9D and receive 5 cards in the mail from me!
     
  • Place a $50 order using host code W3DCZA9D and receive the 5 cards plus the Season of Whimsy Stamp Set (shown above). Plus, ONE FREE TUTORIAL from  
  • Place a $100 order using host code W3DCZA9D receive the 5 cards, the Season of Whimsy stamp set AND a $20 grab bag of selected retired products based on your order!  Plus, TWO FREE TUTORIALS from
     

You MUST apply the host code W3DCZA9D to the order so I can get you your goodies!  
  Thank you for all your help every month, so I can continue to do what I LOVE as a job!


Here are my three latest videos (three part series, on what I did with my team for a reward night).

Saturday, September 16, 2017

Stampin' Up Count My Blessings Acorn Card

Hello Friends,

I have a sweet card share for you this morning.  

These sparkly acorns make my heart DANCE a little bit!


Measurements:

Very Vanilla Card Stock (5 1/2" x 8 1/2" card base, 4 7/8 x 3 5/8”, 2 ½” x 2 ¼”)
Early Espresso Cardstock (5 1/8” x 3 7/8, 2 ¾” x 2 ½)
Garden Green Cardstock (5 x 3 ¾, 2 5/8 x 2 3/8”)
Painted Autumn Designer Series Paper, Acorn Pattern (5” x 2”)

Directions:


1.     Start with the Garden Green Marker, to add ink to the leaves part of your image.  
2.     Add the Early Espresso Marker to finish the acorns and branches. 
3.     Huff the back of the stamp to add moisture and stamp to create your focal point.    
4.     Use a Wink of Stella Clear Glitter brush to move the marker color and fill in the image.
5.     Use the Triple Banner Punch to make the Designer Paper into a banner.
6.     Adhere the rest of the layers as shown above with Fast fuse adhesive and you are done!


Thank you so much for stopping by today!  If you have to have some of these supplies, everything I used on this project is listed below!  

Oh and the GOOD stuff!

I am a little out of reach to hit a year end goal.  I am so close, but so far away from my career milestone of $400K in sales!  

Because of THAT ~ and because I appreciate YOU and all your help every month to be able to continue to do what I love for work, I have a FLASH SALE running till the September 28th!

  • Place a $25 order using host code W3DCZA9D and receive 5 cards in the mail from me! 
  • Place a $50 order using host code W3DCZA9D and receive the 5 cards plus the Season of Whimsy Stamp Set. Plus, ONE FREE TUTORIAL from my class library.
  • Place a $100 order using host code W3DCZA9D receive the 5 cards, the stamp set AND a $20 grab bag of selected retired products based on your order!  Plus, TWO FREE TUTORIALS from my class library.

You MUST apply the host code to the order so I can get you your goodies!  

Click any of the photos below to enter my store. 

Thank you for visiting!

Love,
Selene


Friday, September 15, 2017

Stampin' Up Stepped Up Watercolor Christmas Card Kit, #FridayFun, Episode 8


Greetings Superstampers!

For the past three weeks we have been running a series here. 
Today is the last video in that three part series.

You can check out Video 1 that features the card box here

Video 2 was last week and showed the basics of the Watercolor Christmas card kit here.


This week, I will show you how to take the WHOLE PROJECT up a notch by:
  1. Creating a banner for one of the projects.
  2. Embossing all the red pieces of the card kit
  3. Sanding some of the embossing for effect
  4. Adding Wink of Stella! (I hope you can see the sheer AWESOMENESS in the video)
Here is your video for this week's #FridayFun!


Thank you for joining me today!  Stay tuned for an end of the year special that will be coming out within the next week!  I'm ready to celebrate YOU!

If you need any of the supplies from today's project, here is a list of everything I used.  

Love,

Selene

Tuesday, September 12, 2017

Last Day to get your kit for the Stampin' Up! Holiday Rollout Bash Online or In Person

Hello Friends!

I'm JUST SO EXCITED.

Have you ever wondered what 240 pre tied bows looks like?  
Well, here you go!


Crazy, Mad, Prep Underway for 960 Individual Cards, 60 packets, 16 different designs.
Only 6 packets left!


Don't miss out!

This class will feature FOUR BRAND NEW stamp sets:
  • Festive Phrases
  • Merry Little Labels
  • Snowflake Sentiments
  • Watercolor Christmas 
or substitute similar stamp sets to make your projects!


Here's the link to grab your kit!  Register Now! 

This registration will close down Tuesday September 12th at midnight! I will need a day or two to get the pillow gifts made.
IN PERSON CLASS OPTIONS:
  • Everyone makes 16 Full Size Cards with Envelopes. 
  • Always fun to win a raffle!
  • Every person will also receive an event bag and a small pillow gift.  
TO GO CLASS OPTIONS:
  • 16 packets, with directions mailed to your door for $53 (includes shipping) Plus the PDF tutorial by September 24th.  
  • or PDF documents of all 16 cards with photos and directions (great for your own use, or to print and take to workshops).  
Recommended Supply List: You can always substitute to take the the class and use things that you have on hand to make the cards when taking the to go. This is what you will need to assemble the projects as is.  This list is also at the bottom with links to my store if you need them.


I hope to see you Sunday!  If not, I will see you online when you get 4 individual videos.  One for each of the 4 card classes!  

Until Later!

Love,
Selene

Sunday, September 10, 2017

Last Call for this years 2017 Catalog Kickoff Event! Supply List Announcement

Ho Ho Ho!! I'm throwin' a BASH and I hope you can make it!  Come let me spoil you for THREE hours on a Sunday afternoon!

Join us, the Stampers With HeART Team, on Sunday September 17th and  make 16 BRAND NEW different cards using stamp sets and supplies from the 2017 Stampin' Up HOLIDAY and get to play with the new goodies all in 3 hours!  This by far is the most sought after event that I run all year!  I am limited to 60 packets, in person or to go and they are while supplies last!  Don't miss out on the fun!

Be the FIRST to see the new gorgeous papers, In colors, Big Shot layering framelits and punches  in person! 

 This class will feature FOUR BRAND NEW stamp sets:
  • Festive Phrases
  • Merry Little Labels
  • Snowflake Sentiments
  • Watercolor Christmas 
or substitute similar stamp sets to make your projects!

       
This registration will close down Tuesday September 12th at midnight! I will need a day or two to get the pillow gifts made.
IN PERSON CLASS OPTIONS:
  • Everyone makes 16 Full Size Cards with Envelopes. 
  • Always fun to win a raffle!
  • Every person will also receive an event bag and a small pillow gift.  
TO GO CLASS OPTIONS:
  • 16 packets, with directions mailed to your door for $53 (includes shipping) Plus the PDF tutorial by September 24th. 
  • or PDF documents of all 16 cards with photos and directions (great for your own use, or to print and take to workshops). 
Recommended Supply List: You can always substitute to take the the class and use things that you have on hand to make the cards when taking the to go. This is what you will need to assemble the projects as is.  This list is also at the bottom with links to my store if you need them.


Please Join Us On:
Sunday, September 17 from 1-4 PM
16 Different Cards featuring products from the brand new catalog, plus two full embellishments for only $45!