Wednesday, March 31, 2010

Stamp Club Card

Good Morning Friends!

This week is card club week.. typically my busiest week of the month. This month I made 40 packets each of two projects. I'll have quite a few fun stampers here at the studio over the week. Here's one of them... The inspiration from this card came from the sketch over at stamping 411, a blog I have with 7 girlfriends from across the country.

This stamp set used in this card are Awash with flowers, which will be available next month on preorder from the 2010-2011 idea book and catalog from Stampin' Up! I also used a staple stamp set from my bookcase, Sincere Salutations.

Although this card is intended as a sympathy card, friends who came to the studio made it into birthday, thank you, best wishes and good luck! I love when a set really gives you versatility to make what you need at the time.

I hope you're having a wonderful week and that you have time to stamp something fun!

Rubbah hugs,
Selene Kempton ~
Monday, March 29, 2010

Mojo Morning Stretch

Good Morning Friends!

This is stamp club week for me, so it's a busy one! There are a lot of layers going on for this mojo monday sketch challenge, so I made some of them a little plain.. I'm not sure how I feel about this one, but I really had fun just making it.

This card uses the greenhouse garden stamp set.. and my favorite color combination lately, bordering blue and razzleberry.

Hope you're having a good Monday
Friday, March 26, 2010

Saturday Sketch Challenge 144 and a HUGE Announcement!!!

Oh I'm so excited! We just invited a new operator to the team over at stamping 411!! To read more details about Kerin and this week's excellent sketch adventure, you can check out the post over at stamping 411! So I can finally stop stalking her work, and enjoy the benefit of working with her! Welcome to the family Kerin!

Tomorrow, I'll be spending the WHOLE day at a craft fair at Dracut High School. If you're local and stop by, you could win a free class, or a gift certificate.

On to this week's post! I made the top card shown here, even though I had already used this sketch in my floating reinker tutorial. But I couldn't use the same exact card twice, now could I? It's so cool to see how just switching out a few of the papers, you can have a totally different feeling card! I have a girlfriend who is feeling a little bit out of sorts this week, and I thought she could use something bright to brighten up her day.. So I'll be sending this beauty out soon!

The measurements for the card above are slightly different. than the one below.
Base: 11 x 4 1/4", scored and folded in half at 5 1/2" ~ whisper white
2nd: Layer: 5 1/8" x 3 7/8" ~ tempting turquoise
3rd Layer: 5" x 3 3/4" ~ Whisper White
4th Layer: 3 3/4" x 3 1/4" ~ tempting turquoise
5th Layer:3 3/4" x 2 5/8" ~ Pink Passion
6th Layer: 3 3/4" x 2 1/2" ~ DSP is from the Sunny Day simply scrappin kit

The measurements on this one are slightly different.

Base: 11 x 4 1/4", scored and folded in half at 5 1/2" ~Rich Razzleberry
2nd: Layer: 5 3/8" x 4 1/8" ~ Bordering Blue
3rd Layer:5 1/4" x 4" ~ Whisper White
4th Layer: 4 x 3 1/4" ~ Rich Razzleberry
5th Layer:4 x 2 5/8" ~ Bordering Blue
6th Layer: 4 x 2 1/2" ~ Shimmer White

If you wanted to simplify the above, that's totally cool! Go with it! If a measurement like 3/8" totally baffles you, you can change the measurement OR you can refer to Operator Lee's tutorial on measurements here.

If you are so inclined, please stop by and play along, or just attempt a card on your own! The operators are here to inspire ~ so I hope we've done that!

Have a great week, and I hope you have time to stamp something FUN!
Rubbah hugs,
Selene Kempton

Bloggers Challenge ~ Sketch challenge

This week our list mom, Lisa Somerville came up with a most BEAUTIFUL sketch challenge for the bloggers challenge group.

As you all know, I {heart} sketch challenges and THIS one is no different. In fact, I can see myself using this over and over again!

I used the big shot on the polka dot embossed layer. I used the scallop circle punch, and cut the "friend" stamp tight to the image with scissors. I added a touch of sparkle in the center of the flowers.. Although I could make the whole thing extra sparkly, sometimes, less IS more.

I can't wait to see what my friends are doing for bloggers challenge this week. Great Sketch Lisa!!
Thursday, March 25, 2010

Cards that I have received this week

Good Morning Friends!

Again, I feel like my cup runneth over with the awesome stamping friendships I have been lucky to have. It sometimes blows my mind that I wouldn't have some of these folks in my life if it wasn't for the blessing of having been introduced to Stampin' Up! For that, I am so grateful.

This week, I received two BEAUTIFUL cards from to BEAUTIFUL friends! This first one is from Bonnie Merrill. She was unable to attend the last team meeting because she has been taking an active role in helping her family through a difficult time. I was so excited and surprised to see that in the middle of this busy time, she took the time out to make me a card! Not only that... Isn't it gorgeous?? I just love everything about it. The composition, the excellent cutting, that cool punch behind the background frame! Thank you Bonnie for being an inspiration to all around you and to me personally.

Speaking of inspiring women, I also received THIS gorgeous card from my friend Patti Chesky. I love how masculine it looks.. hey! she used the same ribbon as Bonnie's card above! I didn't notice that before! I guess I need to pull out the pack that sits in my drawer and make something with it. To read more about Patti's cool creation, you can check out her post on it here!

Both of these cards will be displayed proudly in my stamp room. Thanks for the creative and personal inspiration that both of you provide in my life! It so brightened my week to get not one card in my mailbox but TWO!
Wednesday, March 24, 2010

My Inspiring Team

First ~ Sorry about the long post.. There is MUCH more artwork below, so don't forget to scroll down!

This Sunday was my team meeting... It was an absolutely glorious day outside and I secretly thought.. ugghhh.. a team meeting... I really only felt that way, because normally we have 10-12 people in attendance and there's a buzz about the room.

About every 6 months or so, I do a shoe box swap in lieu of a regular meeting. So, everyone brings a prepped card and we either pass the boxes, or we get up and move to the next station. Everyone leaves with every card that was designed by their team mate. A lot of times, I will have it at the pizza place near my home, Romano's, because there just isn't enough room in the studio for all of us.

Some of my adopted downline are in Florida (the rats ~ I'm so jealous! ~ in a good way) and it was a little quiet around the studio.. There ended up being six of us. We listened to my crazy ipod.. I swear I deleted the Christmas music, but we listened to some of that to show tunes, Celine Dion and more... Everyone brought a little something to share. Cheese and crackers, drinks and ...my husband is still talking about Anne Marie's fantastic fudge brownies. Some had a little wine (an ounce at a time with the small cups we had LOL) and others drank iced tea. More importantly, something special happened. There it was. 6 women from all different walks of life coming together and inspiring one another with personals stories, sharing stresses and personal triumphs over major obstacles.

Instantly I felt a giant shift in the way I felt about my meeting. I was so happy I had it, and a little happy that it was so intimate. We all sat around the table and had a glorious conversation. Being inspired by one another on so MANY levels other than stamping... and I couldn't help but sit back and smile after everyone left and think...

YEA, that's it. That is why I do what I do. What a wonderful group of caring, loving mom's, sisters, wives and friends... this is where it's at.. Somehow I missed getting a photo of Deb's awesome card.. Hopefully she'll stop by so I can take a quick picture. I wanted to share with you some of the talent from my team. If you have a team of demonstrators, no matter how big or small ~ I recommend getting together once a month. It might just make a big difference in YOUR life, the way the ladies on my team make such a big difference in mine.

Speaking of being inspired by friends... My card, shown above, started off as a case of my friend Robin Merriman. I called her up and asked her if I could case her card exactly for my team meeting. When I sat down to make it, it looks nothing like her original.. funny... but I did use her idea on the placement of the stamps and my butterflies. You can check out her original by clicking here.

I really wanted to show the awash with flowers stamp set to my team, because hostesses can get this set FREE with a $350 workshop in the month of April!

Here is Ann Marie's gorgeous creation. She said that she thought about doing the flowers that went with the set, but that punches were a more simple way to achieve the same look. She punched all the flowers out for us ahead of time, and this AWESOME creation went together in minutes! Wouldn't this make a wonderful workshop card?

Christine Miscia is the newest addition to my team of inspiring ladies! Chrissy made this adorable pink and brown card. Do you see the top note peeking through inside? She used this as the insert for so folks could write on that instead. I wish when I was new to stamping that I was making creations like this! Clean and simple ~ Gorgeous Christine!
Karen Bernier
made this next adorable creation! We used markers to color the main image, but we used a blender pen and water color crayon to color the base. Makes it look more like real chocolate! Next, we topped off the main image with a two way glue pen and dazzling diamonds! I love that the photo picked up the glitter! Awesome job Karen!

And Miss Gina~~~ That is Regina Maginnis... The first card she made is for the shoe box swap.. She's always bringing me other cards to see, and I always seem to want to photograph them for future use. Check out Gina's cards!!!

First, this is the one for the shoe box swap. Gina shared that contrary to the "never touch the glue dot" rule, she finds it easy to peel a glue dot off, stick it to the paper and then attach the felt pieces from the mini! Excellent tip! We also attached the brad, then used the craft and rubber scissors to cut the back of the brad so you dont see the pieces coming through. Before coming to the meeting, she used the circle scissor plus to cut all the circles for us! Adorable card Gina!
Here's another card miss Gina had to share. Clean and simple, I really love the rock and roll on the flowers~ Beautiful work as always!
This next card by Gina blew my socks off! Hey~ I know that sketch!! This is last week's Stamping 411 sketch. Although she plays along she doesn't have time to post or photograph her artwork.. Such a shame! I know I would follow her blog!
I hope you have been inspired by some of the artwork I've shown here. If you like what you've seen, please leave the girls a comment! Maybe we'll inspire some of them to start their own blogs! I think they should all be blogging.. look at the talent!
Tuesday, March 23, 2010

Featured Artist Crystal French ~ Embossed Reinker Spread

The number one reason why I love being a Stampin' Up! demonstrator is friendships. Please meet one of my newest girlfriends (well you can see her work anyway), Crystal French! Crystal shared her wonderful original cards from the her embossed reinker spread technique.
I had made some cards then a tutorial using a technique that I had named "reinker float". It turns out that this technique was originated by artist Crystal French and is actually called, "Embossed Reinker Spread". Perhaps that's why I couldn't find a tutorial!

Thank you so much Crystal for sharing these wonderful projects!


Monday, March 22, 2010

Sneak peek at this weeks stamp a stack class

Tuesday and Wednesday of this week will be Ronald McDonald card night here at my home. Class attendees will make 12 cards, (3 of each, 4 designs) for $30 and get this ronald mcDonald house set free! (retail value $14.95).

There are 4 spots left. Contact me today to reserve your seat at e.selene@verizon.net.

Contribute to the cause of Making a Difference in the lives of children served by Ronald McDonald House Charities with the Very Thankful stamp set. Not only will you be able to share your thanks with others with these delightful images, but you will have the gratitude of the children and families who benefit from the donation of $2 per set that Stampin' Up! contributes from the proceeds of this stamp set.

Mojo Monday Stretch

Good Morning Friends!

I am having a CRAZY beginning to my week, with a ton to do.. But I always like to start my monday with a cup of Joe and some Mojo monday. :)

I had my team at the house last night. We feasted on cheese and crackers, red wine, and brownies.. while we made some awesome cards. I'll be sharing some of their fantastic creations later this week. At the end of the night, the topic of glossy paper techniques came up and I quickly showed polished stone.. This morning, all the goodies are still on the table, so I thought I'd make some "polished stone" Easter eggs.

I haven't given this guy any ink at all! How fun to make him pink!

See you later this week!
((((hugs))))
Selene Kempton
Friday, March 19, 2010

Saturday Sketch Challenge 143

Hello Friends!
I scheduled my post for tonight because I am doing a workshop for my girlfriend Diane.

It's Friday night, and you know what that means! It's another sketch challenge from the operators at the Stamping 411 blog!

My stampers and I did this at last weeks embossing techniques class. I had my card done over a week early! Love that!!

Tonight's sketch seems very simple. Heck! Simple is good! I've been covering all kinds of embossing techniques, and this one is emboss resist.

Plainly put, I embossed my image from the embrace life stamp set, then used a brayer to put some bordering blue ink across the whole thing. I added some razzleberry with a blender pen, then drew a line for a more dramatic look on the coloring of the flowers. What do you think? I love this color combination... It's my new BFF, I think.

The polkadots are an embossing folder in the SU Spring mini catalog.. Everyone wants that folder it seems! I can't blame them.. I ordered 3 of them.. The first one, I cut into strips so I could emboss rows of 4,6, or 8 polkadots.. Fun!!! The second I cut an oval out of with my craft knife so I can have embossed polka dots all around an oval frame in my card stock. And one plain one, that I seem to use over and over again. Why wouldn't I.. it's gorgeous!!!

So, here is what I used to make this card and the measurements are in purple.

Stamp Sets: Embrace Life

Ink: Versamark, Bordering Blue Ink pad, Rich Razzleberry Marker and ink pad


Cardstock and Measurements:

Base Layer: Whisper white, 11 x 4 ¼” scored and folded in half at 5 ½”

Layer 2: Rich Razzleberry 7/8” x 5 1/8”

Layer 3: Whisper white 3 ¾” x 5”

Layer 4: Bordering blue 1 x 5”

Layer 5: Rich Razzleberry 2 1/8” x 2 3/8”

Layer 6: Whisper white 2 x 2 ¼”


Extras: Whisper White Taffeta Ribbon (12”), Dimensionals, Polka Dot Embossing folder, heat gun, Embossing Buddy, Powder Pal tray, Tombo multipurpose adhesive, snail adhesive (for the ribbon), Clear Rhinestone brad (1), corner Rounder, brayer


Thanks so much for stopping by!
Rubbah hugs,
Selene Kempton

Bloggers Challenge ~ think Spring

Today's blogger's challenge theme is "think spring." When I think of spring... I think of some specific techniques. Usually crayon resist, reinker float and others.. This morning I decided to try a spring version of Josephs Coat. I think now, I could have used more flowers.. :) But it was a really fun technique to try.

I used a sneak peek set that will be available in the new catalog, awash with flowers. It's a gorgeous 18 stamp, two step set. Next month SU is running a promotion that you can get it free with a $350 workshop. Isn't that the coolest??

In a nutshell, Josephs coat is when you emboss (here I did it with three colors of craft ink and clear), then use a brayer to add a very dark color over the rest of your glossy cardstock. My white embossing looks a little purple from the black ink, but other than that, I like it. Any suggestions for me on how to fix the purple tone? Perhaps I could have used white embossing powder instead of clear.

It's a super fun technique and my finger are all inky. :) I have a workshop for my friend Diane tonight, and posts going up over on stamping 411, so it's going to be a busy bee day for me!

Happy Spring and Rubbah hugs,
Selene
Thursday, March 18, 2010

Becky's Party ~ Build a Page.

Thanks to all who weighed in on my workshop card for this weeks workshops... I was still having a bit of a block for tonight's workshop for my good friend Becky.

Sometimes scrapbooking can be overwhelming in the 12 x 12 size. Today I'd like to show you a way to build your pages that doesn't seem so daunting.

One of Becky's guests called me today to ask a question.. While I was racking my brain what to do tonight. She said that her sons birthday theme is going to be the old west! Instantly I had ideas on what to do.... So, all the guests at tonight's workshop will make the very pretty vintage share from earlier this week. and this 6x6 page.

Becky's little boy at the playground makes an awesome "wanted" page, with him behind the bars! So funny! I used a bit of twine and a mini clip to make the lasso in the upper left hand corner of my page... My goodness, I'm happy with this one!

Next ~ at the workshop, I'm going to quickly show how to build a page. Using random images from the same set, I stamped a background on 12 x 12 paper. I added an 8 1/2 x 11 piece of burgundy on top of that (and didn't need to cut anything ~ isn't THAT cool?). Then I matted another 5x7 and and cut a journaling block out from scraps and stamped the 4 corners.. A little ribbon, and a punched star, and this is ready to go.... Are you ready to try a build a page??
Here's the build a page!
Wednesday, March 17, 2010

How To ~ Do the reinker Float

I did a tutorial today for the stamping 411 blog and thought you might like to see it on my blog too. Have a great day. Also, someone posted over there that Patty Bennett did a video on this if you need it.

Good Morning Friends!

I have been playing with the reinker float technique for the last few weeks. I had an embossing class at my house and it was one of the techniques we covered.

I know that Crystal French from Denver came up with this idea. I heard about it from Sandi Maciver after she attended the the Stampin' Up! Seattle Regional Seminar. There it was demo'd by Connie Ingram. In other words, this is not my original idea. However... I never really "got" the directions for it, so my spin might be a little different from the original. I couldn't find a tutorial online for it anywhere to point people to, so here we go.

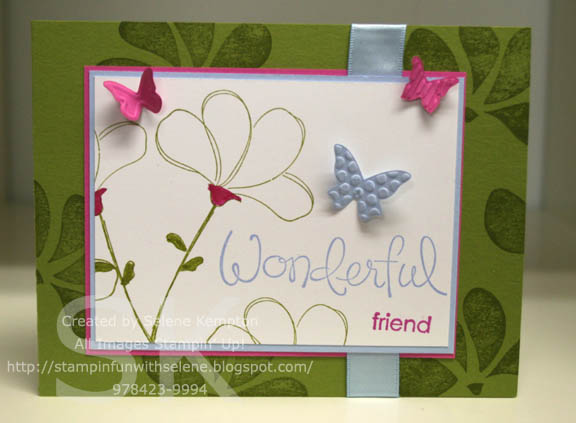
I originally saw this technique done with the large rose from The Manhattan flower Stamp set, but I think it works with any LINE ART type image, and my favorite to use with it is Embrace Life.

The Number ONE thing that you should absolutely have is shimmer white cardstock... This cardstock lets the water float on top instead of absorbing it... So, if you don't want to be frustrated... Get yourself some shimmer ~ or cardstock with that quality. How do I know?? Tried it.. :)

If you've never done embossing, there's a tutorial for it on the stampin up customer website here.

My tutorial has a few parts so hopefully I won't lose anybody.. :) First, the measurements to make your life easier if you're looking to reproduce this card.

Base: 11 x 4 1/4", scored and folded in half at 5 1/2" ~Rich Razzleberry
2nd: Layer: 5 3/8" x 4 1/8" ~ Bordering Blue
3rd Layer:5 1/4" x 4" ~ Whisper White
4th Layer: 4 x 3 1/4" ~ Rich Razzleberry
5th Layer:4 x 2 5/8" ~ Bordering Blue
6th Layer: 4 x 2 1/2" ~ Shimmer White

Next ~ What you will need to start
Your cut layer of Shimmer white
A pretty line art image that can overlap nicely
white embossing powder
versamark
heat tool
dry Paintbrush
Aqua painters, or a wet paint brush
Reinkers
Some type of plastic to put the ink on
a buddy and a pal..
So what's a buddy... Well you call a friend for your Pal.. but I use my powder pal tray.. This is much more fun with a friend, so call someone and use paper to catch your powder.

A buddy is a small rosin type bag, that helps you remove the static and imperfections from your fingers and the paper. So first ~ rub your fingers with the buddy then your paper and it will help the embossing powder not stick to you or unwanted areas of your project.

Next, using versamark ink, stamp a random pattern with your line art stamp. I overlapped mine to make the cool background. I couldn't really get a good photo for the versamark, so skipped that part.

But next I poured my embossing powder on top and flicked the back of my paper to remove any excess.


At this point ~ no matter what I'm embossing, I take a small paint brush and clean up any areas that have flecks of embossing powder where it's not supposed to be. By doing this, my embossing always looks clean and sharp.

Heat your powder and watch it melt. Make sure you embossed the whole thing, it should look shiny. Don't overheat or you'll scorch your cardstock.. oh and ummm watch your fingers.

Next I filled my glass dish with water, and used an aqua painter to pick up my ink droplets. Here I used rich razzleberry and bordering blue.
Notice I used an old dimensionals paper to drop my ink onto! Reuse it all! When it's done, it gets thrown out anyway.

Next I sprayed the BACK of my paper with water... Why did I do that??

Well ~ here's a dorky art thing that I learned in college... Whenever you do something to paper that makes it warp. (heat, water, etc.) do the same thing to the back and it wont roll up on you. By wetting the back first, I wont have curling cardstock.

After wetting the back, I turn my image over and sit it in a plate (hi Eeyore!) Then, really soak the top to make puddles of water. Note ** the embossed areas will keep the puddles somewhat separate, but it's fun to watch the reinker fly into other sections like a little flood.

So here, I'm showing the bordering blue being dropped onto my embossed shimmer. Isn't that fun??

After I was done with the blue, I painted more with the razzleberry and made a wonderful mess! Looky here mom!

I managed to get the paper off the plate without spilling my pools of ink. I set it under my room heater for about 20 minutes, You need to just walk away and let it dry. However, if you get really excited and can't wait, you could use your heat gun. :)

And here she is! This is my reinker float tutorial.. I hope this gets your creative "juices" flowing... (Oh I'm a geek).

I have two more examples online here and here. I hope you enjoyed my silly little tutorial and that it made you smile. :)

Happy Wednesday!

Selene Kempton
Tuesday, March 16, 2010

It's a good day

I have to say... it's been quite the road, but it's a good day. Brian is back to work ~ we just have to follow up to make sure it's completely gone in a month. My sinus infection is going away and I'm feeling much better today.

The SUN!!! is shining. We've had all kinds of flooding here in the northeast. We have a sum pump in the basement, and that kept the basement from over flooding.. it's still wet down there, but not so bad. To all my friends in the NE dealing with flooding, I'm wishing you a quick (and as inexpensive as possible cleanup).

So ~ it's a good day here. We're healthy, isn't that what matters? It's really good to be feeling better. I have two workshops this week and I'm up in the air if I should use this for one of my workshop cards. It's very pretty, but I've always struggled with the vintage style.

I played along this morning with two challenges.. One for the late night stampers yahoo group birthday challenge, and one for my friend Mary Jo's technostamper sketch challenge!

I used the bella blue and bridesmaid designer papers, not quite navy and vanilla. I did some sponging on the edges, but there's not a whole lot to this card.

To make the big bow, I just folded the ribbon over itself, and put the brad on top. I pushed through all my layers using the mat pack and a push pin a few times, to make the hole large enough for the brad. Then it went all the way through to layer 2.

Let me know.. Do you think I should make this a workshop card for this week?
Monday, March 15, 2010

Smokin Mojo!

What a smoldering sketch from mojo Monday this week! I had so much fun!

Some of the pieces were precut from my embossing class this past Friday night. The center panel uses the reinker float technique on shimmer white paper. I used my large circle and scalloped circle dies to make the panel on the right hand side.

I used my new favorite color combo, bordering blue, razzleberry and white. It's so pretty for this time of year.

The bottom panel was embossed with the polka dot embossing folder from the big shot.

For the ribbon, I slid the Untied, overlapped, ribbon under my brad...poked a hole in the layers underneath (except the base layer) and ran my brad through. This makes the brad hold the ribbon really tightly, and makes it easy to adjust the "loops" of my bow.

Not bad for a knot girl! :) I hope you're having a wonderful Monday..
Rubbah hugs,
Selene Kempton
Friday, March 12, 2010

Saturday Sketch Challenge 142

Use your scraps... That's the theme of this week's stamping 411 challenge in my mind.. After creating a bunch of cards for my embossing class that was held tonight, I took one of my leftover packets and had some fun with this one..

So, it's a little bright, and I did do quite a bit to it, but I just used my scraps, embossed all my layers, I used watercolor crayons and blender pens to color it all in, and assembled it based on the sketch... Nothing fancy, just a lot of fun.

If you have a few extra minutes and would like to play along, you can check it out here along with my girlfriends who made their own fantastic cards, and a scrapbook page using this sketch! So fun!

Bloggers Challenge Birthday

Good Morning! I'm a little tardy this morning with my bloggers challenge. I'm feeling a little under the weather with a sinus infection... The doctor has me on TWO different antibiotics this time... Grrr... Anyway, I decided I really wanted to play along with bloggers challenge, even though I'm not 100%.

I made this pretty little card in about 10 minutes, and I like it. It's based on the stamping 411 sketch this week, although I changed it up, it's very clean and simple.

It's nice to have another birthday card in the arsenal, and I really needed a "wake up" card this morning. Have a great Friday!
Thursday, March 11, 2010

True Friend

I'm spending some time this morning putting the finishing touches on tomorrow night's embossing class.

I have one project to share with you today. We made this last night in scrapbooking class to match a very razzleberry page we did. It is quite shimmery in real life. I used shimmer paint, mixed with rubbing alcohol to finish off this pretty card.

Lo and behold ~ you'll notice I used this week's stampin411 sketch to make this pretty card.

I hope you're having a great day!
Wednesday, March 10, 2010

Gifts for me??

I was so excited when my girlfriend/downline Barbi Bickford came by to visit. We spent a little time doing some scrap booking and just chatted. I still remember when I met Barbi ~ I was doing a craft fair and she was there helping her friend.

She told me she was going to be my new BFF ~ I had no idea she was right! Anyway, I just wanted to share the goodies she brought me. (I got to keep them too!) She said she got the patterns online somewhere. I think she said it was Becky Roberts. :)

Thanks Barbi! You are da bomb, BFF
Tuesday, March 9, 2010

Talented Downline

I love when my talented friend/downline Regina Maginnis comes to visit. She always has some awesome cards to share with me. She said the 3 butterflies card was cased from somewhere and she cant remember where from...

Here's some of Gina's work.

Happy Tuesday!