Wednesday, July 13, 2016

Stampin' Up! Seaside Shore, Seashell Card, Framelit Punch Art

Hello Friends!

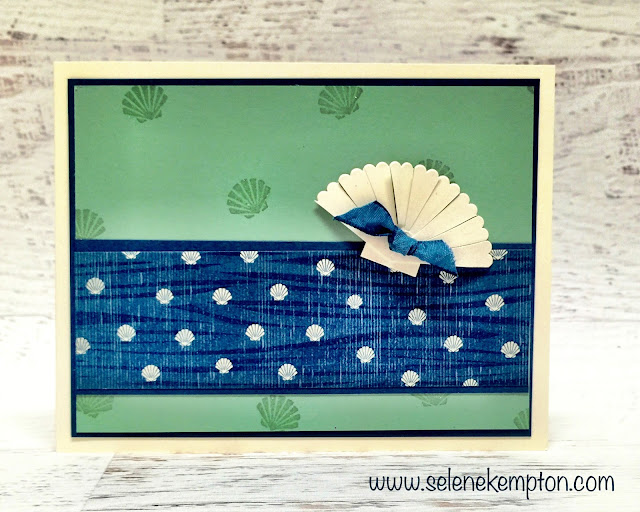
I have a really sweet idea for you today using the Seaside Shore Suite of products.  I designed this card as an extra card when playing with my class to go this month.

First, to make the seashell, take a 2" Scallop Circle, cut from the NEW 141705 Layering Circles Framelits.  Cut it down so that you have about 40% of the circle, then grab a pair of paper snips and make a cut every second scallop.  Cut a small rectangle from the scrap paper and you're ready to go!

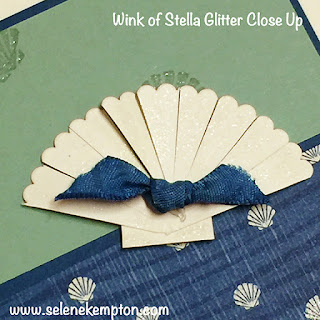
I used a bone folder to shape my seashell so that it would look more realistic, and of course I added some Clear Wink of Stella Glitter to the stamped images and to the top of my "framelit art" seashell.  Supplies & the full set of measurements are below.  

If you love this card, be sure to check out this month's class to go that uses this amazing suite of products.  Click here for more details or to sign up.


Stamps: Seaside Shore 141625 Clear Mount, 141622 Wood Mount
Ink: 138326 Mint Macaron Ink Pad
Paper: Very Vanilla, Dapper Denim, Mint Macaron, By the Shore Designer Series Paper
Accessories: Layering Circles Framelits, Paper Snips, Dapper Denim Rouched Ribbon, Stampin' Sponges, Snail Adhesive, Dimensionals and Glue Dots.

Measurements:
Base: Very Vanilla Card Stock 11 x 4 1/4", scored and folded at 5 1/2"
Layer 2: Dapper Denim Card Stock 5 1/8" x 3 7/8"
Layer 3: Mint Macaron Card Stock 5 x 3 3/4"
Layer 4: Dapper Denim Card Stock 5 x 1 5/8"
Layer 5: By the Shore Designer Series Paper, Seashell Pattern 5 x 1 1/2"
Layer 6: 2" Very Vanilla Card Stock, Die Cut Scalloped Circle
Layer 7: 4" piece of Rouched Ribbon, tied in a knot and trimmed.

Steps:
  1. Using Mint Macaron Ink, stamp the seashell pattern randomly on the Mint Macaron Card Stock (layer 3).  
  2. Use a Stampin Sponge, to sponge the outside edges of this layer with Mint Macaron Ink.
  3. Use Snail Adhesive to attach layers 1-5, then set the card aside for a moment.
  4. Using paper snips, cut the scalloped circle down to about 40%.  First, cut it in half, then trim 4 scallops off each side as shown in the photo
  5. Cut into every second scallop with paper snips to make the shell look separated. 
  6. Using paper snips, freehand cut a small rectangle to go underneath the tip of the seashell.  Use a glue dot to attach it to the seashell
  7. Use a bone folder to shape the seashell, so it looks more realistic.
  8. Use your clear Wink of Stella brush to add a touch of sheen to the sea shell, and to the sea shells that you stamped on the card.
  9. Attach the seashell to your card with Dimensionals.
  10. Add the knot to the middle of the sea shell with a glue dot and you are done. :) 


Monday, July 11, 2016

Stampin' Up! Holly Jolly Greetings Mickey Mouse Punch Art Balloon Card

Good Morning Friends! 

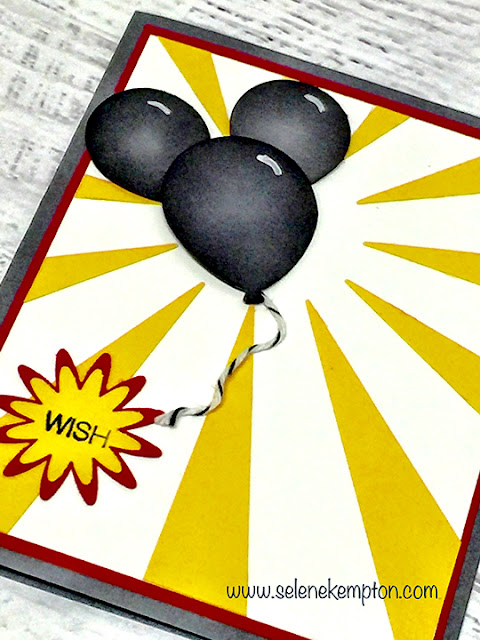
How about another sweet card share? Today's card would be great for any kid at heart!  This is the sweetest project ever, and it uses the scraps from the Sunburst Thinlits to make this awesome background!  Read on for measurements and step by steps.


Stamps: Holly Jolly Greetings by Stampin Up
Ink: Archival Basic Black ink from Stampin Up
Paper: Basic Grey, Real Red, Whisper White and daffodil Delight
Accessories: 140609 Balloon Punch, Sunburst Framelits, Stampin Sponges, Basic Black Bakers Twine, 140612 Blossom Punch, 132133 white Stampin' Chalk Marker

Measurements:
Base: Basic Grey 8 1/2" x 5 1/2", scored and folded in half at 4 1/4"
Layer 2: Real Red 5 1/8" x 3 7/8"
Layer 3,4 and the inside: 5 x 3 3/4 

Steps:
  1. Use the big shot to cut the Sunburst shapes from the 5 x 3 3/4" layer of Daffodil Delight.
  2. Lay the die cut on top of the whisper white.  
  3. Use liquid glue to glue down the "scraps" to the Whisper White Card stock, Remove the die cut piece and you can use it on another card.  
  4. Punch out two small balloons and one large ballon from the balloon punch
  5. Sponge all three balloons with the black archival ink so there's a highlight in the center.
  6. Use the White Stampin Chalk Marker to add the "c" shapes to the top of the balloons to show a shine on the top right hand side.  
  7. Punch out scraps from the real red card stock and the Daffodil Delight Card stock. 
  8. Stamp the word WISH from the Holly Jolly Greetings Stamp set on the Daffodil Card stock.  
  9. Attach the Whisper white layer to the Real Red, then onto the card base.
  10. Use two dimensionals to stick the bakers twine to the card front, then add the balloons on top as shown in the photo above.  I used dimensions on all the balloon layers.
  11. Attach the sentiment to the card front and you are done!  

Isn't this super sweet?  Need any supplies to make this card?  Here's a link to my store.

Thanks so much for stopping by today!  Wishing you joy!

Love,
Selene
Sunday, July 10, 2016

Stampin Up Flourishing Phrases ~ God Made You Card

Good Afternoon Friends,

With so much going on in the world that makes our hearts heavy, it's important to take time to look around.  Everywhere I look, I see more good than I do evil.  I choose to try and see the good in every situation, even in the hardest of times.

Here's a sweet and simple card share for you.  Don't forget ~ God made you and you are good, as you are!


Stamp Sets: Flourishing Phrases Stamp set (Wood 141531) (Clear 141534)
Inks: Daffodil Delight Ink Pad (126944) Brights Markers (131259 )<Daffodil Delight and Tempting Turquoise>
Paper: Whisper White CS (100730), Tempting Turquoise Card Stock Daffodil Delight Card Stock
Other: Snail Adhesive (104332), Blue Sharpie Marker


Measurements:
Tempting Turquoise Card Stock: 5 ½” x 8 ½”, score at 4 ¼”
Daffodil Delight Card Stock: 4 ¾” x 3 ½”
Whisper White Card Stock: 4 ½” x 3 ¼”
Inside: Whisper White Card Stock: 5 ¼” x 4”

Instructions:
    1. Use a sharpie marker to color self-adhesive pearls and set aside to dry.
    2. Stamp the floral image 3 times using the Daffodil delight ink pad as shown in the photo above, and once on the insert for the inside of the card. 
    3. Use the Daffodil Delight and Tempting Turquoise marker to ink the sentiment and stamp it on the top left hand side of your card.  Then, use the Turquoise marker to stamp the sentiment on the inside of the card     
    4. Use snail adhesive to attach the layers together. 
    5. Add the pearls to the center of the three flowers and you are done.
Thank you for stopping by today!  Need to get this set?  Here's a link to my store.

Love,
Selene
Saturday, July 9, 2016

Stampin Up Timeless Textures

Hello Friends!

Here's another project share from the stamp set Timeless Textures.
I just love the bit of Clear Wink of Stella Glitter brush on the bumblebees!

Supplies: 
  • Stamps: Touches of Texture (W 141934, C 143251) 
  • Paper: 
    • Dapper Denim Card Stock 
    • 141645 Moroccan Designer Series Paper 
    • 101650 Very Vanilla Card Stock
  • Ink:  126974 Early Espresso Ink Pad, 138324 Delightful Dijon Ink Pad, 126965 Cajun Craze Ink Pad, 141394 Dapper Denim Ink Pad, 141396 Emerald Envy Ink Pad
  • Other:  104332 Snail Adhesive,104430 Stampin', Dimensionals, 141897 Wink of Stella Glitter Brush (clear)
Looking to get this stamp set for yourself?  You can click here and grab it from my store.  

Thanks so much for stopping by today!

Love,

Selene
Thursday, July 7, 2016

July 2016 and Class, featuring Stampin' Up Seaside Shore Stamp Set, In Person, To Go or Directions Only

It's summer time and I'm spending my birthday week at the beach! Can't keep a good stamper from stamping even when on vacation!
Attend in person this Thursday July 14 OR ~~ Get your packets, pre embossed, pre cut, bows tied, so all you have to do is stamp and assemble!

Check out the NEW option to get the clear mount stamp set with your card kit (retail value 24.41) and shipped to your door for only $30 ~ this is an option I'm trying out by request to see how it goes.  

Four Ways to get this class:

In person: at 9 AM or 6:30 PM, Thursday July 14th
Get the Kit to Go: Same price $15 or waived with a minimum order.  Just place your qualifying online order on my website, and use host code AB3ZRE3U.
I'll mail you the packets and email directions the following week (by July 21st ~ pending availablilty of the stamp set).  Please note** Do Not Choose - No Contact - when you place your order.  So I can see where to ship your packets!  :) I cannot see who is ordering when your online account is set up with no contact.

Online Directions Only:
  Receive the printable PDF directions, and video directions July 21st for all the cards with complete supply and shopping lists for only $10 ~
If you want the pre-cut, embossed, packets to go, it's only $5 more (no brainer!)  **US shipping only on that please.
Note. digital file will also be sent by the 21st also.  These are my in-class directions sheets and contain full measurments and step by step directions. The photos have not been watermarked and the sheets do not have my name on them, so they are demonstrator friendly to reuse them for a class. 
Demonstrators: you may offer the sheets for free with any $50 order.
Complete supply list and shopping list will be part of the directions.
Recommended supplies to assemble these projects as shown with the packets:
Stamps: Seaside Shore Stamp Set
Wood Mount 141622
Clear Mount 141625 
Ink Pads:141394 Dapper Denim,
138326 Mint Macaron,
126983 Calipso Coral
141897 Wink of Stella Glitter Brush (clear)
Recomended adhesives to have on hand:129026 Fast Fuse, 103683 Glue Dots, 110755 Tombo Liquid Glue
For To Go packet customers all cardstock will be prepunched, precut, scored to make assembly as simple as possible.  I will also pre-tie any bows to make it easy to assemble.
Wednesday, July 6, 2016

Stampin Up Timeless Textures and Stampin Up One Big Meaning

Hello Friends,

Just a quick project share for you.  I will be emailing all the step by steps for this cute project and others too, to those on my mailing list.

Did you know that today is my birthday? We are up in Southern Maine looking to have some fun by the sea tonight.  Wishing you a fun rest of the week.


Supplies:
  • Stamps: Touches of Texture (W 141934, C 143251) One Big Meaning (W 138788, C 139420)
  • Paper: 
    • 131197 Delightful Dijon Card Stock (8-1/2" x 5-1/2”)
    • 141645 Moroccan Designer Series Paper (4 3/4” x 3 1/2”)
    • 101650 Very Vanilla Card Stock (4 ½” x 3 ¼”)
    • 120953 Crumb Cake Card Stock (4” x ½”)
    • 104199 Linen Thread 12” piece
    • 107300 Very Vanilla Envelope
  • Ink:  126974 Early Espresso Ink Pad, 138324 Delightful Dijon Ink Pad, 126965 Cajun Craze Ink Pad, 141394 Dapper Denim Ink Pad, 141396 Emerald Envy Ink Pad
  • Other:  104332 Snail Adhesive,104430 Stampin', Dimensionals, 141897 Wink of Stella Glitter Brush (clear)
Did you miss the free Watercolor Wishes Card Class
It will put you on my list for more classes, and free project ideas too!

 Click here to register for the free Love you Lots card class!  


#winkofwatercolor technique class, from me to you!

Love,
Selene