Tuesday, July 31, 2012

7/31 Stampin' Up! A Reason to Smile!

Good Morning Friends!

I'm a little late posting today!  My stamp club is underway for the week.  I do several meeting times and just a one hour class, three projects.  It's a lot of fun to see everyone. 

This is a project I did with my stamp clubs last month!  It uses the A reason to smile stamp set. 

So, here's the scoop and reminder that TODAY is the last day that you can get this AWESOME stamp set for only 5 bucks! 

That's right!  It is available for only $5, with any $50 merchandise purchase through my stampin supplies store

 Here are the item numbers:
Description
$5 Item
Price
Reason to Smile Wood-Mount Set
131274*
$5.00
Reason to Smile Clear-Mount Set
131275*
$5.00
*Enter this $5 item number after reaching $50 on your order.

I had one person already place her order today to get this awesome stamp set because she ALMOST forgot, so I thought it would be good to show you this set today!    For this card, I paired the set up with the Sweet Essentials Stamp Set and the Ornament punch!   First, I embossed a piece of midnight muse card stock with the Fancy Fan Embossing folder, then I was able to punch out several ornaments out of one piece.  Cut the point of the ornament off and you have a vase!  How easy is that!  :)

I stamped the stems of the flower so that they crossed over one another to make it easy to put them in a vase.  I didnt even have to add water; now that's a reason to smile! 

Here are the measurements
Base: Cajun Craze 11 x 4 1/4", scored and folded in half at 5 1/2"
Layer 2: Midnight muse 5 x 3 3/4"
Layer 3: shimmer white 4 7/8" x 3 5/8"
Layer 4: Midnight muse 3 5/8" x 1 1/4"
Layer 5: Comfort Cafe Designer paper 3 5/8" x 1"
Layer 6: is the punched vase (so cool!) and just a tiny bit of linen thread for the top of the vase and you're off to the races!  :)

Here's another reason to smile.  I did this card a few weeks ago and posted measurements on this post, but I wanted to point out the cool technique I used to make the sun flower punch.  Just Punch your flower with a scalloped circle punch, then attach the punched out piece to some copy paper.  rotate the punch slightly and punch again.  Remove the copy paper and add to your project!  so cool!  

If I've given you A reason to smile today, you should get your stamp set before it's too late.  Tomorrow they will be gone. :)  As always, if you need help with anything you are purchasing or have purchased from me, I'm here to serve. 

Thanks so much for visiting!

Rubbah hugs,

Selene Kempton
Check out my customer rewards program! 


Monday, July 30, 2012

7/30 Stampin' Up! Greetings of the Season Sneak Peek

Good Morning Friends!

This card is like a warm sweater, or a country cottage.  I just DIG the new Core'dinations Card stock that is textured on one side, and smooth on the other.  It makes life so easy!

I ran the cardstock layer through the big shot with my snow flurry embossing folder, then sanded it with the new FABULOUS sanding block.  The snowflake is made with the new big shot die Snow Flurry and it took minutes to put this together.  I made 30 of them in about 4 hours.  I just cut the desginer paper (Candlelight Christmas Specialty Designer Series Paper) out with the big shot, flipped the second snowflake pattern over, and layered them up!  So purrty!  I put a half of a dimensional up under the last snowflake to pop it up a bit and added 4 pearls to each card.

The sentiment comes from "Greetings of the Season" stamp set, and is stamped on the new stampable cotton ribbon!  I love when clean and simple screams WOW like this one does!


Stamps: Greetings of the Season 123819   
Ink: Espresso Ink Pad   
Paper: Very Vanilla, Espresso, Core’dinations Card Stock Accessories: Sanding block, glue dots, dimensionals, self adhesive pearls, 7/8” cotton ribbon 127844, Snow Flurry Die 127813

Thanks so much for stopping by today!
Rubbah hugs,

Selene Kempton
Check out my customer rewards program!
Sunday, July 29, 2012

7/29 Stampin' Up, Snowflake Soiree Sneak Peek

Good Morning Friends! 

I have to say I fell in love with this technique at convention.  I got two swap cards with floral stamps that looked similar to my card.  :)

I do not know the originator of this technique OR what it's called, but I like it! 

I used this card as another creation for my Christmas in July stamp camp this week.  So, how do you get all the images to line up?  It's easier than you might think.

First you need 3 pieces of paper layered on top of one another.  In this case, I used vanilla.  you could use designer paper and stamp on that too.  Here's what I did on this card.  First some measurements, all the white pieces are first

Layer 2 is 4 x 5 1/4"
Layer 4 is 4 1/4" x 3
Layer 6 is 3 1/4" x 2"

I took these and stuck them together with dotto, temporary adhesive.  This helps to tack them down.
I took the largest snowflake and stamped it two times, across all three layers using midnight muse ink.  When I stamped, you could see there was a gap, where the paper stacked, but it doesn't matter, because we are going to matte each of the layers.

You want to start with the largest image first, so that you'll have room to stamp the smaller ones.  If you stamp all the small snowflakes, then try and add the big ones, you may not have room for all the images. 

Next, I used the mid sized snowflake with marina mist ink and started to fill in some of the holes. Finally, I added the smallest snowflake and used always artichoke ink.  Isn't that an awesome color combination? 

I know this photo is a little fuzzy (took it with my iphone), but I want to show you all the sparkles!  I stamped the Merry on a piece of scrap cardstock and had the ladies in class run it through the big shot, with the apothicary accents framelit. Then we sponged that layer with midnight muse ink.   I had already punched out the blossoms with the silver sparkle paper.  It does get a little tight going through that punch using the sparkle paper, so I punched those out for the class before they got here.  That paper is really thick! 

We also (at the end) added some of the new dazzling details in silver.  it is take your breath away sparkly and at only $2.50 a bottle, don't be surprised if you see me wearing it on my person around town. ;-)

Sorry to jump around... so now that we've stamped our layers that are all temporary stuck together, we're going to take them apart and matte them.

Base Layer: measures 11 x 4 1/4", scored and folded in half at 5 1/2"
Layer 2: (which is stamped already sits on top) Layer 2 is 4 x 5 1/4"
Layer 3: 4 1/2" x 3 1/4" midnight muse
Layer 4: is 4 1/4" x 3 (vanilla, already stamped)
Layer 5: is 3 1/2" x 2 1/4"
Layer 6 is 3 1/4" x 2"


You could probably change up the sizes, or even make a square or different shaped version.  How pretty would this be with framelits!  hmmm.. Maybe this week coming up.

**UPDATE** My friend Lisa Bohler sent me an email and let me know that this is the Triple Time Stamping Technique, and it was shared by Dawn Olefcheske last month!  :)   Thanks so much Lisa!  I got a few swaps at convention using this technique and didn't know the name.

Have a wonderful Sunday!
Selene Kempton
Saturday, July 28, 2012

7/28 Stampin' Up! Frosty Friends Sneak Peek

Good Morning Friends!

How about a little watercoloring with snowman friends?

The holiday mini catalog is coming Wednesday.  If you don't have your copy yet, pop me an email so I can put one in the mail to you! 

This is card number two from the stamp class the other night.  We stamped with stazon on the whisper white panel.  Then, we used a blender pen with the baja blue ink pad to GENTLY watercolor the line under the snowmen and behind them a little.  So delicate!  Then we added the colors, light to dark.  First, my little pink bunny on the far right hand side of the card.  :) then we added real red, gumball green, and razzlebery to color the rest of the elements (full strength) with markers.  Clean and simple! Love that!

The new lacy brocade embossing folder is so pretty, and it's so very me.  I love all things lace.  reminds me of my mom.  This card is soft and pretty, like a "just after the snow" cool blue and white.  I love the soft colors.

So how about measurements:
Base Layer is 11 x 4 1/4", scored and folded in half at 5 1/2"
Layer 2 is whisper white 4 x 5 1/4"
Layer 3 is Snow festival DSP 5 1/4" x 1"
**Note.  I stuck layer 3 to layer 2, then ran it through and embossed it.  After that, I sanded the designer paper with the new AMAZING sanding block, can you see the pattern from the embossing on the designer paper?  That's from the sanding.  The new sanding block features removable sand paper, so you'll only ever need one block and you can replace the inexpensive paper as needed!  Love that!!!

Layer 4: two pieces of seam binding 6" and 10" (adhere the 6" piece to the back of layer 2) then tie the 10" piece on in a bow).  I love how the seam binding makes such a pretty bow.  One does need to work at it and play for a few minutes, but it makes a gorgeous dimensional, shimmery bow.
Layer 5: is a whisper white piece cut with the apothicary accents framilit die.  I precut this piece for the class members to make the class go a little quicker. :)


To finish the card off, we sponged some baja ink all the way around the framelit to add some depth.  so pretty!!

Stamps: A la carte stamp Frosty Friends 128117
Ink: Stazon black, baja breeze ink pad (with a blender pen)
Paper: Whisper white cardstock, baja breeze cardstock, Snow festival Designer Paper 126908
Accessories: 127819 Lacy Brocade embossing folder, baja breeze seam binding

Do you need everything to make this card?  I do offer a loyalty rewards program.  If you are making purchases through my online store, you should check it out!  :)  What's better than FREE STAMPS?

Happy Saturday and rubbah hugs,

Selene~
Friday, July 27, 2012

Saturday Sketch Challenge ~ and sneak peek!

Good Evening Friends!

Boy, have I been a blog slacker!  :)   Last week, I attended Stampin' Up's annual convention, and this week I spent doing {even more} swaps and a Christmas in July card class at my home last night!  After spending a week on the go, walking the stage (yea) and dining out every night, it's hard to come back to reality of cooking meals and balancing work with family life.  All is good!

I'm really looking forward to huddling around the TV tonight for the opening ceremonies for the 2012 Summer Olympics!  It's amazing to see all the wonderful athletes that are the *best* at what they do!  It's really quite astounding! 

I drew up tonight's sketch and it's reminiscent to some of my first day's as a Stampin' Up! demonstrator.  I remember being at my upline's house and asking (way too) many questions, and wanting to hold my first open house.

She suggested I look through her swaps for ideas.  The diamond, square, diamond for this weeks' sketch came from that first swap card I ever picked up in my hand.  I borrowed (and returned that sample) but I have to say, I've used this layout a bunch of times!  With this sketch, I made the card square and the focal point really pops I think! 

I used this card for my Christmas in July stamp camp last night and although this card was a bit of work, I think the ladies enjoyed making their "vanilla chai tea" card. :)

So first we stamped the focal point on a piece of scrap paper.  We inked up with gumball green, then (a convention trick) we removed the "green tea" from the cup with a blender pen.  It picked the ink right up off the stamp.  Then, we filled the expresso color for the part inside the cup.  "Huff" on the back of your stamp and stamp it onto cardstock.

Next, we used a blender pen, and used it to pick up versamark ink from the pad, to make the cup wet.  Pour vanilla embossing powder on and heat!  We used the new heat gun from SU.  It has two heat settings; Setting one is for drying ink only and setting two is for heat embossing.  The new guns are a lot more quiet!  We could actually still talk with the heat gun going. 

Then, we took the cup over to the big shot and cut it out with the coordinating framelit that is coming out with this set August 1st!  Isn't that the coolest?  If it wasn't bad enough with all of us sniffing our cups, we decided to emboss the steam as well.  Versamark by itself would have probably done the trick, but I wanted it a little bit darker.

Some folks were very concerned about SU retiring all the craft ink, but in class we just ink up in versamark, then ink up in the color we wanted (espresso) and stamped that on the cardstock.  it works just like craft ink.  It does add one small step of cleaning the stamps in between every layer but it works the same.

So one more word about square cards with a 4 1/4" measurement.  If you use the regular medium envelopes, you wont pay the extra postage that is associated with mailing a square card.  Just sayin'

So how about some measurements:
Base: 8 1/2" x 4 1/4", scored and folded in half at 4 1/4"
Layer 2: Espresso 4" square
Layer 3: Candlelight Christmas Specialty Designer series paper (brown snowflakes!! woohoo!) 3 7/8" square
Layer 4: 2 3/4" square espresso, (attached to the card on the "diamond" pattern)
Layer 5: 2 3/4" square vanilla, (attached straight like a square)
Layer 6: 2 1/2" square espresso (attached to the card on the diamond)

Supplies!
Stamps: sentiment is from Winter Memories, the coffee cup is from Scentsational Season (holiday mini)
Ink: Gumball green and espresso.  Versamark, blender pens
Paper: Candlelight Christmas Specialty Designer Series Paper, espresso, vanilla
Accessories: vanilla embossing powder, stampin sponges. 

Oh and I sponged almost all the layers!  :)

I don't think the photo does it justice.  So here's your smellavision.... IMAGINE how Vanillarific it is. You know the girls in class couldn't stop sniffing their cards, but what happens in the studio, stays in the studio!  In person this card is like a warm sweater in the mid winter. :)  Comfort card.  :)  I'm making myself chuckle here!   I hope you enjoy your weekend!

Rubbah hugs!
Selene
Friday, July 20, 2012

Saturday Sketch Challenge 265, holiday mini sneak peek

Good Evening Friends!

It's time for another sketch challenge from your stamping 411 operators!  This week I am off to convention, by the time you are reading this it'll be almost time for me to come home.  I'm sure I'll have lots of stories to share. 

I did some SERIOUS damage in the holiday mini catalog.  Every page is packed with products I want (and now have)  teehee!  Here's a bit of what I got so far. 

Stamps: Ornament Keepsakes
Ink: Stazon white (stamped on a window sheet)
Paper: white and cobbler, plus the new sandable cobbler paper.
Accessories: Lacy brocade embossing folder and NEW sanding block. 

Measurements:
base layer: 11 x 4 1/4", scored and folded in half at 5 1/2"
Layer 2: 5 1/4" x 4
Layer 3: 5 1/4 x 1 1/2"
Layer 4: 2 1/2" circle punch.  I used a circle die for the acetate. It doesn't punch very well and the big shot cuts it like buttah!  :)
Here's how it looks under the hood.  :)

Have a great week!
Selene~
Wednesday, July 18, 2012

Hello from Convention!

Hello From Convention!

We had the most fabulous lunch at the Naked Fish Restaurant, across the street from our hotel.  It is a vegan restaurant (which we didnt know when we went in) but they had the most AMAZING rice bowls. 

It is so much fun spending time with friends here.  From Top left is Priscilla Grunes, Gery Benton, and Barbara Kuprfrian, then I'm on the bottom left and that's my Bestie, Gina beside me.  :) 

Tonight I'm headed to a My Digital Studio Class, and I have some MDS samples to swap if folks would like one!  :) 

It's a very simple card.  I actually purchased the template and changed the colors to match the projects at my workshops!  Well, I better run.  I'm off to a swap at 6:30 first!  So much fun with friends here at convention. 

I'll try to share a few more of my thank you cards that went out this week tomorrow!  ;)  
Rubbah hugs,
Selene

I'll share the sample below.  I used them as thank you's for purchases at workshops last month.  They matched the invitations I did in MDS as well.  :) 
Saturday, July 14, 2012

Saturday Sketch Challenge 264, A Reason To Smile Sunflower Card

Good Morning Friends,

I can't believe doing this post got away from me!!  That never happens!  I've been back from vacation for only a few days, but I'm getting ready to leave for stampin up convention this week. 

I had a team meeting last night and after they left, I fell asleep on the couch! 

Gretchen has a fun sketch for us this week.  I LEAPED out of my comfort zone with this color combination.  :)

Colors: Midnight Muse, Tangerine Tango and Summer Starfruit, which I have another loving name for that I shouldn't share. :)

I started with a 3 x 4 piece of shimmer white and stamped a background using the new Reason to smile sunflower in tangerine, and stamped the small flower in midnight muse.  Then, I used a blender pen to move the color around.  For the center of the flower, I used the coordinating circle stamp and stamped that in the starfruit color in the center of each of my sunflowers.

I matted that with a 3 1/8" x 4 1/8" midnight muse layer.  

I set that aside and grabbed a piece of the scrap from the shimmer, and stamped my sunflower for the focal point.  I punched it out using my scalloped circle punch.  Notice the funky edge on the flower?  Well, I stuck the piece of card stock back on to a piece of computer paper, and rotated my punch and punched again.  Then just removed the computer paper from the back and sponged it with tangerine tango ink.  I like how it looks similar to the shape of the sunflower.  That GORGEOUS embellishment on top is a summer starfruit dahlia.  My absolute favorite new accessory from the main catalog!  just glue dot it on any flowery project and you're good to go! :)   I added dimensionals to the back of this layer and set it aside.

Next, I cut the "so kind of you" layer. This piece measures 1 1/2"  x 3 1/2" and I just tucked it under the matte for the top layer. 

Under that, is layer 2, it is tangerine tango 4 x 5 1/4", embossed with the fancy fan embossing folder.  :)
And the base layer is shimmer white 11 x 4 1/4", scored and folded in half at 5 1/2"

I hope you have a wonderful weekend!
Rubbah hugs,
Selene Kempton


Friday, July 6, 2012

Saturday Sketch Challenge SSC263

Good Evening Friends!

It's time for another saturday sketch challenge from your operators over at stamping 411.

This sketch is SUPER easy this week.  Do you think the sketch artist is on vacation and wants to keep it simple this week?  Hmmm, could be!    :) 

Seriously, it's the last day of vacation AND it's my birthday!  Yep, 22 years old again...  ;-) 

Besides, sometimes when it comes to card making, less is best. 

So how about some measurements?
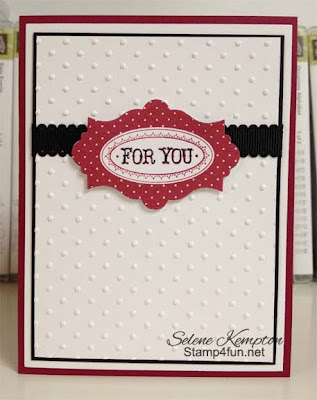
Base: 8 1/2" x 5 1/2" scored and folded in half at 4 1/4", raspberry ripple
Layer 2: 5 1/4" x 4, whisper white
Layer 3: black 5 x 3 3/4"
Layer 4: whisper white 4 7/8 x 3 5/8"
Layer 5: is cut from layer 2  (teehee) then attached with dimensionals!

That's right, who's gonna know if you don't paint behind the toilet?  What??? Forgive me, that's a joke I use in stamp class all the time.  ~~  To make the focal point, I took layer two, whisper white and stamped the For You, then used the coordinating framelit to punch it out (with the big shot).  Then, just hid the scrap piece in between the layers. No one can see the hole back there in between the layers.  :)

The pretty ribbon has polka dots on one side and you're looking at the back side, sans polka dots.

I'm going to keep it brief tonight, as it is my last day of vacation and my family is at the pool.  (where I will be in a few minutes)!  Have a wonderful weekend!  I'll be back home and on track soon!  :)

Stampin' Love,
Selene
Monday, July 2, 2012

Stampin' Up! Life Shared ~ Yes! I made it! and some amazing pictures

Good Afternoon Friends!


I'm writing today from vacation up in the white mountains of New Hampshire.  I've done quite a bit of stamping before this week, and didn't bring any stamping with me on a much needed vacation. 

It's a little chilly for these bones to be swimming in the pool today.  It's only 73 degrees outside.  My hubby took my daughter over to the pool.  I've been wanting to share something so very special with all of you and I've been caught up in taking a little time off.  I wasn't feeling very good at the end of last week and wanted to take a little time out to take care of myself. 


Before my hubby woke this morning, I grabbed my little one and walked the campground.  It's good, and I need to get back to taking walks in the morning. 

Yesterday we did a little shopping to support the economy up in North Conway.  We did our part.  ;-)  So, the big question has been if I earned the trip to Fiji with Stampin' Up! 

The short answer is yes!  I earned the trip thanks to LOTS of orders and wonderful friends who support me while I stay at home and am there for my daughter.  Every single order of glue dots and stamp sets make a huge difference to me!  So, yes I earned it, thanks to so many of you!! :)  I'm sure it will be a trip of a lifetime and I'm ever so thankful to my team and friends.  It's hard to call your "friends" by the title of customer. 

This year has been quite a journey, and I'm thankful to so many people.  I'm also thankful to God who continues to bless my life by bringing so many wonderful crafters into my life.  
So the card above is from the stamp set Life shared 126820. This is a single stamp in stampin up's catalog on page 60.  When I assembled this wood mounted stamp set, I cut the words apart from the image and attached it to the side of my block, so if I want just the words, I have that, and if I just want the kids in the wagon, I have that too!  :) 
Using black stazon ink, I stamped the focal point on watercolor paper, and colored it with markers and an aqua painter.  I started by drawing "L's" on different parts that I wanted to color and just moved the color over, making sure to leave some parts uncolored.  The best water colorists, in my opinion, know what NOT to color.  To check out a step by step marker water coloring tutorial, check out this post. I often get the question of "why do you use stazon ink so much", well, stazon doesn't move when you want to watercolor on top of it. 

I found the cute riding hood red taffeta ribbon on the clearance rack and just made a faux bow with the vintage brad.  I used the framed tulips embossing folder, and sponged the outside with riding hood red classic ink.  

Ink: Rich Regals Markers, Aqua Painters, stazon ink black (to stamp on the watercolor paper)

So ~ after doing some shopping yesterday in New Hampshire, we took a ride up "The Kanc".  That's the Kancamangus highway that cuts up and over a mountain.  There are lots of scenic areas along the way and of course we stopped.  If you are not friends with me on Facebook, make sure you "friend" me, so you can see the rest of the photos we got.  it was a glorious day up on the mountain.  :)  God showed us so many of his paintings including this tree at the Hancock Trailhead off the Kanc.  I had so much fun just taking some pictures and spending time with Brian and Alexis. 

We also saw a fabulous rainbow or two.  We were told that there was a double at one point, but we didn't see that one.   Here's one that I saw and got a quick photo of. 
And finally, here's a photo of my two best buds.  This is my hubby Brian and daughter Alexis at one of the outlook points.  My favorite photo of the day for sure.  :)

So, there is one more thing!  (Speaking of reason's to smile). 

If you decide to place an order with me this month, stampin up is running a sale on the Reason to smile stamp set.  Place a $50 order through my website (or your demonstrator if you have one), before tax and shipping and get the reason to smile stamp set in clear or wood for only $5! 


This GORGEOUS set will only be around for the month of July, so don't miss out on getting yours! 

Here are the links for the
Wood mount stamp set 131274
or the Clear mount stamp set 131275

Note the links or item numbers will only work after selecting $50 in merchandise in my online store first. :)

So ~ just another reason I LOVE Stampin' Up!  They created samples for us to look at!  Check out these cute items made with the reason to smile stamp set!  Just print this fun sheet if you have the stamp set and you'll be able to come back to it over and over again. 

Well that's all for today.. I *might* have more to share this week, but honestly I'm going to go spend some time with the family and try and relax a little!  :)  I actually left my stamping stuff at home!  :)

Rubbah hugs!
Selene Kempton