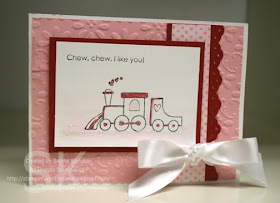
It was so fun to go out to the studio and play today. I chose to do the sketch challenge from the mojo monday website.
I got some new goodies from SU.. In the catalog it doesn't list blush blossom, in the new valentines day paper, but it's in there! The new flowers from the designer paper, features flowers that are made from 4 hearts.. so pretty. I cut the designer paper and just layered it.
Also take a look at that cool scallop punch. Honestly, I was ready to return mine. I played with it for hours, then realized, I needed to flip my paper over after doing the corners, to line things up.
I found an AMAZING tutorial on my friend Gretchen Barron's blog on how to get the punches to line up. I looked at the post, then didn't actually READ it. Much to my happiness, when I sat down a read what she wrote, I was easily able to use the new punches.
I'm still not convinced that I love the design, but being able to do it certainly helps. :) You can check out Gretchen's post here. Guess I need some patience?
Well, I had some shimmer paint still in the spray bottle from Christmas and decided that I was going to make the entire face of my card shimmery. I just love the effect (you can see better in the photo below).
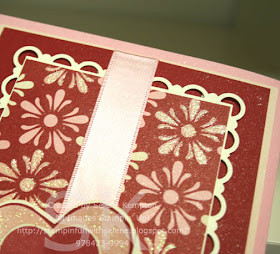
It's snowing here. I wanted to take my little one out during school vacation, but the weather outside is just frightful. Guess I will have some time to stamp today! :)
Rubbah hugs,
Selene Kempton
Pages
▼
Monday, December 28, 2009
Friday, December 25, 2009
Bloggers challenge and Stamping 411
I am feeling a little bit behind on my blog, but it's Christmas! Sometimes in the hustle and bustle, you could miss out what's really important... spending time with the ones you love.
This week's theme for bloggers challenge is Christmas, and attached is the stamping 411 sketch. I turned one of the layers, to account for my text. I used my digital studio to create this card.
I am very fortunate to have some really amazing friends & family. So many friends that I would not have if it were not for stamping. I am thankful for each and every one of you.
This cute little card is what I would like to have printed for thank you cards this year. Christmas was full of wonder and excitement for those little eyes. That is what it's all about!
Thursday, December 24, 2009
12 days of Christmas ~ Day 12 Christmas Eve
Here's a card I made for my hubby. With the stress of the season, I wasn't feeling overly creative. I don't typically do well ~creatively speaking ~ under the gun.. Not to mention I'm still nursing a cold. So I did TWO challenges! I really love challenges.
First Technostamper sketch challenge, and cards and things color challenge!
I used soft suede and a waterbrush to color the tree, then added the bright pink and blue for the ornaments. Then, I used crystal effects on the ornaments for the tree.
This baby is already wrapped inside a package, that is NOT under the tree. We've been running very lean this year, and there's not much under the tree for mom and dad.
However, I have a real Christmas surprise for my hubby. Since he doesn't read my blog unless I facebook it, I can tell you a little something. :)
Just in case, I'm not posting what it is, but I will say it's something he really wants and he's only expecting socks! We bought socks for each other this year, and it's a good thing.. Mine all have holes! :) Mom also got a die cut alphabet I've been wanting (that went on sale). My daughter has been saying all week that maybe santa would bring me the die cuts I want.. She's so into it this year, it's really special.
I may actually get a couple of posts out over the weekend. Bloggers challenge falls on Christmas morning, and the Stamping 411 sketch is Saturday morning. Hopefully I'll get out into the stamp room for an hour today. If not, everything can wait. After all it's Christmas! I'm shooting to participate in all my regular things, but first things first! (Family that is).
I'm really looking forward to mass this afternoon at 4 then to my family's house.
No matter what holiday you celebrate. May you all have a blessed holiday. Merry Christmas.
Selene Kempton
Wednesday, December 23, 2009
12 Days of Christmas ~ Day 11
Still not ready to go back to my stampin room, but I think the antibiotics are starting to work.
However, I do have a really cool project to share today.
Here's a quick treat bag I did during a big shot class here at my home. You can make two bags from one piece of 12 x 12 designer paper "bride". First, I cut two half inch strips (for the belly bands), then I took the 11 inch piece of paper and cut that in half at 5 1/2". Run it through the big shot with the fancy favor die, and you have a quick and simple box.
For the belly band, I used night of navy ink, and colored the bride paper using a sponge dauber. The shiny part of the paper resists the ink.
Also ~ if you notice, I lined up the design on the belly band, with the design underneath. To run the elastic cord, I took some dimensionals and used that to adhere my stretchy cord on the box. Otherwise the ornament would be suspended there (not hanging from anything). Isnt the night of navy beautiful? These were my wedding colors. :)
Can you believe tomorrow is Christmas eve?
Tuesday, December 22, 2009
12 Days of Holiday Projects ~ Day 10
Well, as you might know, I'm very much under the weather.. I hope I'm better for Christmas. My doctor said that I'm on the wrong antibiotic (for too long also), and that I should be fine by Christmas (here's hoping). I really could not stamp today, but tomorrow, my is my daughter's last day before her Christmas break. We purchased this smores kit and it needed a gift tag.
Many of our gifts this year are handmade. I'll post some of them after Christmas (can't take a chance someone might peek). My daughter has really enjoyed Christmas so far, because we have hand painted some gifts that we can fill with goodies. There is something about a handmade gift that's so special.
Anyway, this tag was colored with my watercolor pencils, and a waterbrush by my 5 year old. She did a really good job writing her teacher's name (proud mama). In many ways, this is the most beautiful project of the week. The care and joy put in by my 5 year old, makes this beautiful. I hope she draws me a picture for Christmas ~ or something to that effect. She really is my sunshine, and although i'm feeling under the weather, she reminded me all day to get plenty of liquids.. She's taking care of her mom. so cool.
Even if I am sick, that's the best Christmas gift a mom could ever get. A really good kid. Be nice to your kids & remember they will pick the retirement home.
Monday, December 21, 2009
Mojo Monday ~ a cool and simple sketch
I was supposed to start a new day job today. Instead, I'm sick at and home. I feel SO yucky! I took a quick peek at the mojo Monday sketch and spent a half hour in the stamp room.
This is a sneak peek of what will be available in January, isn't it pretty?
I used the rock and roll technique to get two colors on my stamp for the main flower. I used markers (kind of sloppily) on the white, to decorate that middle panel.
So my goal is to bundle up on the couch and do nothing today, but I do need to go and get my little one in a few hours. Hopefully I can keep my germs to myself and not get her sick. Geepers!
Sunday, December 20, 2009
12 Days of Holiday Projects ~ Day 9
Well, if it ain't broke, don't fix it! I just love this week's stampin 411 sketch, so I decided to make another card!
I embossed the second layer with the petals embossing folder. I used some retired paper I had in my studio, and finally took some ink to this stamp set.
Demonstrators who attended Stampin' Up's regional seminar in Maine got this stamp set for free.
I cut out my wreath and then put another panel of white underneath. I cut the diamond shape of the right hand edge of the card.
Check out this awesome sketch and play along at the stamping411 blog.
12 Days of Holiday Projects ~ Day 8
I'm posting this one a tiny bit early, so I can link back to my friend Mary Jo's site. She has done 100 weeks of sketch challenges on her blog and I wanted to make a card with her sketch this week. Mary Jo has the cutest sketches every Monday if you want to check them out.
This is also for a non traditional Christmas colors card challenge from the Late night stampers yahoo group. I had a lot of fun with this one. I embossed the "Christ is born" in silver embossing powder. I used almost amethyst, basic grey, silver, and whisper white paper. For the main element, I used some satin ribbon to make a bow. I didn't want to take away from the clean and simple design. I love that it looks like a present, and a cross...
This card will go out to a dear friend who has been struggling with some family illness. I know this will brighten her day.
Rubbah hugs,
Selene Kempton
Friday, December 18, 2009
12 Days of Christmas ~ Day 7 ~ Saturday Sketch Challenge 130
Howdy! Isn't this the cutest sketch ever!! You should go and check out what my girlfriends from the Stamping 411 blog have done with it. They are all different and beautiful versions of the same sketch! Fantastic!
This week, I'm making a lot of Christmas thank you's. I am so very thankful for all the great folks in my life. If I (or my daughter) get a small gift, I'd like to have the thank you's ready to go. :)
I cut my paper super thin, to make the faux thread of red through the hole in the button. I stamped and punched a thank you, and added it behind the white layer with flocked Designer paper. Quick, simple and beautiful thank you cards are a great way to remember those who have remembered you this Christmas!
12 Days of Holiday Projects ~ Day 6 ~ Bloggers Challenge
Good Morning Everyone!
Today's Blogger's challenge is a Sketch challenge! I (((heart)))) sketches, and was very excited to make this card. The list mom Lisa Somerville designed this sketch and she did a wonderful job!
I'm not sure if you can see it by the photo on my blog, but there is actually a large white space around the outside of the blue, so I used that as my card base layer.
I haven't used this stamp set in such a long time, and I really love this penguin dude all macked out in his tux that I thought based on the sketch, I'd just use him. The paper is ((of course)) the specialty Designer Series paper from the mini catalog, Christmas Cocoa. It's so very rich and I was worried about adding so many layers of it, but I think this card is adorable.
I stamped some snowflakes using champagne shimmer paint and a sponge dauber, but you can't see it in the first photo well, so I took another from a different angle.
The paper banner was "edged" with a real red marker to give it a little border so it didn't look so plain. I used tombo multipurpose adhesive on the "valley's" of my banner and just let it dry. I have changed over to the tombo multipurpose adhesive for all my projects. I still use snail to attach ribbon, but I like having a minute to position my goodies, then once it's down, it doesn't move. Love that!!
I hope you have time to check and see what the other ladies from the bloggers challenge group are up to. You'll be glad you did, they are so talented. I'm going to post day 7 a little early for the stampin 411 sketch challenge this week. See you tonight!
Thursday, December 17, 2009
12 Days of Holiday Projects ~ Day 5
Five GOOOOOOlden Rings!!! LOL I was having some fun with the idea of the 12 day's of Christmas song and just HAD to make this card.
So I'm a silly goofball ~ but I hope you enjoy. This card could mean different things to different people, but for me it's poking fun at the commercial side of the holidays. What little I have, I'm happy to share. And I'm blessed to have so many wonderful people in my life that share with me. Doesn't get any better than that.
First, I embossed my 5 diamond rings with gold embossing powder on shimmer white paper. I added dazzling diamonds to the diamond part to color them in.
Next, I pulled out one of my letter sets from sixxix and ran it through, piecing the word seriously together. To do the question mark, I used a stamp and white embossing powder.
Like that green ribbon? Well ~ that's a sneak peek of what's to come... Old olive Satin ribbon is dreamy to work with and so chic. My friend Gretchen Barron sent me a package of love, with things that will be available in the new catalog and this is the first thing I've actually broken into from her package. (I've been hording the goodies and looking at them). ahhhh.
I would also like to mention the most amazing gift I got from 6 wonderful girlfriends from the 411 blog. in no particular order... Lee, Robin, Gretchen, Tiffany, Connie and Patti sent me the most fabulous card and touching, heartfelt gift for Christmas. I am overwhelmed with joy and thankful for awesome friends.
Each one of these ladies are hardworking, family driven, beautiful people and I'm thankful to Stampin' Up! or I would have never met them.
Blessings to you all..
Selene
Wednesday, December 16, 2009
12 Days of Holiday Projects ~ Day 4
Tuesday, December 15, 2009
12 Days of Holiday Projects ~ Day 3
Monday, December 14, 2009
Mojo Monday ~ Birthday
This week on Friday, I'm making albums with six, 13 year olds in the studio. For the birthday girl, was thinking I'd like to do a little extra.
These are her favorite colors, and the simply scrappin kit she liked the best.
I started tonight with this card that will match her book and other goodies.
I got the inspiration for this card using the sketch for mojo monday! I hope you like it and check to see what others are doing with this cool sketch. I just love sketches.
12 Days of Holiday Projects ~ Day 2
Here we go! Bright and early and getting my mojo in tact! I'm really loving this stamp set and the true meaning of Christmas. I finished making this card and sat down with my little one.. Explaining why we really celebrate Christmas was endearing...
It doesn't matter which holiday you celebrate ~ the rich colors in this project speak for themselves. I used shimmer paint and alcohol to spray the front of my card and the whole thing is shimmery! So fun!
See you soon for day 3!
It doesn't matter which holiday you celebrate ~ the rich colors in this project speak for themselves. I used shimmer paint and alcohol to spray the front of my card and the whole thing is shimmery! So fun!
See you soon for day 3!
Sunday, December 13, 2009
12 Days of Holiday Projects ~ Day 1
On the first day of Christmas I realized... that all my friends and customers have their Christmas cards completed and I've yet to start mine!
In walks my friends from Late night stampers group. They have a challenge on the group, for card designers to post 12 days of Stampin' Up! cards to earn a prize! Ultimately, I'm just excited to get mine started. So, here's day 1.
I did this with my card club a few months ago and had some premade packets left over. I stamped the tree tag image on designer paper and cut it out. then layered the trees with dimensionals.
The entire cardfront was sponged with whisper white craft ink. I used crystal effects and chunky glitter for the tops of my trees and whisper white taffeta is tied on the front.
Clean and simple. So fun to make!
See you tomorrow!
Friday, December 11, 2009
Saturday Sketch Challenge 129 ~ Happiness Is....
Another cool sketch from the operators on the Stamping 411 blog! This week, I'm thinking I'd rather be any place else than home. A frigid 27 degrees today, and I'm dreaming of tropical locations!
I made myself a card to try and warm up...
Okay First the measurements, then the process...
Layer 1: 8.5" x 5.5" piece of cardstock, scored and folded in half at 4.25"
Layer 2: 4 x 5.25"
Layer 3: 1.5" x 4"
Then some satin ribbon to separate the line between my layers (so you don't see it). Every time I touch this satin ribbon, it brings me back to when I was in my godfathers wedding. My mom made me a dress that feels like that satin ribbon.
I used the large oval punch and the scallop oval punch to make my layered "happiness" emblem. I stamped off a seashell, then stamped it over the word in cameo coral.
How about more on my process. I knew I wanted to start with tempting turquoise, and I referred to my color wheel. It seems I never do that! When I looked up tempting turquoise, the color wheel suggested taken with teal and as a contrasting color, cameo coral. That's how I got this tropical color combination.
I haven't given this stamp set Ocean Commotion much love yet and it's already retiring! Gheesh! where does the time go!! I stamped the vegetation looking stuff in taken with teal, and then added some texture with swirly texture plates and my big shot. Then to make the "waves" pop a little more, I sanded them with a sanding block. The small piece of polka dot paper comes from the moments and milestones simply scrappin kit from stampin up. I like this set because it is generic baby, and so many are choosing NOT to find out the sex of the baby now... We have a two new babies in the family and will be adding one more in the spring, and mom doesn't want to know what it is.. Drives me crazy!!! :)
Finally, that cute bow accent is just some whisper white taffeta ribbon. I added it using a glue dot. I hope you have time to play along with the sketch this week. Check out what my friends on the 411 blog did with this sketch! You will be amazed! ((I always am))
Blogger's Challenge ~ Birthday
I haven't created anything this week.
It was customer appreciation week here, so it takes me a whole week to fully appreciate everyone! 6-8 people at a time for a week.
Although I feel a little late with this weeks blogger's challenge, it gave me a push to get out in the studio and start thank you cards from my daughter's birthday party last month.
If you read my blog, you may have seen my daughters birthday this year was at build a bear. My nephew John is all boy and affectionately named his commando bear "kill". Yep ~ all boy!
My mom (nana) informed me that John sleeps with his bear every night in cute little boy form, but to make the cut, he had to be one tough teddy.
When making the thank you for little John, I couldn't help myself. So here is Beary Cute Commando Bear, to send a special little thank you to my nephew.
I colored him with chalk pastels, to make him look bear like and even colored the designer paper with pastels, although the picture only picked up the black, it matches better with old olive in person (it's weird how that works sometimes). I'll be glad to get some thank you's in the mail. :) Anyone else feeling behind?
Friday, December 4, 2009
Saturday Sketch Challenge 128
It's been quite a busy week getting ready for Christmas. Shopping, trimming the tree and lots and lots of classes! It's been fun, but I'm looking forward to some rest on Sunday.
I've seen lots of my buddies on line playing with new stamps that everyone will be able to order in January, and I'm wishing I placed my preorder too, but I'm enjoying some sets that I already own.
I did a Christmas card class tonight, and decided I needed to do something that is not Christmas (for sanity reasons). So, I pulled out this valentines set. I'm in love with it. it's the very first set I purchased from the new catalog in July when it came out, and my goal is to make 25 projects with it before valentines. Here's #1!
This sketch is from the stamping 411 blog ~ I hope that you'll come and play along and try this super simple sketch. So ~ how about some measurements
Base: 4 1/4" x 11", scored at 5 1/2" and folded in half
Layer 2: pretty in pink cut to 4 x 5 1/4"
Layer 3: real red 1 3/4" x 4" (used eyelet border punch for the decorative edge)
Layer 4: polka dot DSP cut 1 x 4"
Layer 5: 2 3/4" x 3 3/4"
Layer 6 2 1/2" x 3 1/2"
My bow is some white satin ribbon and it's tied and glued under layers 3 and 4.
I watercolored the image with markers and a waterbrush and added dazzling diamonds with a two way glue pen, and sprayed shimmer paint with alcohol over the entire face of the card.
Wicked fun to make! (can you tell where I'm from?)
Have an awesome weekend ~ I'll be spending time with family. I hope you find time to stamp something fun over the weekend!
Rubbah hugs,
Selene Kempton
Bloggers challenge ~ Ornaments
TGIF!
It just so happens I started decorating my tree last night. I really love the look of a hand made ornament. one of my favorite things, is the ornaments you can make with the ornament sizzix die.
Every time you swipe through, you cut 4 circles, each have 3 score marks. Glue them back to back for a stunning creation. You can make them any size or shape you like.
Also ~ there's a photo below of an ornament I got from Robin Merriman at one of the stampin up events from days past. She made this with some designer paper, a rubon, some punches and ink. Isn't that spectacular?
And this year I've decided that the star on the top is going to be paper. I think it looks fantastic, although I may add some glitter. Check out and see what my girlfriends are doing for hand made ornaments. They'll be sure to wow you!
Tuesday, December 1, 2009
Community
When I decided to purchase the demonstrator starter kit (to get some great products at a discount), I never would have imagined the friendships that were to come of it.
Before Thanksgiving, I did a card drive for the troops. I collected and made about 200 cards total to go to the troops overseas. 60-70 of them came from Regina M. (an awesomely talented stamper on my team). I thought I was done! Last week, I also received two packages from fellow demonstrators Robin and Jaydee.
Looking what I have here from these two ladies... it's probably more than what I sent in on the first batch and I really wanted to share.
First ~ Robin. One of my bestest buds and part of the Stamping 411 Operators group...
Robin seems to juggle more in one day than I ever could. She is currently a full time demonstrator; serving on the advisory board for stampin up; raising a beautiful daughter Emma and balancing everything perfectly with some help from her great hubby Mark. With all that, she still had time to send me an anniversary card on my wedding anniversary and a BAZILLION cards for the troops. Above is a the card she sent and photos of her very generous donation. So generous!
Jaydee is another girlfriend from online. We are just getting to know one another, but when she saw that I was collecting cards for the troops, without missing a beat, she sent me a huge package of cards (with envelopes)!Here's another look, this is what I collected this week. So far in the last 3 weeks, I've been able to donate over 500 cards and envelopes with help from my stamping friends and know that these are going right to dangerous areas where access to gorgeous creations like these just wouldn't happen.
Last Tuesday, Helping Our Troops sent over 600 packages went out to our troops overseas and these cards will be going into shipments before Christmas. You can visit this website for more information on where the donations are going: http://helpingourtroopsma.org
Helping Our Troops (H.O.T.) is a program designed to support our American Hero's from Eastern Massachusetts serving overseas. We are an all-volunteer, non-profit 501(c)(3) public charity based out of Stoneham, Massachusetts, U.S.A.
It's so beautiful to see community, across the country in a day and age when many don't know their neighbors. Thanks ladies for your generosity. Lisa, from the donation center came by and I figured this second batch to be over 300 cards! They were stunning cards too! Lots of embellishments, gorgeous watercoloring! I had to take pictures of some before i let them go.
I'm so excited to be of assistance to others and feel blessed to have such wonderful friends who do the same. Thanks to all.
Rubbah hugs,
Selene
Monday, November 30, 2009
Mojo Monday Stretch
I just love a good sketch challenge first thing in the morning! When I saw this week's mojo monday sketch, I knew exactly the stamp I wanted to use. I've been playing with this gorgeous medallion image a lot and have found the joys of stamping with it right on my designer paper.
First I stamped my image on a 4 3/4" square piece of designer paper from the bella bleu paper pack from Stampin up. I cut my next paper 1/8" larger, and my card is 5 1/4" x 10 1/2" folded in half to make my card base.
I stamped my "true friend" on some scrap paper and made a small banner. I attached everything with the tombo multipurpose adhesive (green tube) and just drew a line down the center of the butterflies in the back, and down the "valley's" of my paper banner.
Next I took some white shimmer paint and mixed it in a 2 ounce bottle with about 1 ounce of 91% rubbing alcohol and sprayed the mixture all over my card front. This made my card so shimmery in real life! I added some "bling" to the center of the medallion and I am done!
Fantastic sketch! I had fun! Happy Monday!
Rubbah hugs,
Selene Kempton
Friday, November 27, 2009
Saturday Sketch Challenge and MDS
I hope you had a wonderful holiday!
It's time for another fabulous sketch challenge from the operators at the 411 blog.
This week's sketch certainly lends itself well to a scrapbook page. Being the day after Thanksgiving, I was still not ready to get out in the stamping studio. So instead, I used my digital studio to create this awesome page.
In the photo, you'll see 6 of the 7 of our group. Patti is missing but we will get some photos again in January.
Also, there are some amazing gifts on the 411 blog this weekend and all you have to do is leave a comment! I hope you will go leave some love, and maybe receive some in your mailbox!
Now ~ A little more about my process. My digital studio could certainly be one of the most addicting tools in my arsenal. Let me set the scene... It's the day after thanksgiving. You can sit on the couch with the laptop and not get the stamps dirty. :) No cleanup, no prep.. This is just gorgeous!
The background paper is real red flowers, and I put a punch shape square, which i enlarged in a solid red. I added in a flourish and grabbed one of the colors in the paper. it's a stamped off real red. At this point, I clicked a button and slid it to the left, to make that element 40% opaque.
Drop shadow is a girls best friend. Click the element, then on the right, click drop shadow. The program will allow you to adjust how dark, and where the shadow sits. This is such fun!
Have a wonderful Weekend!
Selene Kempton
Thursday, November 26, 2009
Giving Thanks
Thanks for your support all year long. I appreciate you and your readership. I visit blogs, and so often, I don't know the person behind all the projects.
In addition to the friendships I have made as a result from stamping, here are a few people I'm thankful for. These photos were taken last week on my daughter's birthday.
I thought it might be fun for you to meet some of my family. God bless you all, and wishing you a Happy Thanksgiving.
In addition to the friendships I have made as a result from stamping, here are a few people I'm thankful for. These photos were taken last week on my daughter's birthday.
I thought it might be fun for you to meet some of my family. God bless you all, and wishing you a Happy Thanksgiving.