Pages

Sunday, June 29, 2008

My Truck

Happy Sunday!

Well, some of you know that I got a new truck to tow the camper. My husband drives over 110 miles a day, so I'm driving the gas guzzler... It's a used truck, but it only had 16K miles on it when we purchased it.

One of my girlfriends took a look at my graphics and said "your husband is not going to want to drive it now, it's really girly." I'm not sure about all that, but I LOVE driving the truck. I'm not sure that I would want to go back to my old ~ low to the ground ~ car.

So, I just had to share.. I'm loving the flourishes.

Hugs,
Selene

Thursday, June 26, 2008

Fun With Decor Elements!

I had another bunch here this evening for the Fresh Cut's stamp a stack and we had a lot of fun! I realized a short time in, that everyone was busy working and I had some free time on my hands. I just added a decor elements letter on the wall and I had an extra. So ~ it was time to play.

As many of you know, you can color our regular rubons with blender pens and pastels, so I got to thinking... I wonder if the decor elements can be colored???

The answer is YES~ This album, I applied a lower case "d", and used regal rose craft ink and sponge daubers to color the letter.
Then I applied heat and stick powder to it, and used a paint brush to remove excess powder from my album.
Heat it once with the heat gun to make it sticky, apply glitter (I used the chunky essentials glitter). and re~heat it to set it. Just AWESOME!

Fun, Fun, FUN!!


Check out what we are making at class this week!
The first batch of happy stampers came through last night and tonight we're going to do it all again!
At this class we made 16 cards (4 of each design). All in about 3 hours! I hope you like the samples!
These were made with the fresh cuts note cards that will be available in the new catalog in August.


Wednesday, June 25, 2008

Stampin Space Revisited!

I had even MORE fun with the Decor Elements last night while my family slept!
Here is the definition to the word "create" up on my stamp wall. it is right above my tools.
This is a pretty cool tool area. It's a fairly new addition to my stamp room. Only two trips to Ikea, and I basically own the whole store!
It's so nice to be able to put my hand on exactly what I need. AND NOW, I have a little inspiration on the wall right in front of me!
Here is a close up of "create" and a photo of another piece I put in my restroom, to accentuate the one I put in the kitchen. I think this is just fabulous! I can see I'm going to have a LOT of fun with this new product ~ now I need to place another order!

Tuesday, June 24, 2008

More Decor Elements!


My Daughter was so excited last night when we put the vinyl on her wall.
That flower light is from ikea, it's a night light for her room. She was dancing around saying, "I love my name on my wall!" She's 3 and full of spunk! Please tell me what you think!
I think that it's fabulous! I can't wait to see what else Stampin' Up! has coming down the line!

Monday, June 23, 2008

Crazy for my Crazy Sistah Carol M.

As some of you may know. I belong to a special online group of demonstrators called the Utah Divas. We are an international group of demonstrators who are sharing ideas and friendships. They are really a wonderful group to belong to. So ~ let me tell you about my crazy stampin sistah Carol!
We signed up for a program called stamping sisters. Every month we swap 3 projects and a small amount in product with one another. We talk on the phone and get to know one another.. Can i just tell you that my sistah is CRAZY!!!
Look at the contents of the package she sent me!

So ~ apparently she missed the concept of 3 projects! And I Love her for it!
See the paint can in the middle? It's filled with Disney items for my daughter. Check it out! I'm still trying to figure out how you got all that in the paint can and if I can actually get it all back in!


Got my Decor Elements today!

How Psyched am I??


Well, I received the package at 3pm and I've already completed one project. I can't imagine I'll ever want to take the flourishes down. They are perfect for this frame and wall behind the frame.
I can only say that I'm shocked at how easy these are to apply, and I can see that if I ever DID want to remove the flourishes, that it wouldn't harm my wall at all!

I just had to share these photos and there will be MANY more to come. I think there's a trend starting!
What a great way to make this picture stand out a bit and add that "home like" feel that I wanted when I hung this picture. This picture is very special. It came from my aunt who lives in London and it was a wedding gift. Adding the flourishes really makes it special in this corner of my kitchen. I have recessed lighting and there is a light that shines on it. It looks AWESOME! Please let me know what you think!
This second photograph is a close up of the wall where I was able to overlap the images. SO SIMPLE! I'm addicted!
Finally, I wanted to show that I also applied it to the glass. It seems like adding the "flower image" to the glass really ties the flourish together. It's not just the flourish, and a picture. It makes it more of one thing. Am I making sense? Probably not, but I LOVE IT!! I just wanted to share.


Friday, June 20, 2008

Cute Bear Jar

Well ~ This week some of the girls from my team and I went on a trip to Ikea. My second time there! You have GOT to try the sweedish meatballs. My friend Robin suggested them, and they ARE fabulous!

Anyway, I found these cute little jars there (they were 4 for $2.99) and when they stand on the side, they just look like animals to me... At least, animals waiting to happen! So, Last night at the technique junkies club, we made these cute little bears! LOOK at that CUTE BUTTON tail! Isn't that the cutest!?!


So, How did we do it?? Many of the girls who came into the class said "I could NEVER do that" And less than 5 minutes later, they had their own work of art completed!


I'm hoping that this graphic is large enough so you can see it...
With Close to Cocoa paper we punched a scollop and two 3/4" circles.
With creamy caramel paper, we punched a 1" circle and two half inch circles

With black paper, we punched one 1/4" and two 1/8" circles and with White paper we punched two 1/4" circles. We used SU!'s tombo multi purpose adhesive to stick it together.
Then I opened my stash of cut rubber peices (leftover from when I mount my stamps) and we used that like dimensionals. We used crystal effects on the side that was not sticky, so that our bear would really stick up off the cover of the treat jar! Aren't these Fabulous? Here is a photo that breaks down what we punched.


Wednesday, June 18, 2008

OOPS~

Well, it looks like I was not supposed to post this information because it was a "sneak peek" for demonstrators.
So ~ let me just tell you that the new home decor line is coming is AMAZING! I will have it in my hands on Monday along with the brocures that i can give you.. Send me an email at e.selene@verizon.net to have me deliver a copy to you!

I'm so very excited to be seeing this for the first time! The first day to order from this catalog will be July 1st.

The images are available in white and chocolate. One image will be available in chocolate and craft. These images can be applied and easily removed from walls in your home when you want to redecorate. Best of all, you don't have to worry about painting!

Tuesday, June 10, 2008

Another Quick Cuts Sample


I made this card for my team meeting swap.
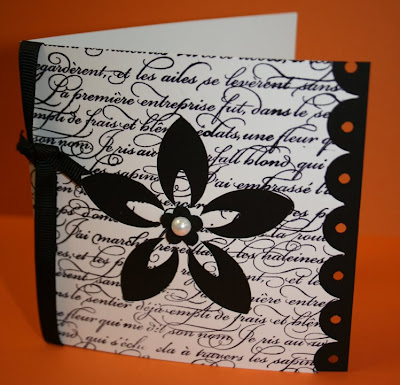
First, I stamped the fresh cut large image over the cardstock, then cut the quick card apart to make a standard sized greeting card. I used the back part of the card to matte the front.. does that make sense? Anyway, then punched a 5~petal flower and stuck it in between the layers.
Next, just a half bead from SU!'s pretties kit, a glue dot, and stick it together.
That thank you is from our rubons. They always go on so quickly! No fuss, no mess. Wahoo!
The best part?? It only took me about an hour to make fifteen of these.

At the meeting every month we get together to learn something new and the HIGHLIGHT of the meeting is ALWAYS the swaps! We always marvel at all the talent in the room and get re~energized about our love for stamping all over again! Not to mention, it's an AWSOME way to get to see my friends!

Monday, June 9, 2008

What a FABULOUS weekend!


This weekend was my annual open house.

Can you believe it's already been 2 full years that I have been a demonstrator??

We made some wonderful projects with the new quick cuts cards. These cards are amazing. You just pop out the die cut flower, embellish, and viola!!!, you have a quick note card that looks like you spent hours perfecting it!

Many people signed up for clubs and they are almost full! Make sure you let me know if you want to join one them before space runs out! And NOW!!! Here is the Prize Roll.... Is your name on this list? Congratulations to all the winners!

And for those of you who popped by, thanks so much for spending an hour with me! I had a blast catching up with everyone!

  1. $20 in free product ~ Michelle J.
  2. Hostess set Level 1 ~ Keri D.
  3. Hostess Set Level 1 ~ for a friend ~ Tammy
  4. Birthday Whimsy ~ Debbie
  5. Basket full of fun ~ Level 3 Hostess Set ~ Becky C.
  6. Older and Wiser Level 3 hostess set ~ Carol
  7. Older and Wiser Level 3 hostess set ~ Diane T.
  8. So Many Scallops Stamp Set ~ Gina
  9. So Many Scallops #2 ~ Dee
  10. Watercolor Pencils ~ Cheryl D.
  11. Boho Punch ~ Deb T.
  12. Lots O Thoughts Stamp Set ~ Leigh Ann P.
  13. Fresh Favorites Buttons ~ Carol H.
  14. Hodgepodge Hardware ~ Amy V
  15. Merci Stamp Set ~ Lisa T.
  16. Friendship Blooms ~ Regina M.

Friday, June 6, 2008

Father's Day Gift by Jenn W.


One of my friends & avid scrapbooker Jenn, made this terrific frame for her hubby for fathers day.
They just had their very first baby! This is so adorable!
To matte the saying and prints, she used night of navy and brilliant blue paper. Very simple, and just a perfect gift for dad! I love it! I would recommend craft ink, because it comes off very easy, but Jenn said that the classic ink works great too!
Thanks for sharing Jenn!

Monday, June 2, 2008

Fresh Cut Flowers Stamp Set and Matching note cards!


Want a peek of something that is going to be in the new Fall & Winter 2008 Idea Book & Catalog? Check out this SWEET Fresh Cut Flowers Stamp Set & Note Cards.


You can make some projects with these note cards at my open house this weekend.


Cant make the open house? Place an order on the day of the open house to be entered into prize drawings AND mystery hostess benefits drawings.


To view more details about this promotion, click here and check out my stampin up website! Or, click here for the printable flier.

More Tile!


I just love stamping on Tile. This set of tiles was inspired by a sign at Broken Branch KOA Campground up in North Woodstock, NH.
My husband and I camp there with our daughter quite frequently, and they purchased a new sign last year.
First, I created the sky and ground and baked that in the oven. Next I stamped the bear (also in craft ink), touched it up with a paint brush and rebaked it in the oven. Thanks for visiting.

Team Meeting Stamp Project

Tonight at my team meeting, we had a great time making these FUN, scrapbook pages for dad! These are the same as the previous chipboard wall art projects that I have been doing, but it seems like a great time of year for making things for dad.

I find that the tombo multipurpose adhesive works EXCELLENT for adhering paper to chipboard. So, do you think my husband will like this set, when i put a photo of Alexis on there? Let me know what you think about this chipboard gift set and you could win a prize!
Thanks so much for visiting.